
NgRx Feature State vs. Root State
I was recently working with an NgRx project where I needed to use feature state in lieu of root state. Setting this up was actually really intuitive and I wanted to just document what I learned on a high level.
I found Wes Grimes NgRx best practices article here very helpful in learning this process. Wes also has a great sample project that can be reached here.
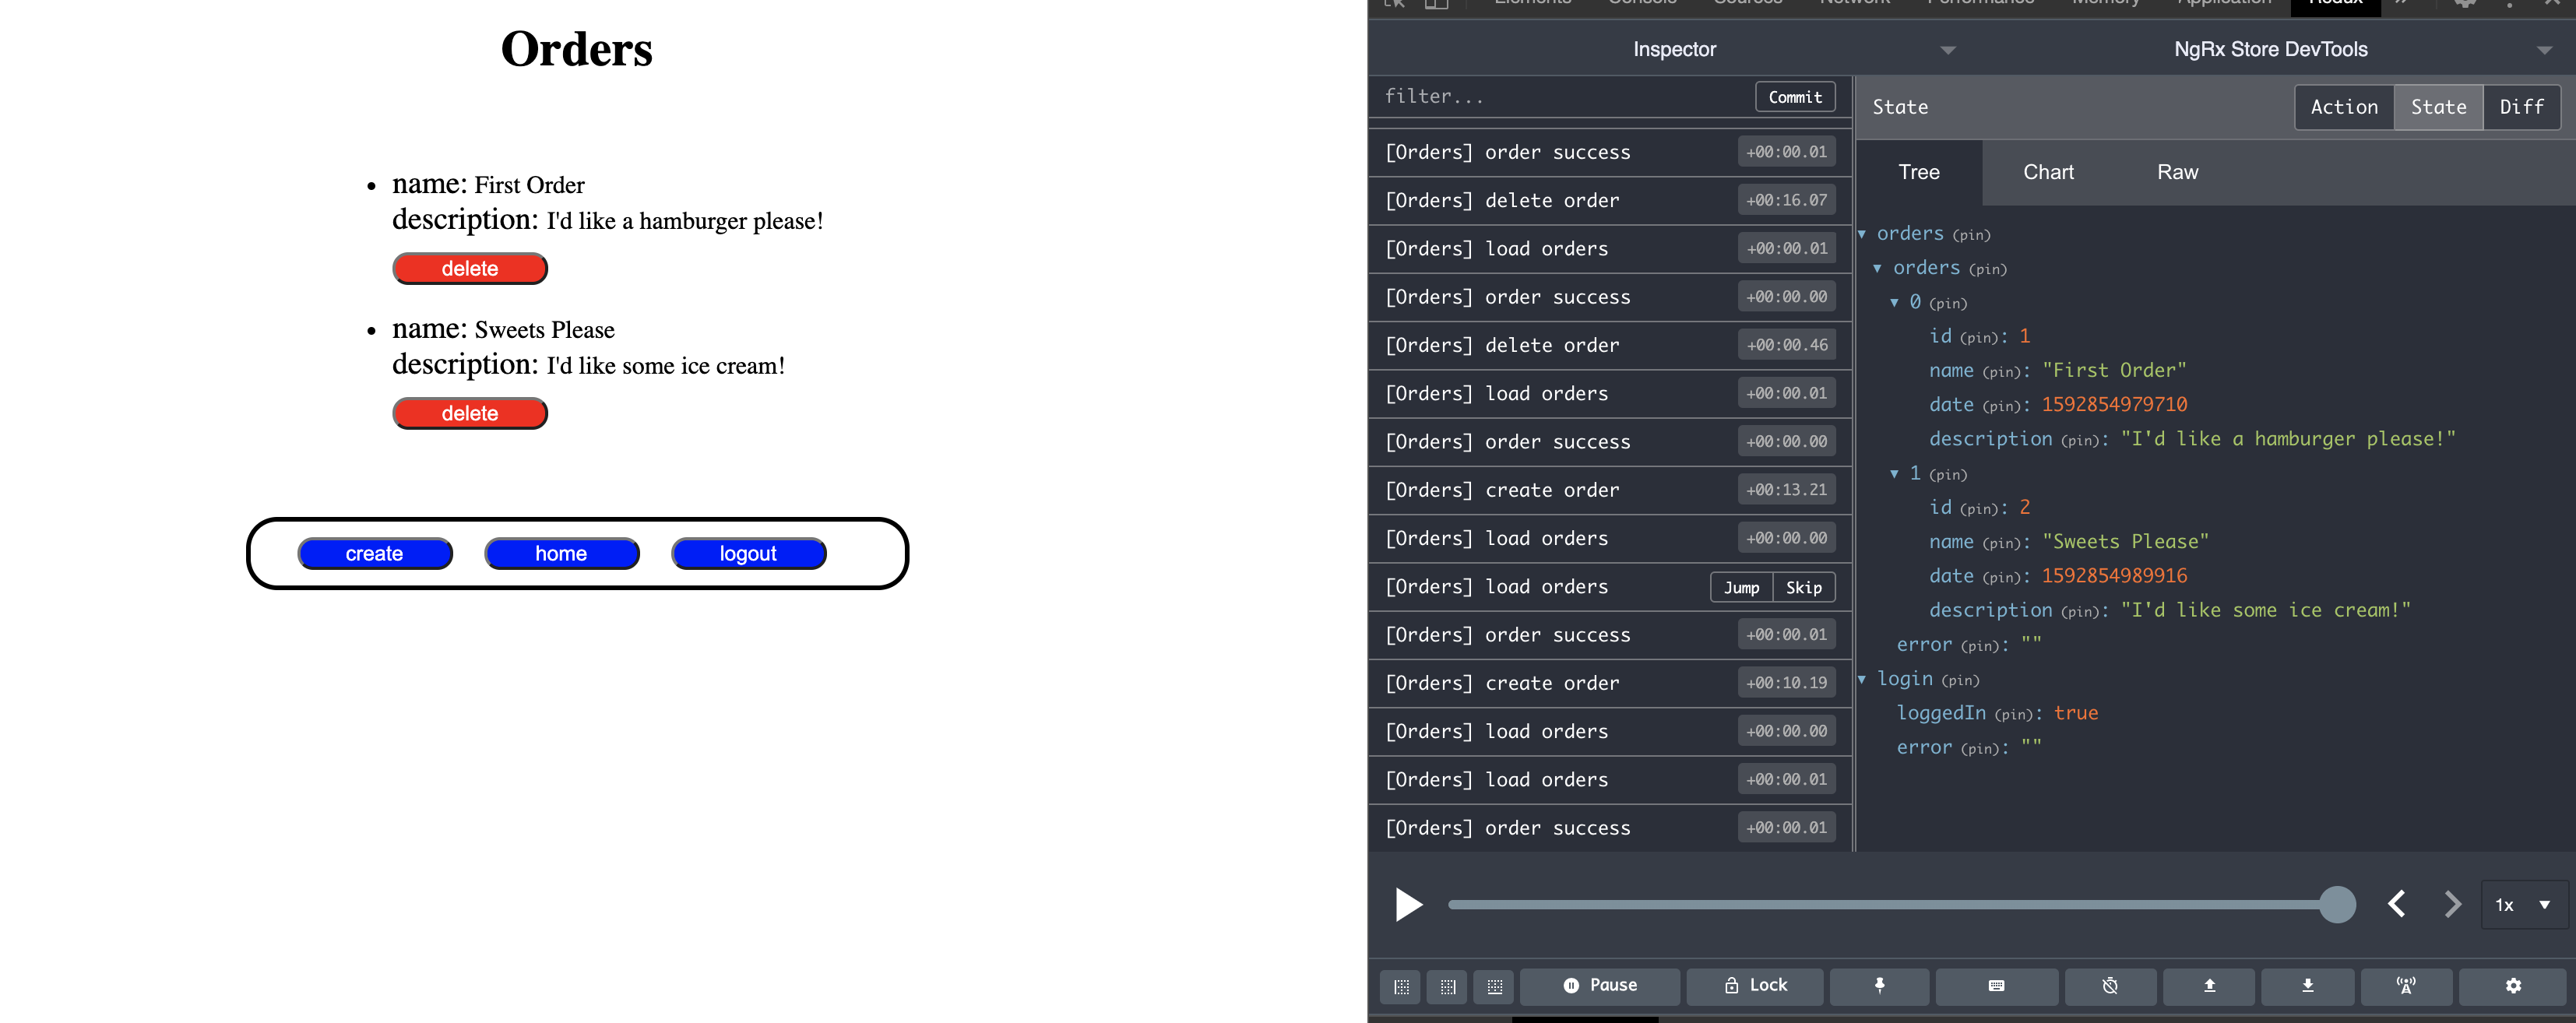
I’m going to showcase feature state in my sample project “Reyrey’s Orders” that can be reached here. My sample project is basically just a dinner ordering application that has a store that hold (1) login information and (2) order information.
I understand there are many ways to implement NgRx, and this post is just an effort to share some of the cool things I learned about feature state recently.
WHAT IS STATE ANYWAY
NgRx and (more generally) the Flux Pattern is a way to use global state in your applications. This is important because it creates a uniform way to handle data in your application. It also scales very well as it enables your team to use one way in many places. You see this in React Redux, NgRx, Vuex, and others.
When working with Flux, you will typically do this in terms of:
- State is Immutable (never changes only recreated)
- Store = holds state that components can retrieve through by subscribing
- Actions = triggered by events and handle interactions with the store
- Reducers = tied to action, handle interactions with the store to generate a new state
- Effects = external API calls return new actions to generate new State
- Selectors = how your components retrieve slices of state from the Store
ROOT STATE
When following the NgRx “getting started” guide, you typically see the baseball example that uses “root state” as everything is registered in your Angular application’s “app.module” file. I also implemented this in my post Adding NgRx to Your Existing Applications.
There are different ways that you can implement it, but basically you just create the actions, reducers, and effects files alongside your existing components. Then import them as follows:

FEATURE STATE
With feature state, you build your store by feature and import it as a module. This is really helpful if you have a larger application that has many different areas within the global store.
In my sample application, I specifically had feature state for the (1) login and (2) orders areas of the Store.
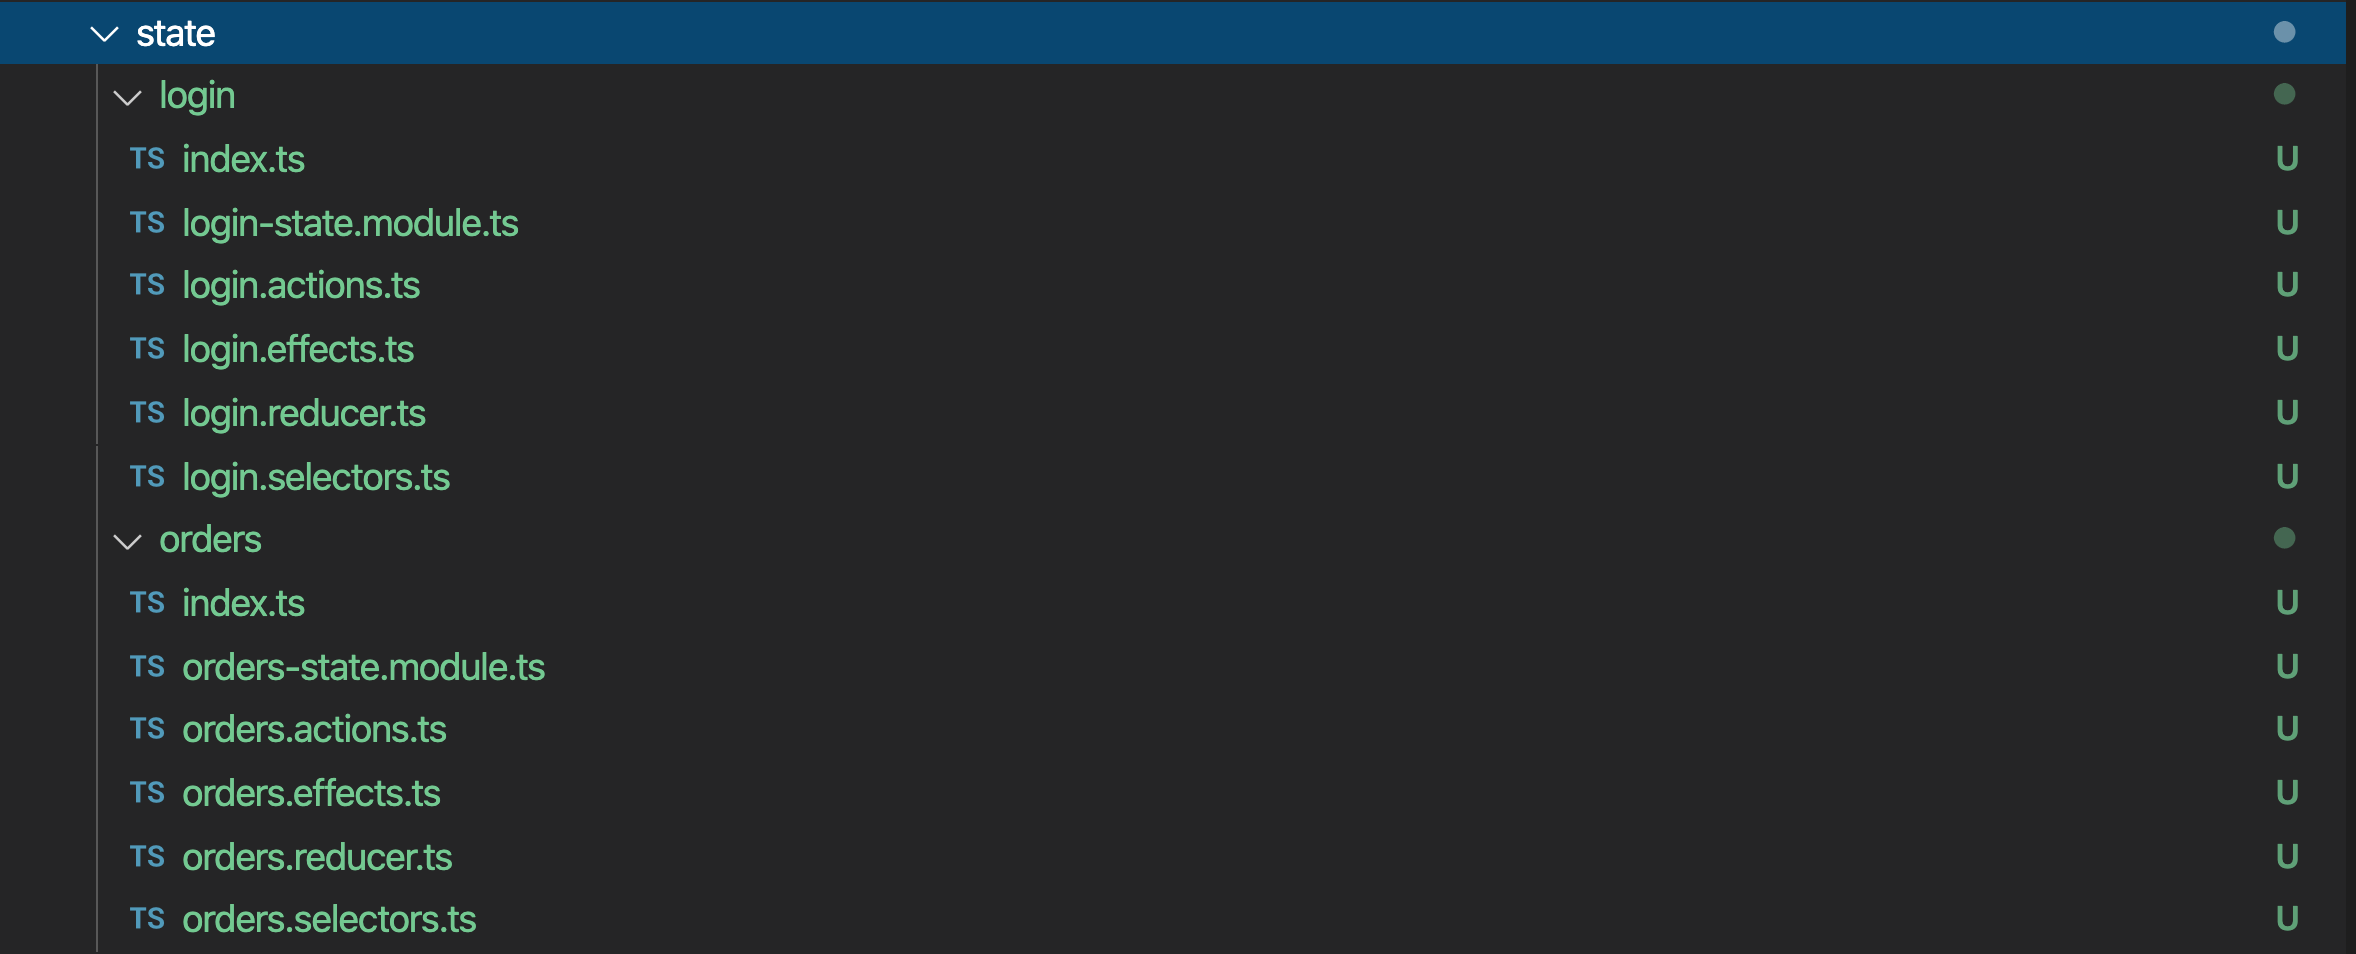
In order to achieve this, you can take advantage of the JavaScript modules by creating an “index.ts” file that looks like so (here we are looking at the orders file):
import * as OrdersActions from "./orders.actions";
export * from "./orders-state.module";
export * from "./orders.reducer";
export * from "./orders.selectors";
export { OrdersActions };
If you notice, you’ve still got the defined actions, reducers, effects, and selectors in their own files. However, you wrap them all with a module that can be then imported. Here, look at the “.orders-state.module” file:
import { CommonModule } from "@angular/common";
import { NgModule } from "@angular/core";
import { EffectsModule } from "@ngrx/effects";
import { StoreModule } from "@ngrx/store";
import { OrdersEffects } from "./orders.effects";
import * as fromOrders from "./orders.reducer";

@NgModule({
  imports: [
    CommonModule,
    StoreModule.forFeature(
      fromOrders.ordersFeatureKey,
      fromOrders.ordersReducer,
    ),
    EffectsModule.forFeature([OrdersEffects]),
  ],
  declarations: [],
})
export class OrdersStateModule {}
The reducer and effect are both being registered just like you would with the root state approach. However, you are using a key to define the area of the store that is specific for the feature.
I was really surprised at how much this helped my development experience. With these files being defined in their own folders, it made changes super easy.
Finally, when you’ve built out your basic scaffolding of your Store, you can import them alongside the other module imports in your app.module file like so:
import { BrowserModule } from "@angular/platform-browser";
import { NgModule } from "@angular/core";

import { AppRoutingModule } from "./app-routing.module";
import { AppComponent } from "./app.component";
import { LoginComponent } from "./login/login.component";
import { HomeComponent } from "./home/home.component";
import { PageNotFoundComponent } from "./page-not-found/page-not-found.component";
import { ViewOrdersComponent } from "./view-orders/view-orders.component";
import { OrdersFormComponent } from "./orders-form/orders-form.component";
import { EffectsModule } from "@ngrx/effects";
import { StoreModule } from "@ngrx/store";
import { StoreDevtoolsModule } from "@ngrx/store-devtools";
import { environment } from "../environments/environment";
import { OrdersStateModule } from "./state/orders";
import { LoginStateModule } from "./state/login";
import { HttpClientModule } from "@angular/common/http";
import { FormsModule } from "@angular/forms";

@NgModule({
  declarations: [
    AppComponent,
    LoginComponent,
    HomeComponent,
    PageNotFoundComponent,
    ViewOrdersComponent,
    OrdersFormComponent,
  ],
  imports: [
    BrowserModule,
    AppRoutingModule,
    StoreModule.forRoot({}),
    EffectsModule.forRoot([]),
    StoreDevtoolsModule.instrument({
      maxAge: 25,
      logOnly: environment.production,
    }),
    OrdersStateModule,
    LoginStateModule,
    HttpClientModule,
    FormsModule,
  ],
  providers: [],
  bootstrap: [AppComponent],
})
export class AppModule {}
You see the specific imports with:
import { OrdersStateModule } from "./state/orders";
import { LoginStateModule } from "./state/login";
This post is focused on an implementation pattern so I didn’t show the associate actions and reducers files, but you can check them out in the associated “state” folder.
When you’ve got it wired up correctly, you result in a nicely defined store as seen here:
Closing Thoughts
If you’re using NgRx for the first time, it can be very daunting to see all of the options available. The pattern that was shown here (and learned from Wes article) really showcases a good way to manage State in your application. The application I’ve shared only has two small areas of State. However, you can imagine that it could really scale nicely as you add more features.
I hope you enjoyed this post and learned something in the process. Thanks for reading, like my post here and follow me at andrewevans.dev.