
Building a JavaScript Virtual Assistant
Over the last several years, virtual assistants have become much more popular. The big cloud providers all have their own flavor including, Alexa, Cortana, and Google’s Home Assistant. The technology that runs these assistants has become more accessible and easier to work with recently. The process to build one of these for yourself, is easier than you might think (and fun too).
In this post I’m going to walkthrough how to create your own Virtual Assistant. I’m going to use JavaScript, Twilio, and the Serverless Framework to put together a fun and easy to use Virtual Assistant.
I have a public version of the project I’ll be walking through in this post. If you’d like to follow along, check out my sample project on GitHub. I’ve named it after R2D2 in honor of International Star Wars Day (May 4). I’m also presenting this project at the RVAJS meetup on 05/04/2021. The meetup is virtual, and you can tune in via Zoom if you sign up.
How it works and some background
So before I go into the whole process, I’ll share a short story of my learning journey with this technology.
About 2 years ago, I started learning about the technologies that run Virtual Assistants. I did a few projects with Twilio, and also realized I could leverage my JavaScript skills to build a NodeJS backend.
Twilio has some great documentation, and I built a serverless backend with Firebase Functions. This was the first iteration of my Virtual Assistant.
The basic process is just that you have an endpoint that you connect to Twilio’s messaging service. You buy a phone number with Twilio, and then when people text that number, you can intercept the message and respond accordingly.
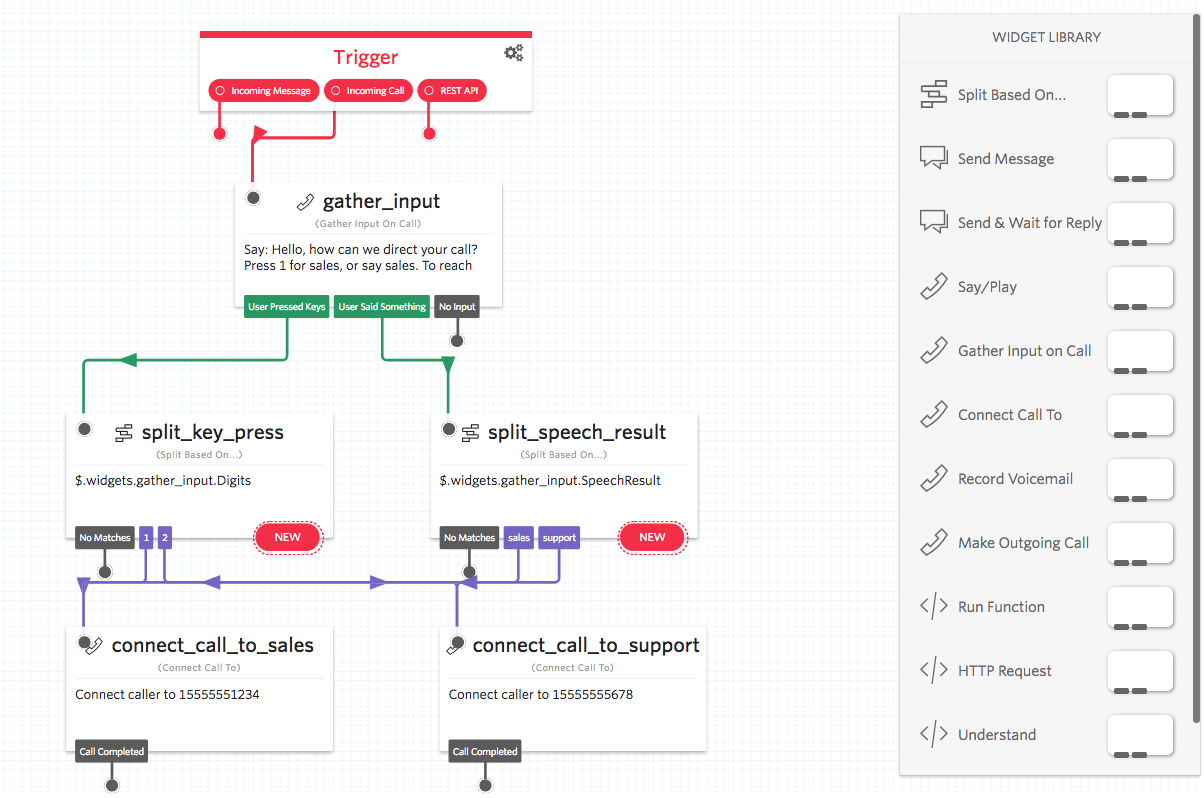
In my first iteration of this project, I also used Twilio Studio. This allows you to intercept the messages and build workflows like you see here:
I built endpoints to respond to the different steps in the workflow, and for a time that worked for me. If I wanted to add a new feature, I just created a “decision step” which would read in the text message and respond accordingly.
I was able to use this for daily tasks like Reminders, and even things like tracking groceries. I used Firebase Firestore to persist any data I worked with.
Unfortunately, my workflow became very complicated. I realized that my app had scaled to a point where it became difficult to add features. This was mainly because the WYSIWYG editor literally had to render as I added blocks etc. From a cost standpoint, this also created mini interactions with Twilio for each “conversation” that my Virtual Assistant had with me. The combination of my issues with Twilio Studio and cost made me decide on a rewrite.
For the rewrite (and final version of my project), I decided to do the routing of requests all serverside. Do it all in code. This is what I shared in the above section with the flow chart. This made it easy to follow paths, and understand logic as I communicated with my Virtual Assistant.
The basic process became the following:
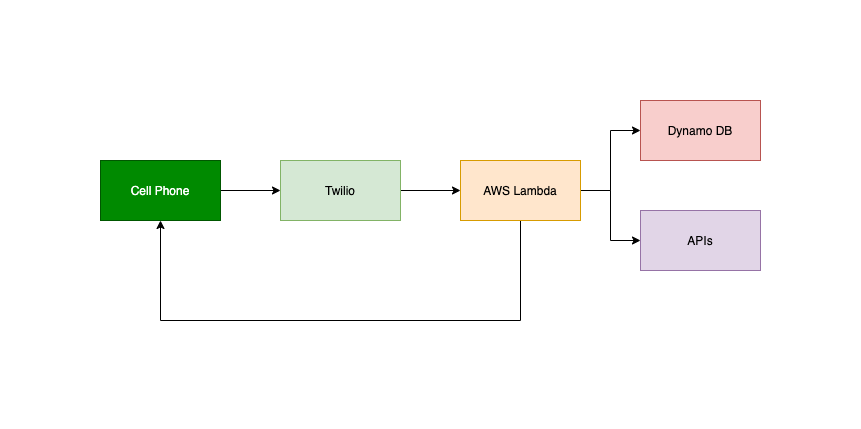
Its the same setup where you interact with the Virtual Assistant via SMS to Twilio. The main difference is the use of AWS and being able to do it all in code vs. using the stuido flow.
I also had just learned about the Serverless Framework and was excited to build out a serverless API with AWS Lambdas.
After some rewriting and migration of the code, I ended up with a nice clean implementation that had JavaScript modules for each “feature.” The routing of the requests looked something like this:
const messageRoutes = async (action) => {
  const messageBody = action.Body.toUpperCase();
  const messageFrom = action.From;

  if (messageBody.includes("REMINDERS")) {
    // reminders message
    console.log("reminders message was sent");
    await remindersMessage(messageBody, messageFrom);
  } else if (messageBody.toUpperCase().includes("GROCERIES")) {
    // groceries message
    console.log("groceries message was sent");
    await groceriesMessage(messageBody, messageFrom);
  } else if (messageBody.includes("WEATHER")) {
    // send weather message
    console.log("weather message was sent");
    await weatherMessage(messageBody, messageFrom);
  }
};
Some of the features I built included writing to a grocery list my wife and I use, reminders, and a weather forecast. There are a lot of cool things you can do here, this is just an example.
There are also lots of fun things you could do with Natural Language Processing (NLP) to make this whole process smarter. I was good with just sending commands as you see in the above snippet.
Setting up a Twilio Account
So the first step is that you’ll need a Twilio Account. If you go to Twilio.com/try-twilio, you enter your information and create a free account. With a free account you’ll get a trial number and can basically get started. If you want to create a project beyond just playing with the console, you’ll need to purchase a phone number.
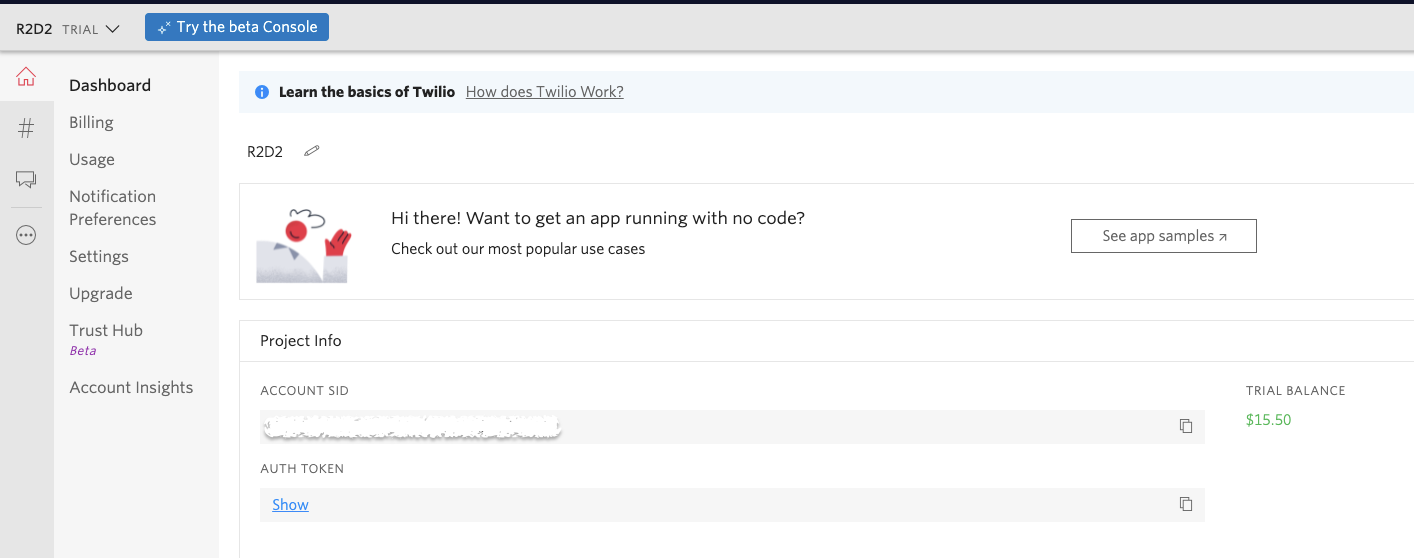
With your account you’ll have an Account SID and Auth Token as you see here:
You’ll need those to use the Twilio APIs. Building a NodeJS project, the process to send a message looks like this:
// copied from the NodeJS sample at https://www.twilio.com/docs/sms/quickstart/node
const accountSid = process.env.TWILIO_ACCOUNT_SID;
const authToken = process.env.TWILIO_AUTH_TOKEN;
const client = require("twilio")(accountSid, authToken);

client.messages
  .create({
    body: "This is the ship that made the Kessel Run in fourteen parsecs?",
    from: "+15017122661",
    to: "+15558675310",
  })
  .then((message) => console.log(message.sid));
When sending messages with Twilio, the payload looks like this:
// copied from example at https://www.twilio.com/docs/sms/quickstart/node?code-sample=code-respond-to-an-incoming-text-message&code-language=Node.js&code-sdk-version=3.x

{
  "account_sid": "ACXXXXXXXXXXXXXXXXXXXXXXXXXXXXXXXX",
  "api_version": "2010-04-01",
  "body": "This is the ship that made the Kessel Run in fourteen parsecs?",
  "date_created": "Thu, 30 Jul 2015 20:12:31 +0000",
  "date_sent": "Thu, 30 Jul 2015 20:12:33 +0000",
  "date_updated": "Thu, 30 Jul 2015 20:12:33 +0000",
  "direction": "outbound-api",
  "error_code": null,
  "error_message": null,
  "from": "+15017122661",
  "messaging_service_sid": "MGXXXXXXXXXXXXXXXXXXXXXXXXXXXXXXXX",
  "num_media": "0",
  "num_segments": "1",
  "price": null,
  "price_unit": null,
  "sid": "SMXXXXXXXXXXXXXXXXXXXXXXXXXXXXXXXX",
  "status": "sent",
  "subresource_uris": {
    "media": "/2010-04-01/Accounts/ACXXXXXXXXXXXXXXXXXXXXXXXXXXXXXXXX/Messages/SMXXXXXXXXXXXXXXXXXXXXXXXXXXXXXXXX/Media.json"
  },
  "to": "+15558675310",
  "uri": "/2010-04-01/Accounts/ACXXXXXXXXXXXXXXXXXXXXXXXXXXXXXXXX/Messages/SMXXXXXXXXXXXXXXXXXXXXXXXXXXXXXXXX.json"
}
The fields you really need are body and from since those are how you’ll respond when the messages comes across.
Making a Serverless API
So now that you have the general form of a Twilio Request and Response, lets make a Serverless API that hosts your code.
A little bit about Serverless…
The serverless framework is a great platform for creating apps from the leading cloud providers. If you checkout the examples page it shows the various languages and providers that serverless works with.
If you’re familiar with AWS, building a Severless API with AWS Lambdas is really straightforward. You can start with one of the quickstart examples, or just follow the docs.
The first step is to install the CLI by following the docs. Assuming you’ve already got the AWS CLI installed, Serverless will read in your local AWS credentials to interact with your AWS account.
The Serverless CLI works with a serverless.yml file. A great example is in the serverless examples GitHub repo. A serverless.yml file looks like this:
# copied from the example at https://github.com/serverless/examples/blob/master/aws-node-simple-http-endpoint/serverless.yml

service: serverless-simple-http-endpoint

frameworkVersion: ">=1.1.0 <2.0.0"

provider:
  name: aws
  runtime: nodejs12.x

functions:
  currentTime:
    handler: handler.endpoint
    events:
      - http:
          path: ping
          method: get
In your serverless yaml file, you define the service name and provider (in this case AWS). Then you define the Lambda functions with a handler and path. The handler is a local JS file that is read in by the yaml file. In this example it looks like this:
// copied from example at https://github.com/serverless/examples/blob/master/aws-node-simple-http-endpoint/handler.js
"use strict";
module.exports.endpoint = (event, context, callback) => {
const response = {
statusCode: 200,
body: JSON.stringify({
message: `Hello, the current time is ${new Date().toTimeString()}.`,
}),
};
callback(null, response);
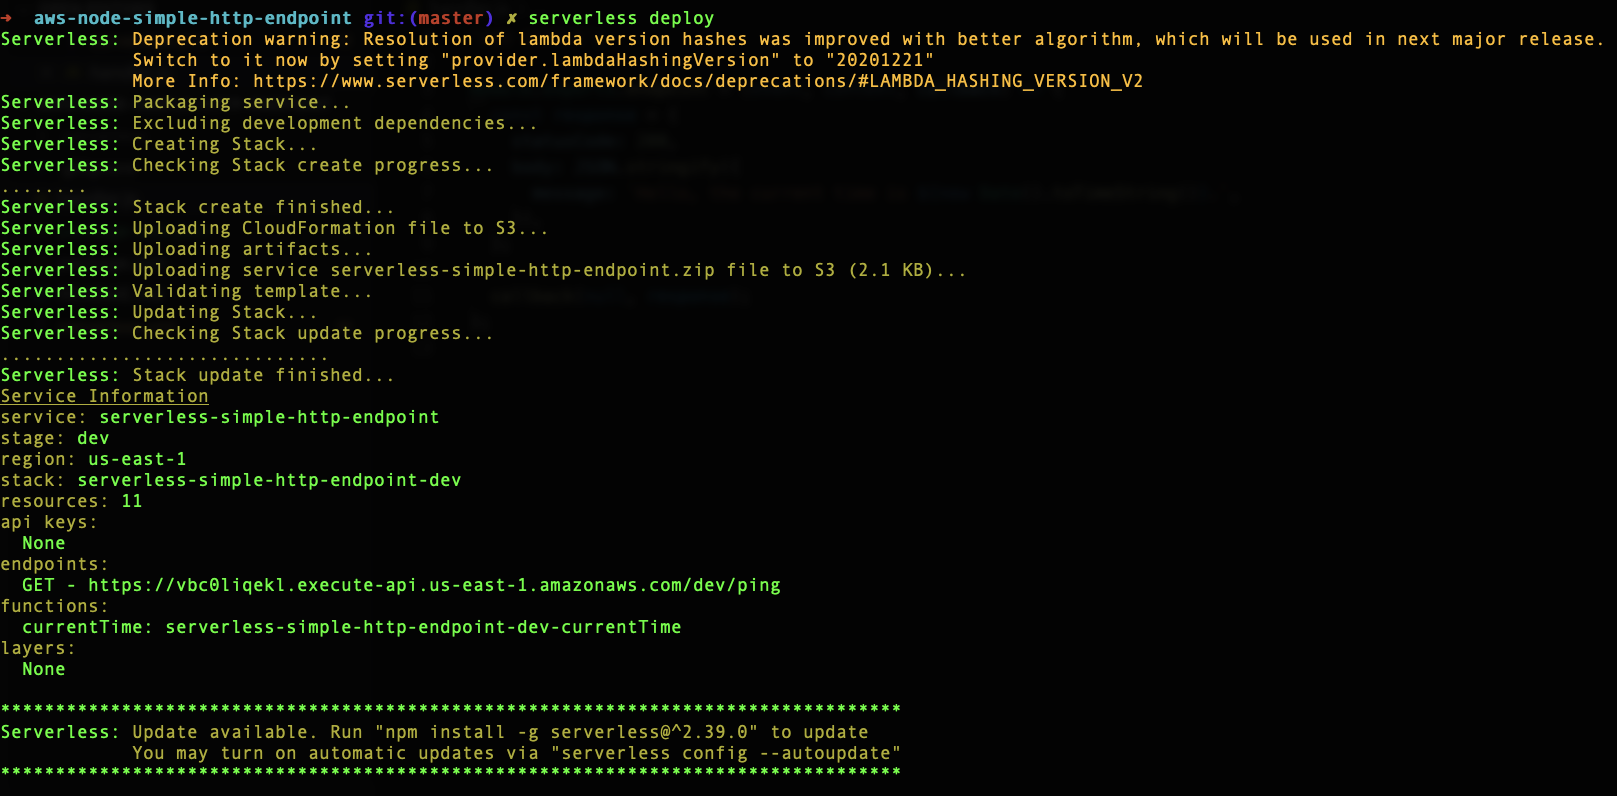
};So to see this in action, first copy this example at the Serverless GitHub repo. Then use the Serverless CLI to deploy the sample with serverless deploy in your terminal. Running this will create the Lambda for you with AWS CloudFormation. The coolest part is, all you needed to do was provide the serverless.yml file and the Serverless Framework does this all for you.
The terminal output for that example should look like:
If you call the endpoint that was created, you should see something like:

Setting up your Serverless Project
So now you’ve got the background and toolkit to create the virtual assistant. In this section, I’m going to walkthrough how you can create one yourself.
For the example I’m going to share, I went ahead and bought a phone number as well ($1). This was just to avoid any issues I might have with trial accounts, and is optional if you are looking to just play with something like this.
So the first step is to create the Twilio account and get your phone number, Account SID, and Auth Token as I mentioned before. With those three values, you can now create the backend to hook up to your Twilio account.
I’m first just going to build a “hello world” endpoint, and then I will go about creating a endpoint to handle storing a “to do” list.
So first create a folder and a initialize a JavaScript project with:
mkdir r2d2-assistant
cd r2d2-assistant
npm init -y
Now create a serverless.yml file with the following:
service: r2d2-assistant

frameworkVersion: ">=1.1.0 <=2.33.1"

provider:
  name: aws
  runtime: nodejs12.x

functions:
  greeting:
    handler: handler.greeting
    events:
      - http:
          path: greeting
          method: post
Before we proceed, lets also install qa with npm install qs. We will use qs to parse the message payload.
Next, you’ll create a handler.js file that will be where you’ll be able to define your Virtual Assistants behavior. Let’s start this file with just the following:
"use strict";

const qs = require("querystring");

const greeting = async (event, context, callback) => {
  let response = {};
  try {
    const headers = event.headers;
    const body = qs.parse(event.body);
    console.log("greeting recieved with body");
    console.log(JSON.stringify(body));
    console.log("greeting recieved with headers");
    console.log(JSON.stringify(headers));

    response = "Hello from your R2D2 assistant!";
  } catch (error) {
    console.log(error);
  }

  return {
    statusCode: 200,
    body: JSON.stringify(response),
  };
};

module.exports = {
  greeting,
};
All this does is pull out the headers and body from calls to the Lambda. It also just returns a response of “Hello from your R2D2 assistant!” so we know it is working.
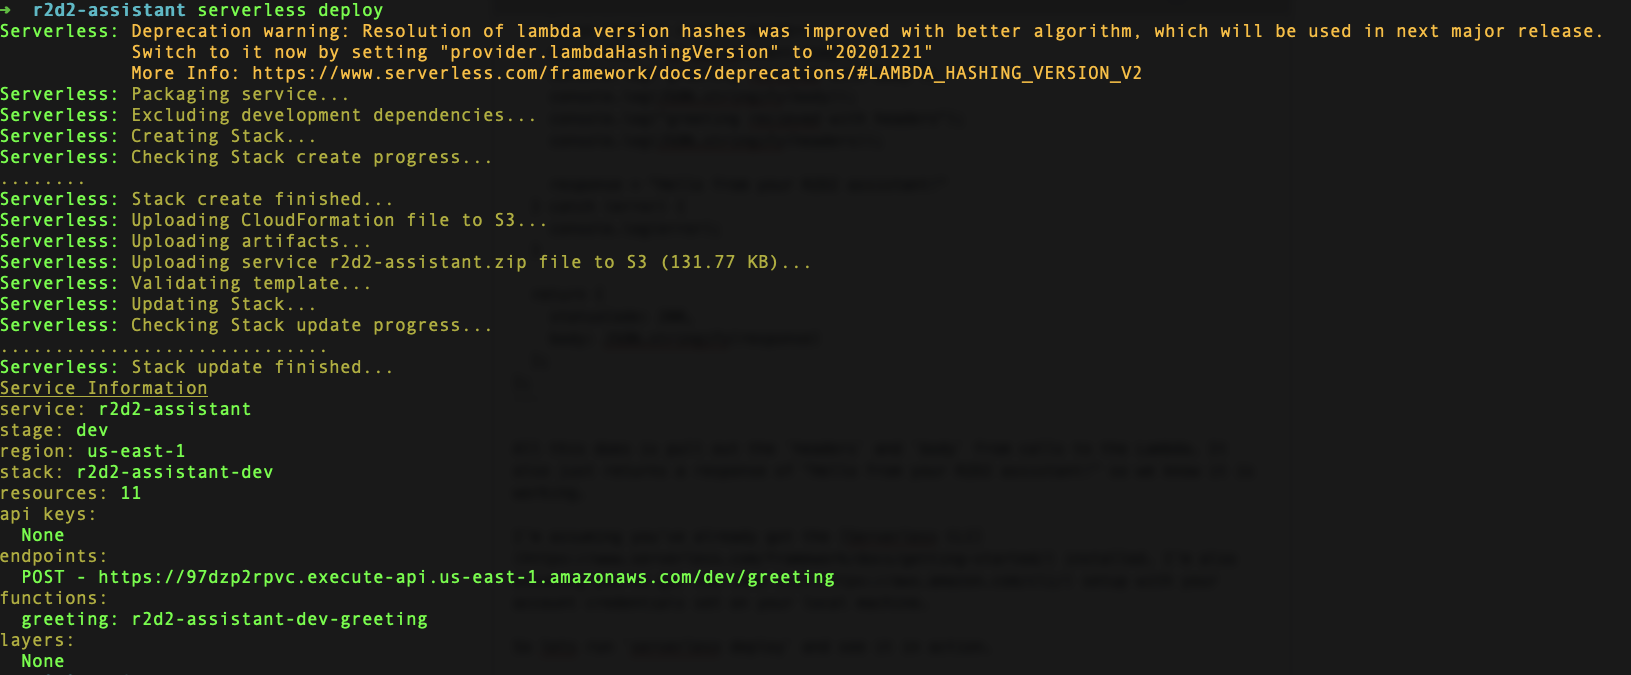
I’m assuming you’ve already got the Serverless CLI installed. I’m also assuming you’ve got the AWS CLI setup with your account credentials set on your local machine.
So lets run serverless deploy and see it in action. You should see output that looks like this:
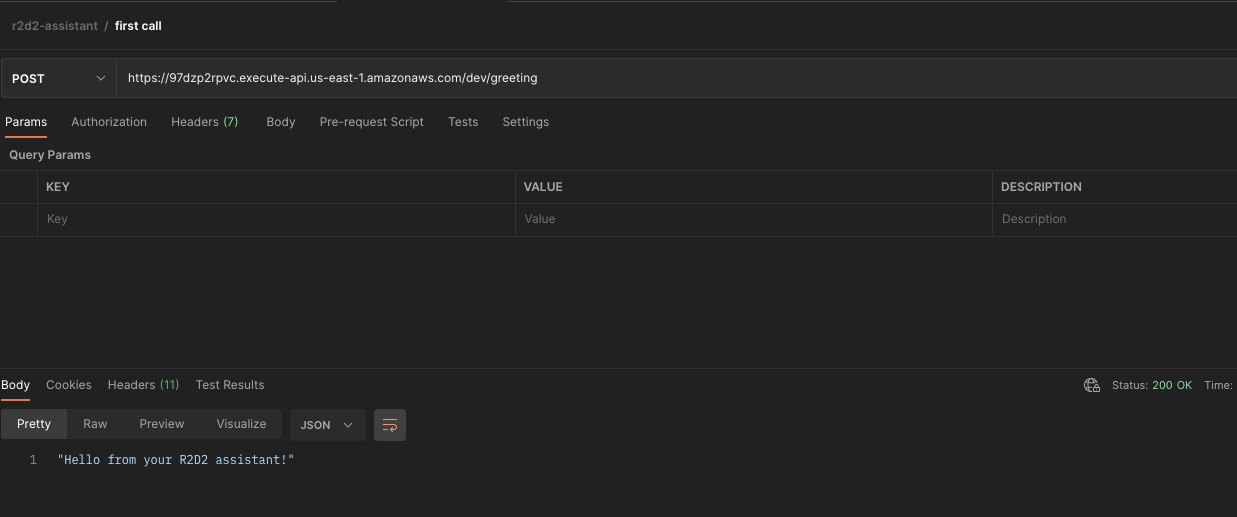
If you pull this up in Postman, you should see the following:
Connecting your Serverless Project to Twilio
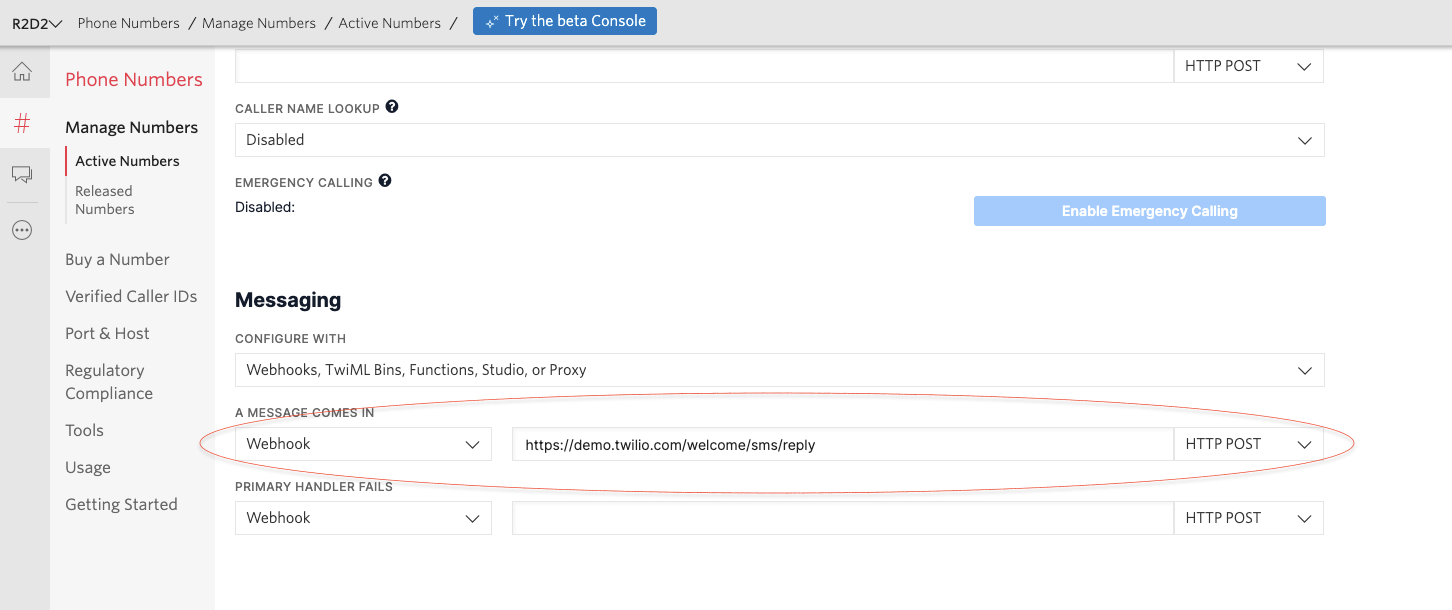
Ok, so you now have a working API that you can connect to Twilio. If you pull up your Twilio Console, you just add the endpoint you created to the messages section and WHEN A MESSAGE COMES IN. Make sure you’ve selected POST and you’re good to go.
You’ll now need to change your API to use Twilio’s NodeJS helpers to actually send a return message. You’ll need to grab the Twilio Number, Twilio SID, and Twilio Auth Token to properly send your messages.
You’ll also need to install Twilio’s npm package with npm install Twilio.
The end result should look like this:
"use strict";

const qs = require("querystring");
const TWILIO_ACCOUNT_SID = "<YOUR_TWILIO_ACCOUNT_SID>";
const TWILIO_AUTH_TOKEN = "<YOUR_TWILIO_ACCOUNT_AUTH_TOKEN>";
const TWILIO_ACCOUNT_PHONE_NUMBER = "<YOUR_TWILIO_ACCOUNT_PHONE_NUMBER>";
const twilio = require("twilio");
const client = twilio(TWILIO_ACCOUNT_SID, TWILIO_AUTH_TOKEN);
const MessagingResponse = require("twilio").twiml.MessagingResponse;

const greeting = async (event, context, callback) => {
  let response = {};
  try {
    const headers = event.headers;
    const body = qs.parse(event.body);
    console.log("greeting recieved with body");
    console.log(JSON.stringify(body));
    console.log("greeting recieved with headers");
    console.log(JSON.stringify(headers));
    response = "Hello from your R2D2 assistant!";

    await client.messages.create({
      body: response,
      from: TWILIO_ACCOUNT_PHONE_NUMBER,
      to: body.From,
    });
  } catch (error) {
    console.log(error);
  }

  return {
    statusCode: 200,
    body: JSON.stringify(response),
  };
};

module.exports = {
  greeting,
};
You’ll notice we’re pulling in the Twilio dependencies and then using the client object to send a message. We also pulled the From number, so we know who to send the message back to.
With all of this in place, just run serverless deploy on your terminal and the Serverless Framework will pull in all these changes and redeploy your API.
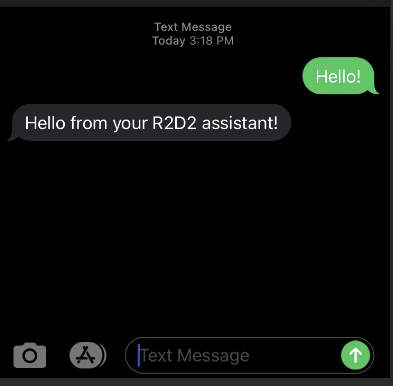
Then when you test it, you should see something like this:
If you follow the README in my sample project [r2d2-Assistant](https://www.github.com/andrewevans0102/r2d2-assistant] you’ll see that there are different branches for each step in building this. If you follow the README you can go from this basic integration to a full “to do” list and using serverless to build AWS infrastructure.
Closing Thoughts

In this post I covered the process of creating a Virtual Assistant using JavaScript, Twilio, and the Serverless Framework. I showed you how to hook up an AWS Lambda to a Twilio phone number, as well as setup functionality to store basic “To Do” list items.
The way I built the Virtual Assistant here was fairly manual in that you had to code for specific commands and keywords. A step beyond this would be able to include some Natural Language Processing or other AI mechanism to act as a “conversation.”
I really just touched the surface of what you can do with the Serverless Framework as well. I highly recommend checking out their docs to learn more.