
Building a Weather Station with JavaScript
If you’ve followed my writing, you’ll have seen that I’ve built several weather applications. I love working with weather applications and the outdoors. Last year I built a weather station, you can follow what I did by reading my post Building a Weather Station with a Raspberry Pi and Firebase.
A few weeks ago the DHT22 sensor I was using went bad. I took this as an opportunity to improve my original project, and rebuilt my weather station. In the process of doing this, I had the chance to use some pretty cool technologies. In this post, I’m going to walk through what I did and share some things I learned a long the way. I have an open source version of my project available in my GitHub repo evans-weather2. I’ll be referencing that in this post.
My Project
So to start with, I want to define what I mean by a “weather station.” My “weather station” is basically a central place that I can get the following information:
- temperature
- humidity
- wind direction and speed
- Barometric Pressure
- Detailed forecast for today and tomorrow
- Radar
- Hourly project temperature for the next 12 hours
The end product is that I put this all into an application that can run on an old computer I have at home. To build this all I needed was:
- Raspberry Pi Zero W
- DHT 22 Sensor (you can get these on Amazon)
- Jumper wires
- A Firebase Account
- VSCode
The way it works is that I have a Raspberry Pi hooked up with a DHT22 sensor and that gives me temperature and humidity:
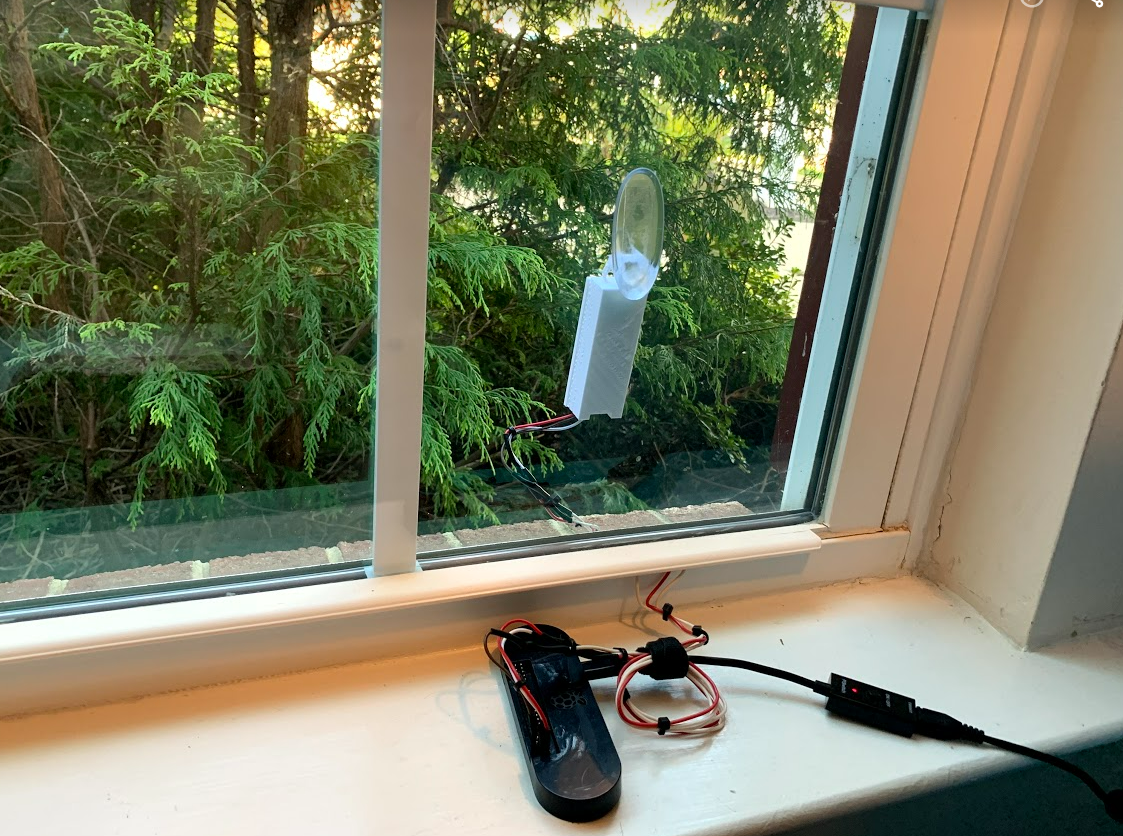
If you see in the picture, I have 3D Printed housing for the sensor that I was able to use to attach to the window.
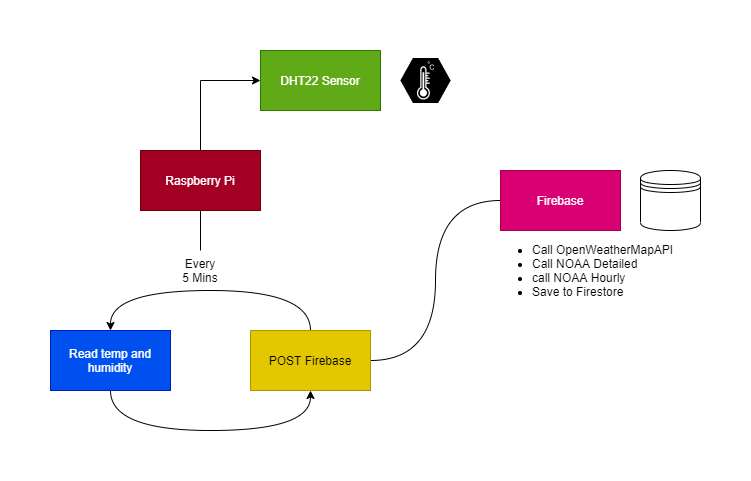
Once I have the temperature and humidity, then I just add a cron job on the Raspberry Pi that runs every 5 minutes to get the temp and humidity, and then do a POST to a Firebase Function API that I have built that saves the information to Firestore.
When the POST happens, it then triggers calls to NOAA APIs for projected forecast and hourly temperatures, and then the OpenWeatherMapAPI to get the barometric pressure and wind information.
All of this information is stored in Firestore and the process basically looks like this:
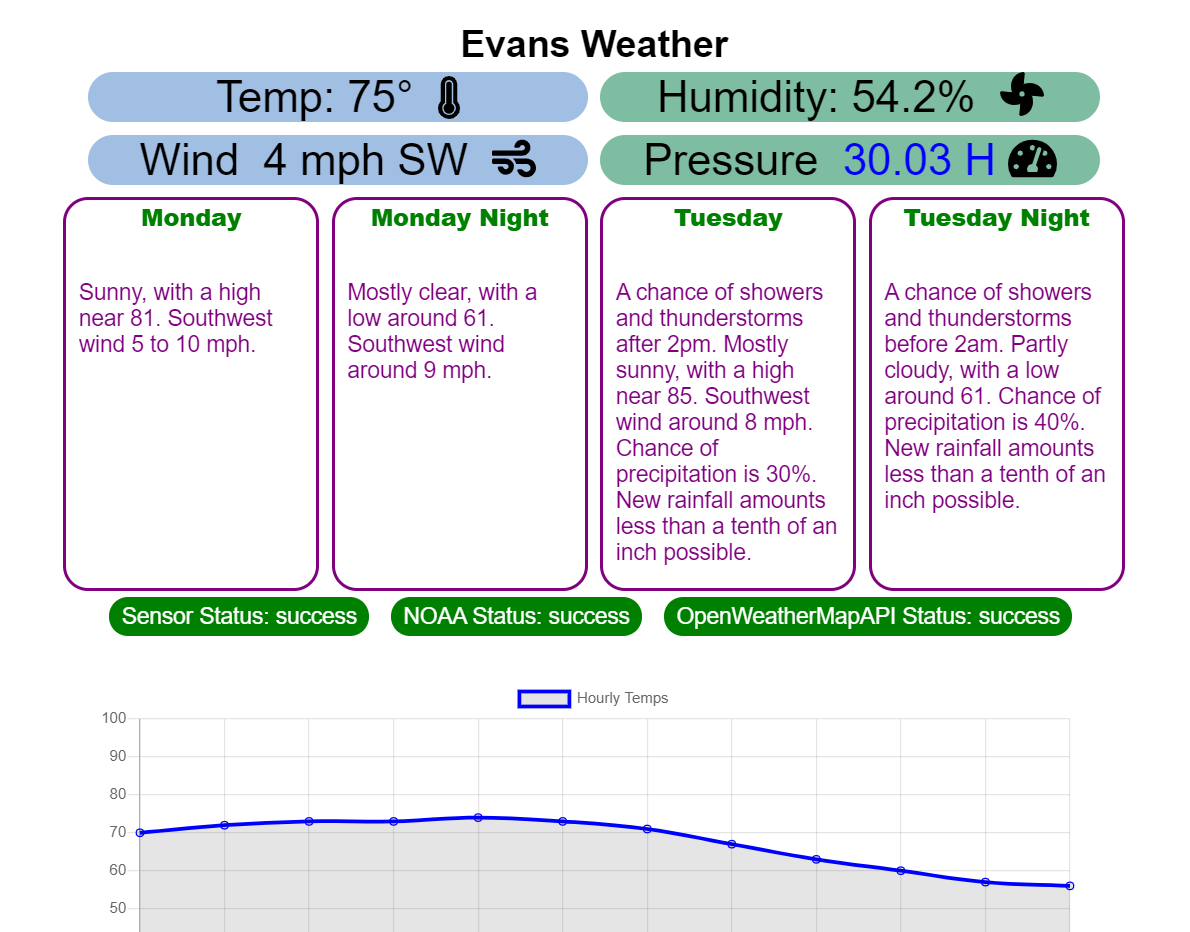
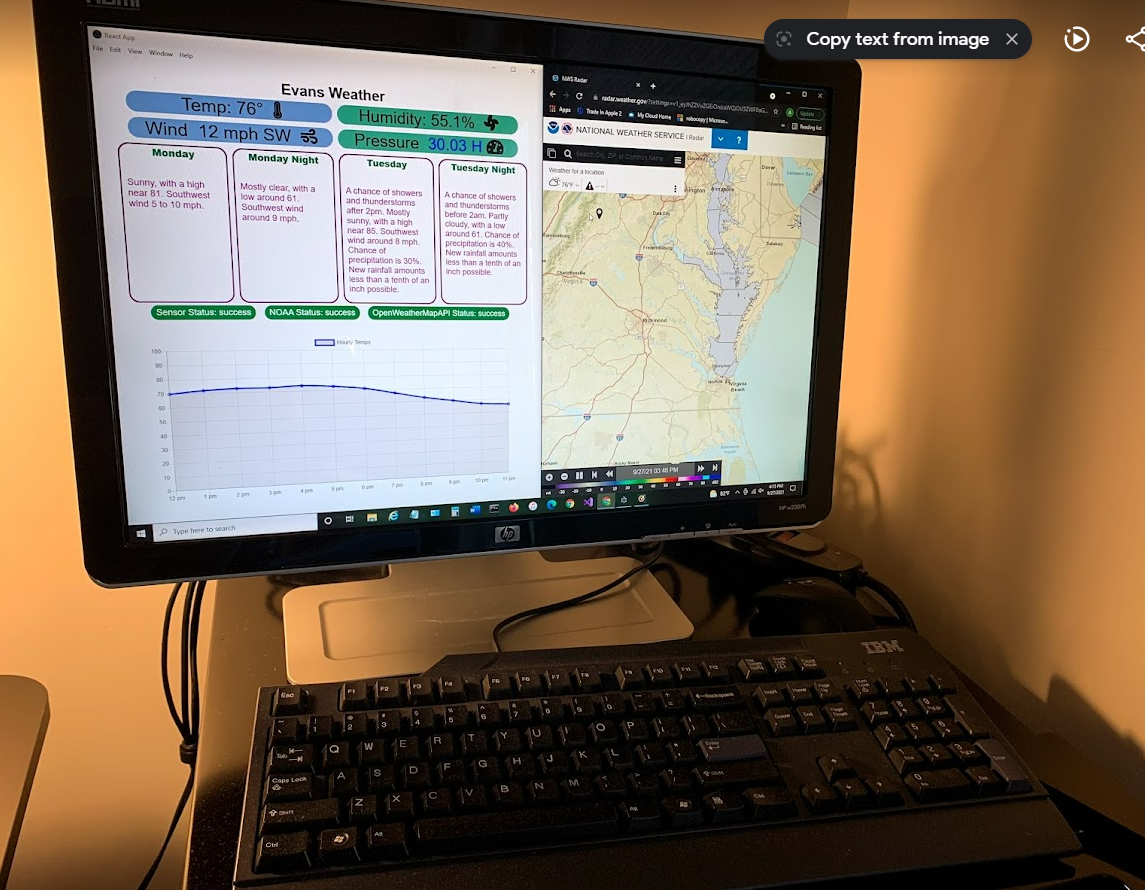
While all this is happening, I then have an Electron App (originally a React web project) that is running on an older computer. This app polls the Firestore instance and retrieves the weather information every 5 minutes. The screen ended up looking like this:
Alongside it, I have the NOAA radar which auto updates. So the end result is that my weather information is updated every 5 minutes, and then my radar is continually updated as well. Thus creating a fully functional (and automated) weather station.
Application Architecture
So to build this project, I had three big components:
-
The weather sensor
- Raspberry Pi
- DHT22 Sensor
-
The weather server
- Firebase Functions API that
- POST to gather the data and store it in Firebase
- GET to retrieve the data for display
-
The weather client (Electron App)
- Originally a React project (built with create-react-app)
- Packaged as an electron app so it could run as a program on an old computer
Putting all of these together took time, and I basically just iterated over each one individually.
Weather Sensor
The weather sensor was pretty straightforward. If you’ve seen my previous posts, I’ve used DHT22 sensors several times. They’re great and easy to work with, especially with a Raspberry Pi. Other than the physical wiring of the sensor, the code for this is basically just (1) GET data and then (2) make an HTTP post.
try:
	temperature = round(dhtDevice.temperature * (9 / 5) + 32)
	humidity = dhtDevice.humidity
	weather_body = {
		'temp': str(temperature),
		'humid': str(humidity),
		'status': 'success'
		}
	logging.info('reading successful with temp: ' + str(temperature) + ' and humidity ' + str(humidity))
	sentRequest = requests.post(url = sensor_endpoint, headers = headers, data = json.dumps(weather_body))
	logging.info("sensor was sent with status code of " + str(sentRequest.status_code))
	time.sleep(10)
except RuntimeError as error:
	# Errors happen fairly often, DHT's are hard to read, just keep going
	logging.error('Runtime Error')
	logging.error(error.args[0])
	weather_body = {
		'temp': '',
		'humid': '',
		'status': error.args[0]
	}
	sentRequest = requests.post(url = sensor_endpoint, headers = headers, data = json.dumps(weather_body))
	logging.info("sensor was sent with status code of " + str(sentRequest.status_code))
except Exception as error:
	logging.error('General Exception')
	logging.error(error.args[0])
	weather_body = {
		'temp': '',
		'humid': '',
		'status': error.args[0]
	}
	sentRequest = requests.post(url = sensor_endpoint, headers = headers, data = json.dumps(weather_body))
	logging.info("sensor was sent with status code of " + str(sentRequest.status_code))
I also included a custom header with a encoded JSON Web Token. This is to secure the transaction between the Raspberry Pi and my Firebase API. I used pyJWT. To create the token I basically did this:
>>> import jwt
>>> encoded = jwt.encode({"some": "payload"}, "secret", algorithm="HS256")
>>> print(encoded)
eyJ0eXAiOiJKV1QiLCJhbGciOiJIUzI1NiJ9.eyJzb21lIjoicGF5bG9hZCJ9.Joh1R2dYzkRvDkqv3sygm5YyK8Gi4ShZqbhK2gxcs2U
>>> jwt.decode(encoded, "secret", algorithms=["HS256"])
{'some': 'payload'}
copied from the GitHub example at https://github.com/jpadilla/pyjwt
I had one issue when attaching the value as a bearer token. I had to use the “decode” method of bytes so that the value passed into the Header was a string and could be consumed by my Firebase API.
headers={
    "Content-Type": "application/json",
    "authorization": "Bearer " + encoded_jwt.decode("utf-8")
}
Figuring that out took a little bit more time than I had hoped, but that worked and then I was able to send it to Firebase.
Weather Server
Other than the obvious calling and parsing of data to the Weather APIs, my Firebase instance checks the Bearer token attached to verify the request from the client. I thought this was really cool because my Firebase Functions API is actually in JavaScript. The Raspberry Pi that I had hooked up with the sensor is running Python. This is one of those times when web standards really becomes powerful. Two different languages can use the same thing because they’re using the same underlying Algorithm. Since I’m using JavaScript, I used the jsonwebtoken npm package. With my Functions API, I’m using Node Express and added this as middleware like this:
// secure API calls
const validateToken = async (req, res, next) => {
  if (req.headers.authorization === undefined) {
    console.log("authorization header was not defined");
    return res.status(403).send("Unauthorized");
  }

  try {
    // verify the JWT for the request
    const authorization = req.headers.authorization.split("Bearer ")[1].trim();
    console.log(authorization);
    const decodedPayload = jwt.verify(authorization, process.env.SENSOR_KEY);
    if (decodedPayload.source !== process.env.SENSOR_SOURCE) {
      console.log("authorization header was not valid");
      throw new Error("Unauthorized");
    }
    console.log("authorization header was good");
    next();
    return;
  } catch (error) {
    console.log(error);
    return res.status(403).send("Unauthorized");
  }
};
app.use(validateToken);
If you’d like to learn more about building APIs with Firebase Functions, I recommend you check out my post Building an API with Firebase.
Weather Client
My client then displays the data retrieved is an Electron App that is running on an old computer. There are lots of ways I could have done this, but I chose Electron because (1) I thought it was cool and (2) it was more sustainable then having to stay logged into a web app. I was looking for something that could run autonomously and that I wouldn’t have to fix very often.
I started the project by building a React website. I basically just followed the creat-react-app process. Then I added an RxJS interval to properly run the polling of the Firebase API:
// call weather every 5 minutes after it loads
const weatherTimer = interval(intervalSeconds);
const unsubscribe$ = new Subject();
const weatherObservable = weatherTimer.pipe(
  takeUntil(unsubscribe$),
  catchError((error) => {
    throw error;
  }),
);
unsubscribe$.subscribe();
weatherObservable.subscribe(async () => {
  setShowProcessing(true);
  try {
    await callWeather();
  } catch (error) {
    console.log(error);
  }
  setTimeout(() => {
    setShowProcessing(false);
  }, 2000);
});
With this, I had a “callWeather” function that basically did the HTTP call and then updated the associated local state of the weather information.
Electron by itself is a really cool technology as it lets you package JavaScript projects into fully packaged apps that can be installed on desktops. There are a lot of ways to do this, and I had to do some googling to get it all right. Once you get down to it, it’s really just using one of the build tools and adding a few things to your project:
- install electron and electron-builder as a dev dependency to your project
- create an npm script that packages your project with electron builder
"electron-pack": "npm run build && electron-builder build --publish never"- Add a “build” definition to the
package.jsonas follows:
  "build": {
    "appId": "com.example.electron-cra",
    "files": [
      "build/**/*",
      "node_modules/**/*"
    ]
},- add a “homepage” entry to your
package.jsonas follows:
"homepage": "./",- add a “manifest.json” file to your React App’s public directory that looks similar to the following:
{
  "short_name": "React App",
  "name": "Create React App Sample",
  "icons": [
    {
      "src": "favicon.ico",
      "sizes": "64x64 32x32 24x24 16x16",
      "type": "image/x-icon"
    },
    {
      "src": "logo192.png",
      "type": "image/png",
      "sizes": "192x192"
    },
    {
      "src": "logo512.png",
      "type": "image/png",
      "sizes": "512x512"
    }
  ],
  "start_url": ".",
  "display": "standalone",
  "theme_color": "#000000",
  "background_color": "#ffffff"
}- when all that is set, you can run
electron-packand that should create the packaged solution
There are a lot of options with electron builder. I recommend checking out their docs.
I also had several issues getting this to work initially. I found it works best if you’re on the OS of the machine you want to install it on. So that means if you want to install on a Mac, do this on a Mac, if you want to do it on a PC, do it on a PC. I use both, but for this project I was primarly working on Windows Subystem for Linux (WSL) on a Windows PC. I ended up having to get onto regular Windows and use VSCode on windows (not WSL) to properly package the EXE file that I used for installing it on my old computer. There’s a lot of docs on this as well, but I just recommend building it on whatever OS you intend to do an install on.
Beyond the packaging, the rest of the electron app was basically just tweaking the display to match what my screen resolution showed.
Full Picture
So with all of this hooked up, I ended up with a fully working solution. I’ve had it running for a few weeks now and I have to say it works great. Other than the typical Windows Updates, I haven’t even really had to restart the machine it’s running on. I recommend checking out the source code at my GitHub repo evans-weather2.
This project is cool because it makes use of several technologies for both front and back. It also was a learning opportunity for me because I had not really dove that deep into JSON Web Tokens or packaging React apps for Electron. There are a lot of ways to do this same type of a project, and that also makes this fun.
I encourage you to check out some of the technologies I’ve outlined in this article. They all have a pretty solid set of docs and have a lot of fun things to learn and do.