Playwright for End to End Tests
I recently used Playwright on a project at work and wanted to talk about some of the cool things that it does. If you haven’t heard about it, Playwright is an End to End (e2e) testing framework that was brought to you from the same team that originally worked on Puppeteer.
In this post I’m going to walkthrough a sample project and cover the primary features that Playwright offers. I’ll be walking through my sample project playwright-intro.
I’m also going to compare it with some of the older testing frameworks like Cypress and Selenium Webdriver.
Let’s go!
What is Playwright
Playwright is a e2e testing framework that runs alongside your application. There are several ways that you can install it in your project, but if you want to go with the manual route just do the following:
npm i -D @playwright/test
# install supported browsers
npx playwright install
Once you’ve done that, you configure it by creating a playwright.config.ts file at the root of your project:
// playwright.config.ts
import { PlaywrightTestConfig, devices } from '@playwright/test';

const config: PlaywrightTestConfig = {
  forbidOnly: !!process.env.CI,
  retries: process.env.CI ? 2 : 0,
  use: {
    trace: 'on-first-retry',
  },
  projects: [
    {
      name: 'chromium',
      use: { ...devices['Desktop Chrome'] },
    },
    {
      name: 'firefox',
      use: { ...devices['Desktop Firefox'] },
    },
    {
      name: 'webkit',
      use: { ...devices['Desktop Safari'] },
    },
  ],
};
export default config;
The configuration file lets you define things like timeout and retry. It also lets you define which browsers you want to test on in the projects entry.
In full disclosure, I’m still a fan of Cypress.io and think that its an equally awesome project. That being said, one of the first advantages I saw with Playwright was the number of browsers it supports out of the box. You can run tests with Chrome, Edge, Firefox, and even Safari. There are also some additional options, but it covers the majority of the popular browsers your clients might be using today.
Once you have the config file setup, it’s time to write your first test.
If you’ve used something like jest in the past, you’ll be pretty familiar with what a test looks like with Playwright.
import { test, expect } from "@playwright/test";

test("basic test", async ({ page }) => {
  await page.goto("https://playwright.dev/");
  const title = page.locator(".navbar__inner .navbar__title");
  await expect(title).toHaveText("Playwright");
});
Playwright has several objects that are built in and simplify your test writing. You wrap the actual test with a test block and then use the page object to do actions etc. There are locators which are basically just pointers to tell Playwright what to do (i.e. click, go to a page, etc.). Then there are assertions that you can invoke to verify your test is successful with expect. This all follows the old pattern of:
- Arrange (setup your data)
- Act (exercise your code)
- Assert (verify that what you did is what you expected)
To run your Playwright tests, you just use the command line with:
npx playwright testYou also can specify “headed” browsers that run locally vs “headless” browsers that run as a background process:
npx playwright test --headedTypically you’ll do headed browsers for local testing, and then put the headless tests in your CI pipeline.
Once you run your tests, the results are printed to the console like so:
npx playwright test

Running 5 tests using 5 workers

  ✓ [chromium] › example.spec.ts:3:1 › basic test (2s)
  ✓ [firefox] › example.spec.ts:3:1 › basic test (2s)
  ✓ [webkit] › example.spec.ts:3:1 › basic test (2s)
If you choose a html reporter in your config file you also get a report that you can serve locally to do a deep dive into your tests:

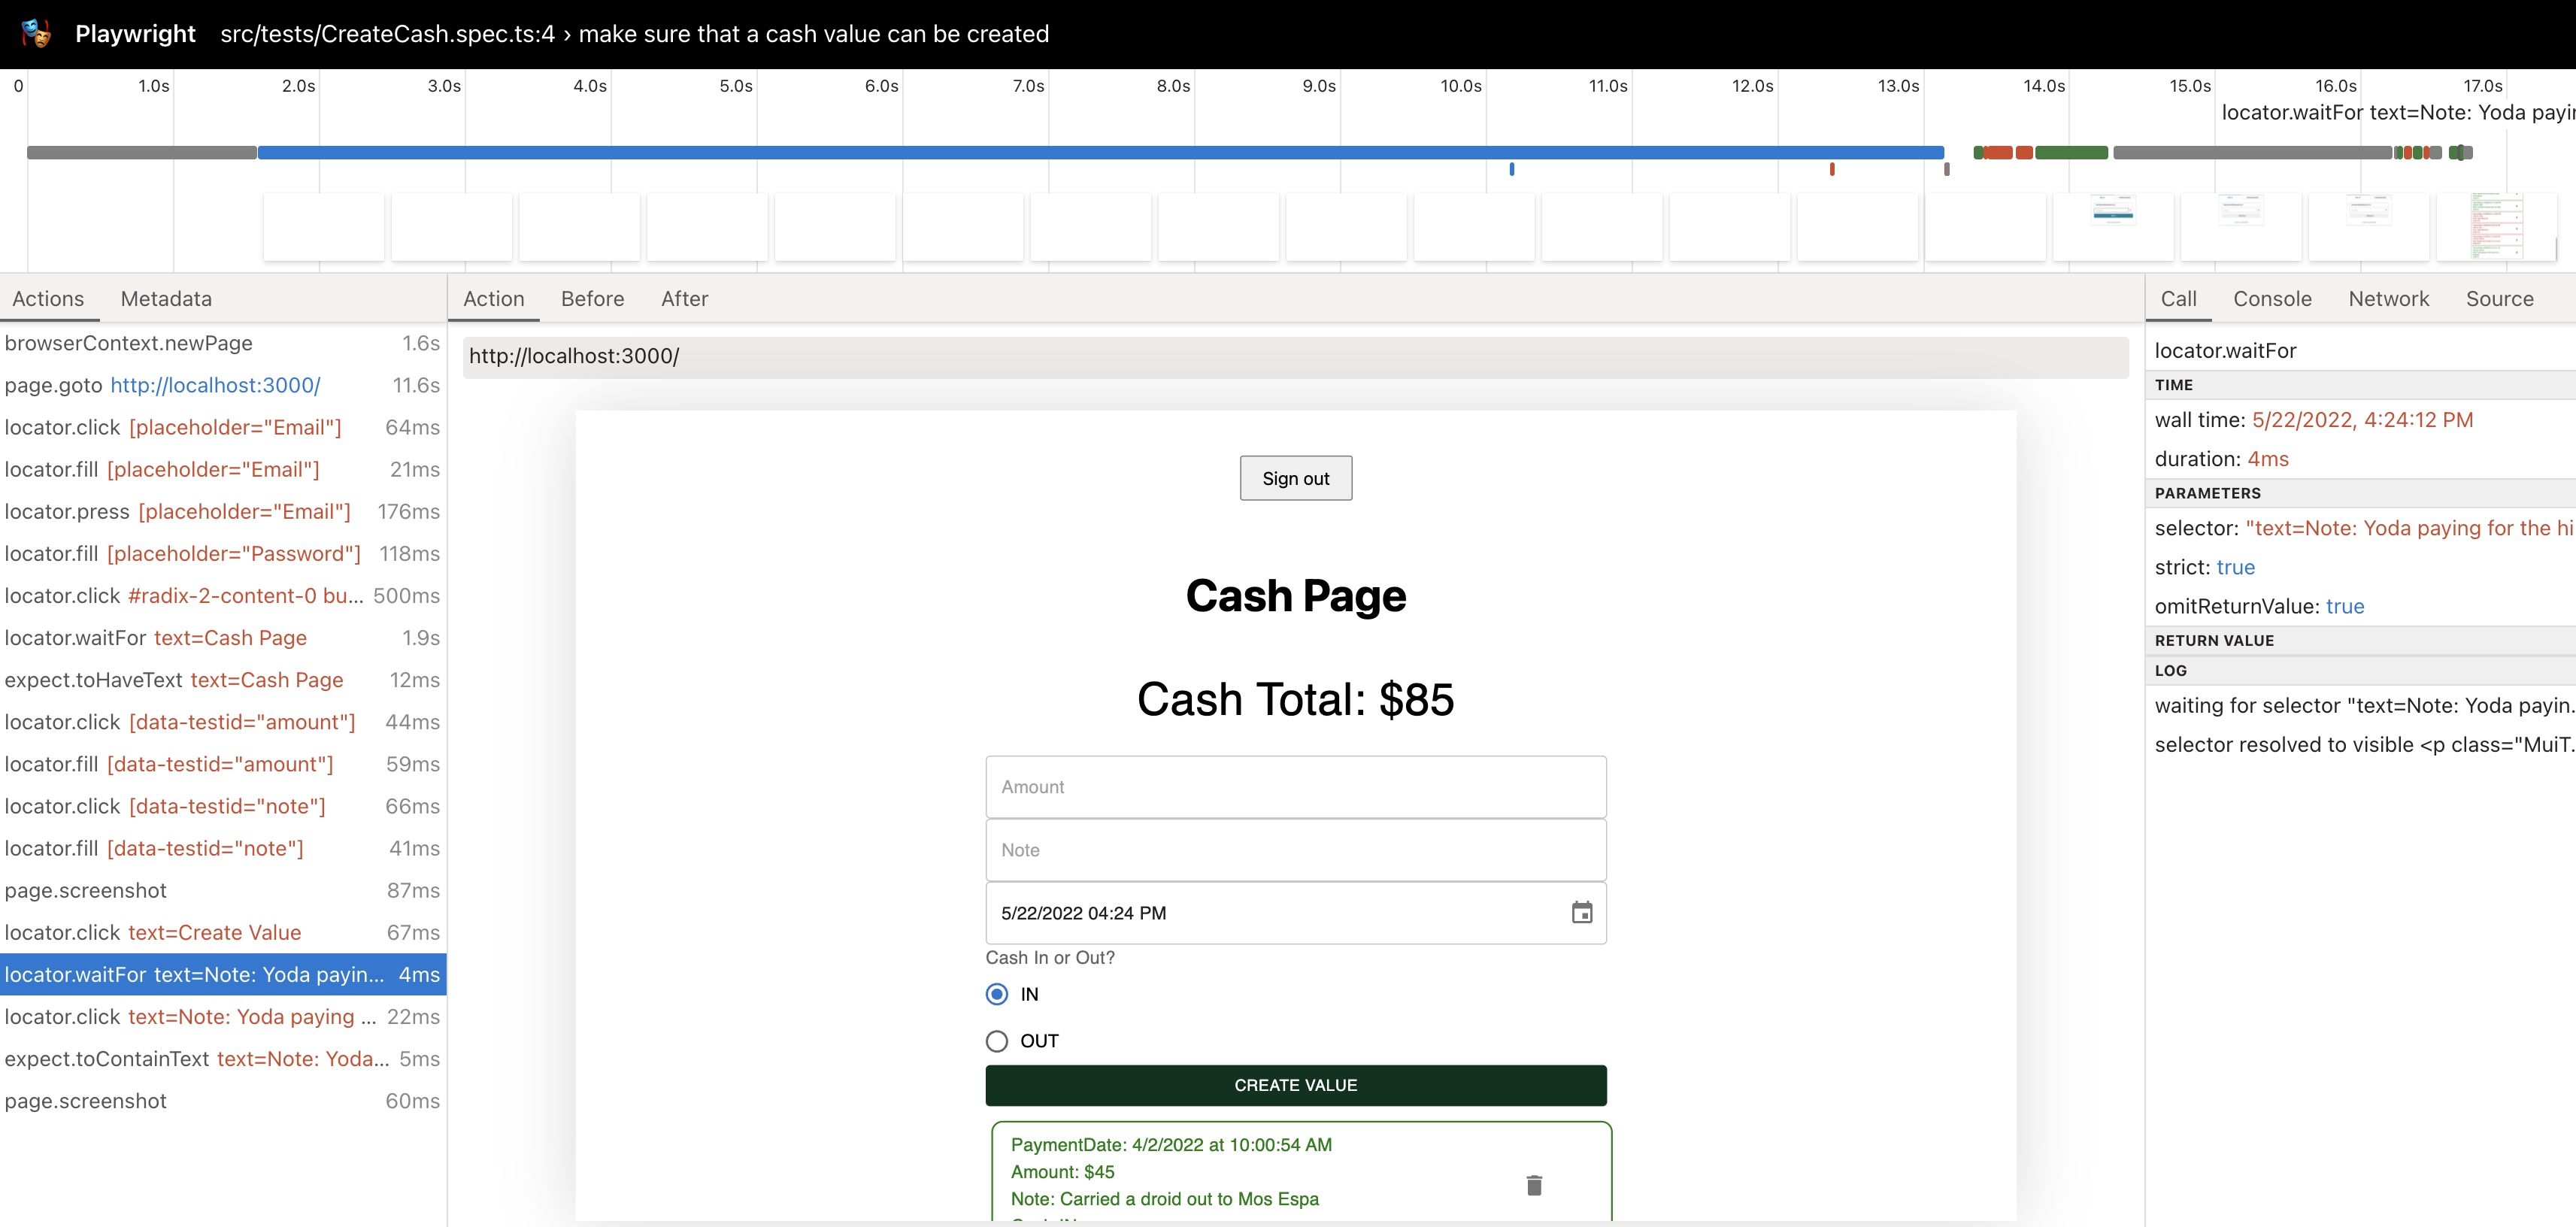
Additionally, each report also has a trace that can be viewed. Its a pretty self explanatory tool, but basically lets you walkthrough what the test did with screenshots and logging output:
Example Project
So in the next few sections I’m going to share a few examples from my project playwright-intro. The project is basically just a cash ledger that takes inputs and outputs. As a fun bonus, I made the example transactions based on the Start Wars character The Mandalorian.

The app basically just has two pages, one for login and then one for the cash ledger. The login is using AWS Cognito and was built with AWS Amplify. The process for doing the Auth for this is not specific to AWS, and could be catered to most of the popular Auth frameworks in use. I’ll cover more on that in the Auth section below.

Organizing Tests
In an effort to organize my applications tests (and reduce the amount of code I write) I created a tests directory:
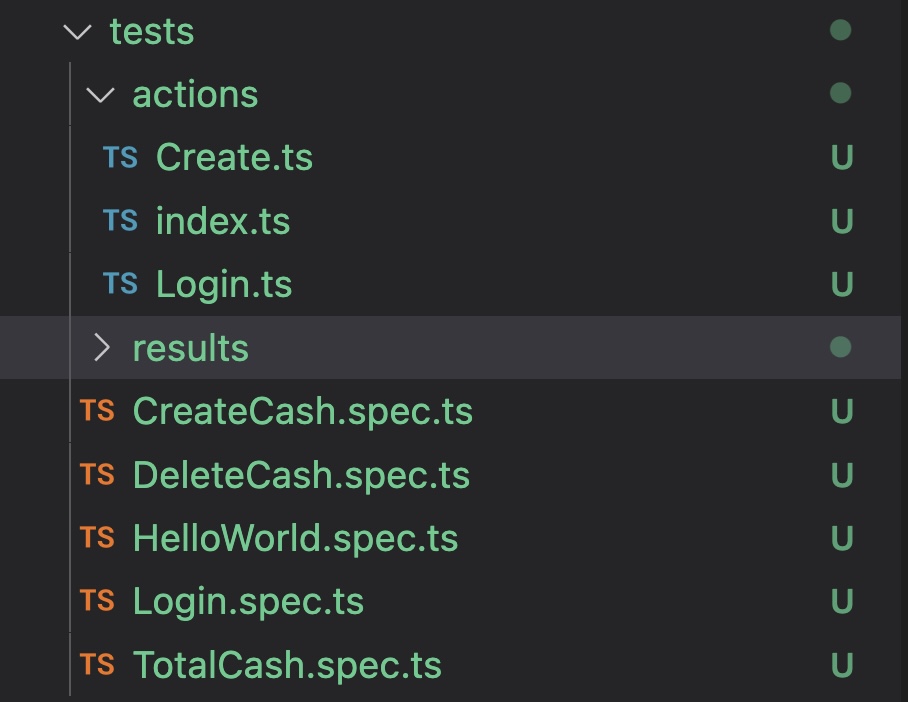
The `actions` folder contains reusable tests, and then the `.spec` files have the tests that I run.
As stated in the earlier sections, the tests themselves are written with the “Arrange, Act, Assert” method.
import { test, expect, Page } from '@playwright/test';

/**
 * create cash flow with test user
 * @param page
 */
export const createCash = async (page: Page, amount: string, note: string) => {
    // Click [data-testid="amount"]
    await page.locator('[data-testid="amount"]').click();
    // Fill [placeholder="Amount"]
    await page.locator('[data-testid="amount"]').fill(amount);
    // Click #mui-2
    await page.locator('[data-testid="note"]').click();
    // Fill #mui-2
    await page.locator('[data-testid="note"]').fill(note);

    // save a screenshot of the cash form with inputs
    await page.screenshot({ path: 'src/tests/results/CREATE_CASH_STEP_1.png' });

    // Click text=Create Value
    await page.locator('text=Create Value').click();

    await page.locator(`text=Note: ${note}`).waitFor();

    await page.locator(`text=Note: ${note}`).click();

    await expect(page.locator(`text=Note: ${note}`)).toContainText(note);

    // save a screenshot of the cash form with inputs
    await page.screenshot({ path: 'src/tests/results/CREATE_CASH_STEP_2.png' });
};
When you write the tests, they follow a logic flow where you do an action and then check for an assertion etc. If you notice, one of the cool parts about Playwright is that it allows you to do things to make the test runner wait:
await page.locator(`text=Note: ${note}`).waitFor();This is a pretty powerful feature, since one of the main issues with frameworks like Selenium Webdriver is that your tests can get flakey and there isn’t a really good way to wait for pages to load etc. I’ve worked on a number of projects where a test would run differently every time you ran it, just because of timing. Playwright has several cool helpers with waiting, I recommend checking them out here.
Code Generation
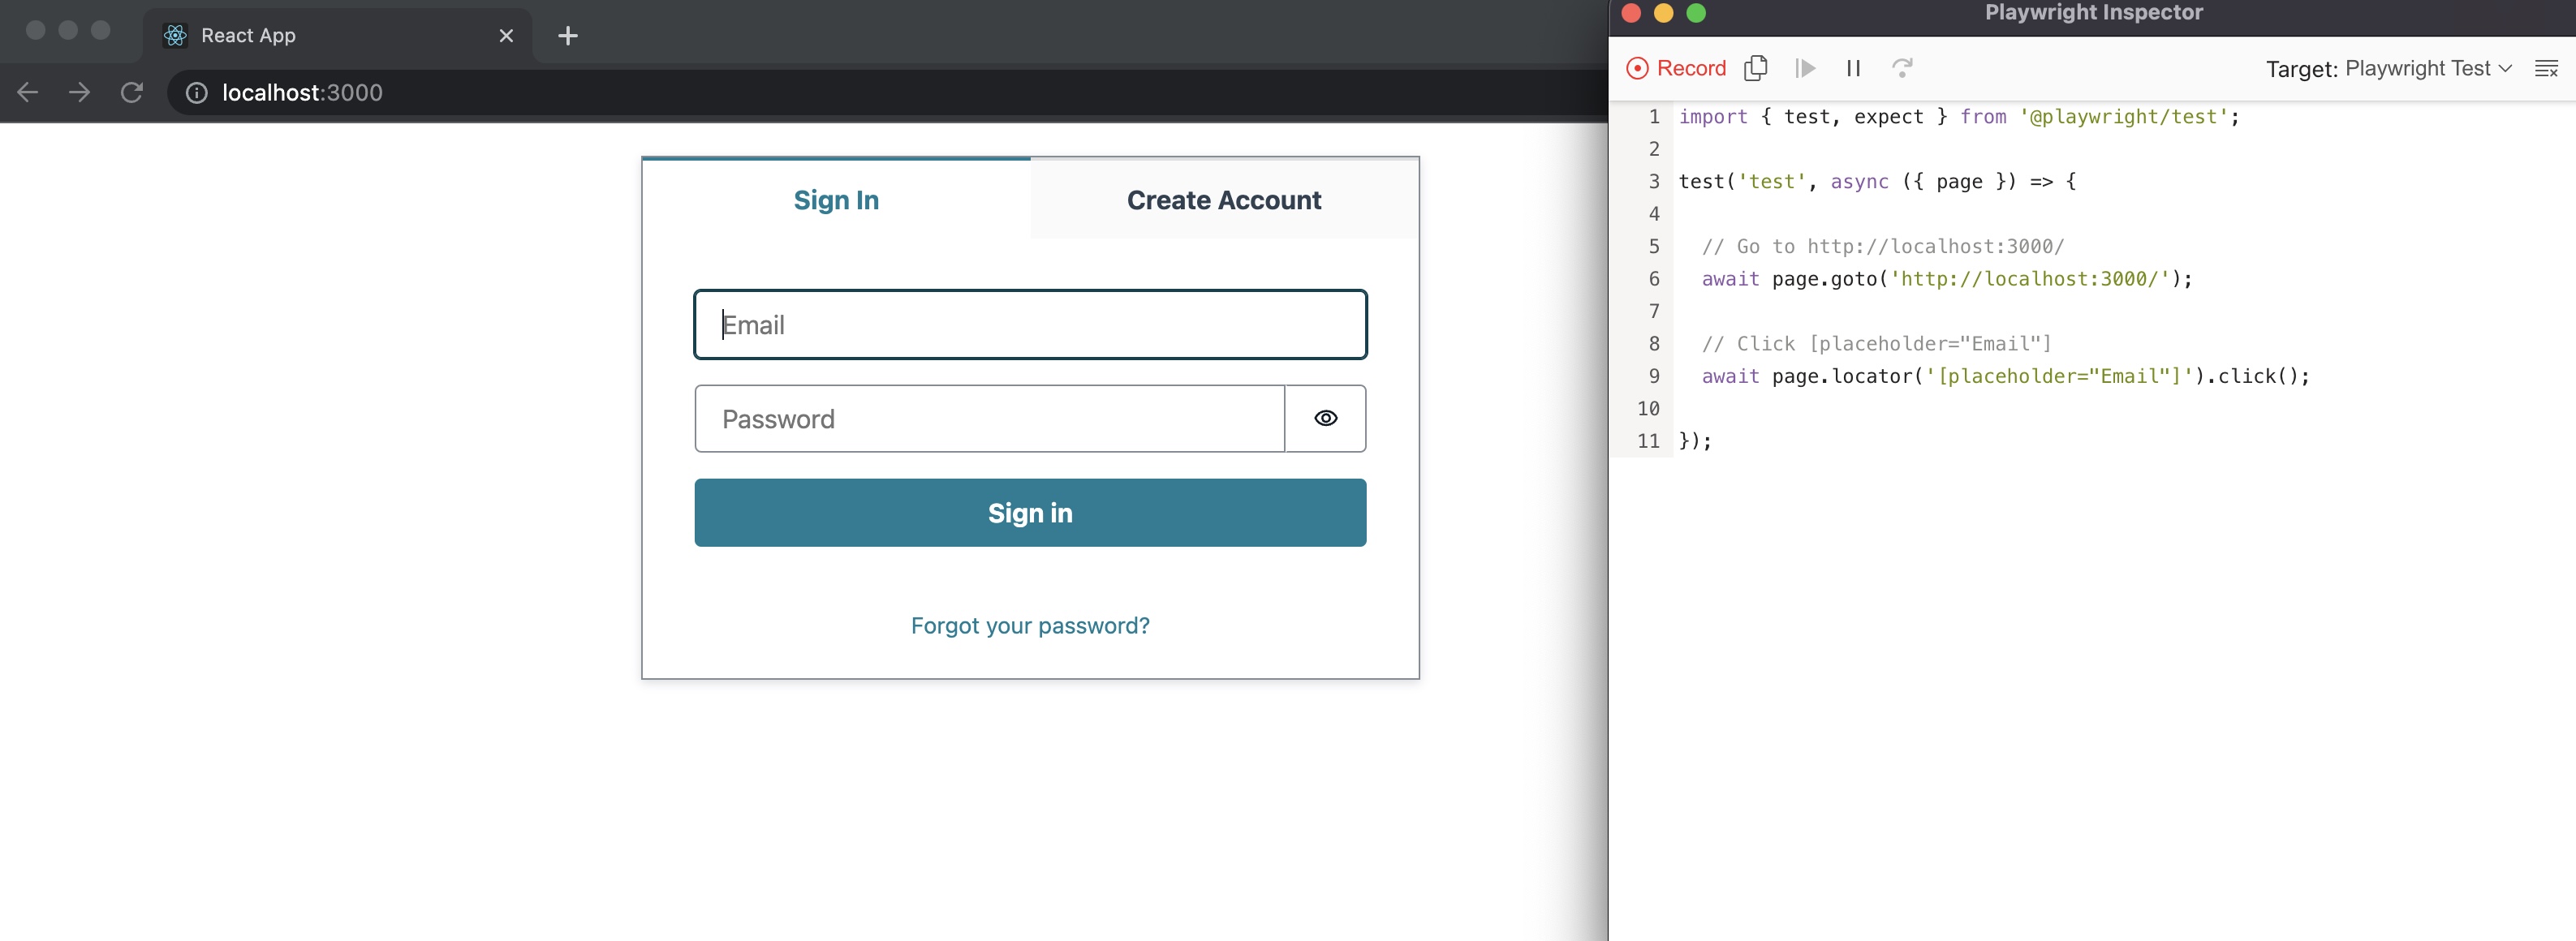
So one of the difficult parts about writing e2e tests is that you actually have to write them! This can be cumbersome if you’re trying to write out actions in tests. Playwright has a nice feature that generates your code for you. You basically just run:
npx playwright codegenand a code generator will appear alongside an emulated version of Chrome. There a lot of customizations that you can do to this, but I thought this was pretty cool.
Authentication
So one of the major usescases with e2e testing is Authentication. Playwright has an entire guide that goes over multiple ways that you can reuse your Auth credentials. The best part is that you can use one of their methods, or just walkthrough the auth flow (enter username, enter password, etc.) in your tests.
The sample project that I’m referencing uses Amplify’s Auth and the Amplify UI Auth Component. So to write my login flow, I just did the following:
export const fullLogin = async (page: Page) => {
    const username = process.env.REACT_APP_PLAYWRIGHT_USERNAME;
    if (username === null || username === undefined) {
        throw 'Username is not defined in environment file';
    }

    const password = process.env.REACT_APP_PLAYWRIGHT_PASSWORD;
    if (password === null || password === undefined) {
        throw 'Password is not defined in environment file';
    }

    // Go to http://localhost:3000/
    await page.goto('http://localhost:3000/');

    // Click [placeholder="Email"]
    await page.locator('[placeholder="Email"]').click();

    // Fill [placeholder="Email"]
    await page.locator('[placeholder="Email"]').fill(username);

    // Press Tab
    await page.locator('[placeholder="Email"]').press('Tab');

    // Fill [placeholder="Password"]
    await page.locator('[placeholder="Password"]').fill(password);
    // Click #radix-2-content-0 button:has-text("Sign in")
    await page.locator('#radix-2-content-0 button:has-text("Sign in")').click();

    const title = page.locator('text=Cash Page');

    await title.waitFor();

    await expect(title).toHaveText('Cash Page');
};
If you notice I’m pulling in environment variables from a local .env file. So I don’t have to check those into source control. This is great since I can create a test user and then swap out the values if I wanted. Additionally, whatever CI platform you’re using can have these values as secrets and can read in them using a secrets manager or however you store your credentials in your CI system.
Reporting
One of the coolest parts of Playwright is the versatile reporting that it can do. As I showed in the first section, the html reporter allows you to have an interactive report (with trace) that you an view after tests run.
Playwright also supports screenshots and videos when tests are ran. This is similar to what Cypress does with their videos, but I actually like it even better because it was super easy to just take a screenshot during a test:
// Click [data-testid="amount"]
await page.locator('[data-testid="amount"]').click();
// Fill [placeholder="Amount"]
await page.locator('[data-testid="amount"]').fill(amount);
// Click #mui-2
await page.locator('[data-testid="note"]').click();
// Fill #mui-2
await page.locator('[data-testid="note"]').fill(note);

// save a screenshot of the cash form with inputs
await page.screenshot({ path: "src/tests/results/CREATE_CASH_STEP_1.png" });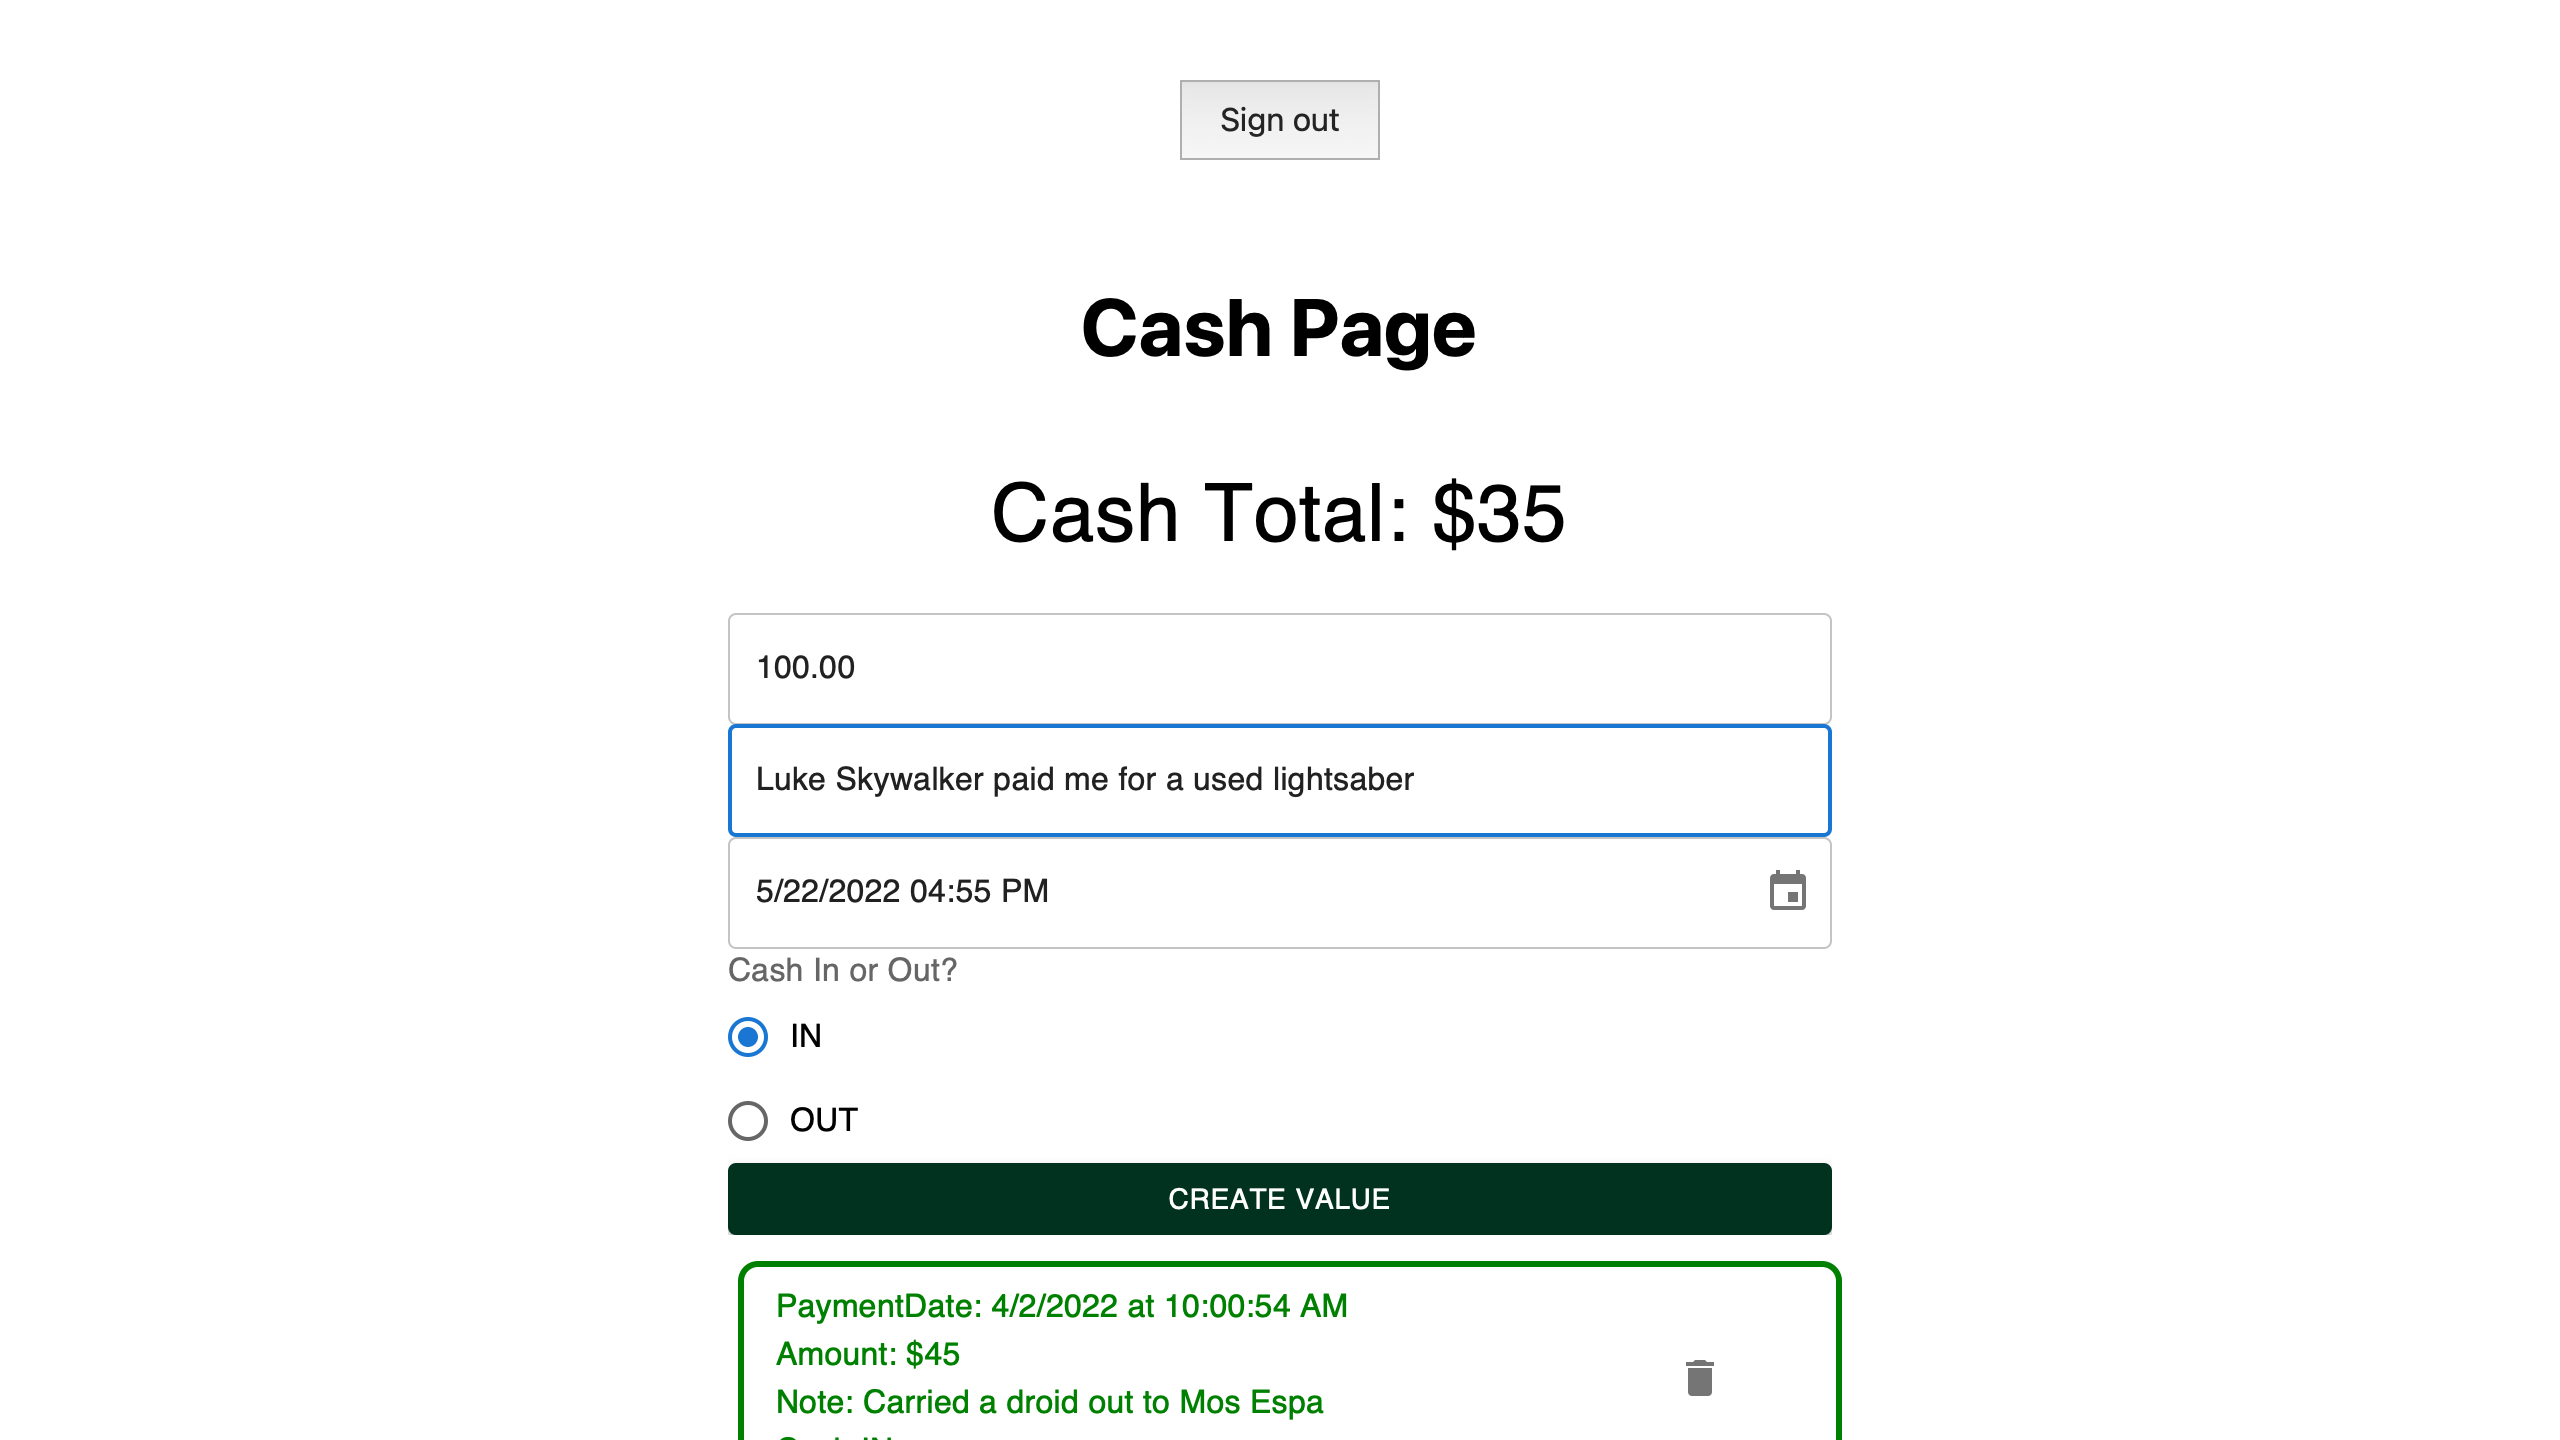
With videos, you just specify where you want to put them in the use entry in your playwright.config.ts file:
    use: {
        trace: 'on',
        video: 'on',
    },
Further improvements
So this is all cool, but I also wanted to mention that I automated a lot of these through some basic npm scripts:
        "e2e-headless": "npx playwright test",
        "e2e-headed": "npx playwright test --headed",
        "e2e-record": "concurrently \"npm run start\" \"npx playwright codegen\"",
        "e2e-report": "npx playwright show-report"
I used the npm package concurrently to run my app alongside the test recorder as well.
It works with anything
So as I mentioned in the first sections, I used this for a project at work. The reason we went with Playwright was because (1) it was super intuitive to setup and (2) we could easily add it alongside a somewhat nontraditional setup.
Since Playwright just runs alongside your project, you can really put it anywhere you’d have your package.json file. You can even run it on specific environments. This becomes powerful if you want to run it on a staging environment or QA setup etc.
Wrapping Up
So in conclusion, I really recommend you check out Playwright. Its been a blast to work with, and has really provided value to my projects. Plawyright is also sponsored by Microsoft, and you can check out their Git Repo here. I recommend checking that out as well as [their Getting started docs].
Thanks for reading my post, follow me on Twitter at @AndrewEvans0102.