
Deploy a React App with the AWS CDK
Deploying projects is often a challenge for teams and invidividuals. The AWS Cloud Development Kit (CDK) makes this easier through infastructure as code. Building on top of CloudFormation templates, the CDK makes it so developers can scaffold a project and build a resource stack. When compiled, CDK projects create CloudFormation templates that can then be deployed into your AWS account. In this post, I’m going to show how you can deploy a React App with the CDK. I recommend checking out my sample repo on GitHub to follow along.
Getting Started with the CDK
The AWS CDK is very robust and could definitley not be covered in the course of one blog post. However, there are some great docs and examples at the AWS CDK getting started page.
You can build CDK apps with several languages. I’m using TypeScript for this post. CDK “apps” are basically scaffolded projects that work with the aws-cdk CLI. You’ll see me refer to various commands in this post. I recommend reviewing the prerequistes section of the AWS docs before getting started.
As I stated in the intro, CDK apps generate CloudFormation templates that will then be used for deployments. These deployments create stacks that are a collection of resources. In the following sections, this is what I mean when I refer to a “stack.”
Using the AWS CDK is really nice because you can automate infrastructure and deployments, and is similar to what you see with technologies like Terraform.
The CDK has a broad set of constructs and functions that cover different things that you’ll build in AWS. I recommend checking out the full CDK API reference. I also recommend checking out the sample CDK projects on GitHub.
Setting up the CDK app
So with the background covered, I’m now going to walk through creating a CDK app that deploys a React project.
If you go ahead and clone my sample repo on GitHub, I’ve already setup both the React project and the CDK App. Before proceeding, I’m just going to walk through what I did to set it up.
First, make sure you’ve followed the preqrequistes as outlined in the CDK docs.
With the prereqs done, create a react project with create-react-app by running the following in a terminal:
npx create-react-app deploy-react-with-cdk --template typescriptBefore going further, we need to add a special location for where our React app’s built bundle will go. This will be used in the CDK app. Modify the package.json file build script to be the following:
"build": "BUILD_PATH='infra/resources/build' react-scripts build"With that change done, we now need to create a folder to house the CDK app. The CDK app can sit anywhere in your existing projects. One of the best parts is that it can sit alongside your running application code. Many times you see a convention to create a “cdk” folder, but you can name the folder whatever you want. In this case I’m naming my folder “infra”. Create an folder named “infra” at the root of the project.
Once I create the infra folder, then I run the CDK init command to scaffold the app:
cd infra
cdk init app --language typescript
When that finishes, you should have a project that looks similar to the following:
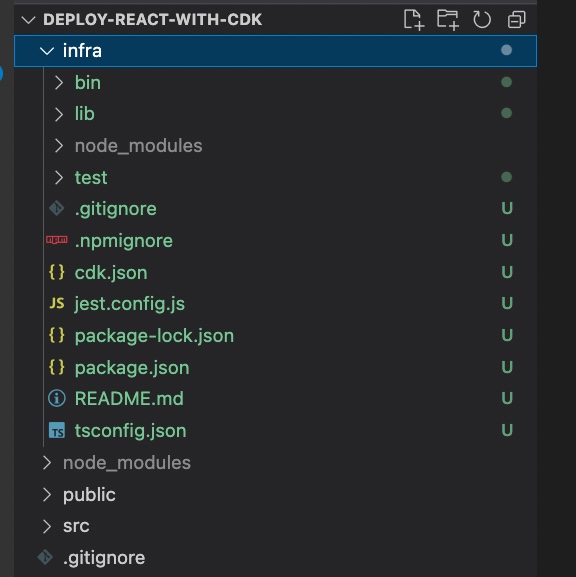
With that setup, the next thing I usually do is create an output directory for the TypeScript compiler. This is to avoid having the compiled JS files appear next to the TS files as I’m doing my work. This is by no means required, but it does make development easier. To do this I modified my infra/tsconfig.json file to include an “outDir” setting and also put this same folder in the exclude values so that the compiled project output won’t be touched when you run tsc on the project:
{
  "compilerOptions": {
    "target": "ES2018",
    "module": "commonjs",
    "lib": ["es2018"],
    "declaration": true,
    "strict": true,
    "noImplicitAny": true,
    "strictNullChecks": true,
    "noImplicitThis": true,
    "alwaysStrict": true,
    "noUnusedLocals": false,
    "noUnusedParameters": false,
    "noImplicitReturns": true,
    "noFallthroughCasesInSwitch": false,
    "inlineSourceMap": true,
    "inlineSources": true,
    "experimentalDecorators": true,
    "strictPropertyInitialization": false,
    "typeRoots": ["./node_modules/@types"],
    "outDir": "InfraBuild"
  },
  "exclude": ["node_modules", "cdk.out", "InfraBuild"]
}
Additionally, we’re going to add two npm scripts that we’ll use later when we call the CDK CLI. Add the following two npm scripts to the CDK app’s package.json file:
"cdk-synth": "cdk synth",
"cdk-deploy": "cdk deploy"
Now with that setup, we can start building our app.
Building the CDK App
So the app we want to build basically will deploy a React project as a static site that sits in S3 behind a CloudFront Distribution. If you’re new to AWS, CloudFront is AWS’ Content Distribution Network (CDN).
CDN’s offer great performance benefits as they can cache resources instead of making full requests from the CDN to the origin when users access a website. By pointing the CDN to an S3 bucket you can host a website serverless. CloudFront does the routing work for you, and you can build rules to access your site including specific Web Application Firewall (WAF) rules if needed. CDN’s are really cool and I highly recommend checking out more on them at AWS.
What we hope to accomplish with this project is the following:

Please note that this diagram is necessarily simple since we are just doing a basic deployment. In a real production application, you would normally also include Route 53 to do routing for a domain to your CloudFront distribution.
In addition to the setup here, you would also typically create an Origin Access Identity (OAI) to control access to your S3 bucket. This enables you to lock down parts of your bucket if you wanted to have privileged access etc.
If we go back to the scaffolded code earlier, you’ll notice a bin and a lib folder. The bin folder has a infra.ts file, and the lib folder has a infra-stack.ts file.
- The
bin/infra.tsfile is where the CLI will read the code and generate the CloudFormation Templates and eventually build the stack - The
lib/infra-stack.tsfile is where your stack is defined.
The AWS best practices recommend that you build a Construct for the different parts of your application that can be reused in this stack (or even additional stacks). So to do this, lets create a file called lib/deployment-service.ts. Inside deployment-service.ts add the following:
import { Construct } from 'constructs';
import { CfnOutput, RemovalPolicy } from 'aws-cdk-lib';
import { Distribution, ViewerProtocolPolicy } from 'aws-cdk-lib/aws-cloudfront';
import { S3Origin } from 'aws-cdk-lib/aws-cloudfront-origins';
import { BlockPublicAccess, Bucket } from 'aws-cdk-lib/aws-s3';
import { BucketDeployment, Source } from 'aws-cdk-lib/aws-s3-deployment';

const path = './resources/build';

export class DeploymentService extends Construct {
    constructor(scope: Construct, id: string) {
        super(scope, id);

        const hostingBucket = new Bucket(this, 'FrontendBucket', {
            autoDeleteObjects: true,
            blockPublicAccess: BlockPublicAccess.BLOCK_ALL,
            removalPolicy: RemovalPolicy.DESTROY,
        });

        const distribution = new Distribution(this, 'CloudfrontDistribution', {
            defaultBehavior: {
                origin: new S3Origin(hostingBucket),
                viewerProtocolPolicy: ViewerProtocolPolicy.REDIRECT_TO_HTTPS,
            },
            defaultRootObject: 'index.html',
            errorResponses: [
                {
                    httpStatus: 404,
                    responseHttpStatus: 200,
                    responsePagePath: '/index.html',
                },
            ],
        });

        new BucketDeployment(this, 'BucketDeployment', {
            sources: [Source.asset(path)],
            destinationBucket: hostingBucket,
            distribution,
            distributionPaths: ['/*'],
        });

        new CfnOutput(this, 'CloudFrontURL', {
            value: distribution.domainName,
            description: 'The distribution URL',
            exportName: 'CloudfrontURL',
        });

        new CfnOutput(this, 'BucketName', {
            value: hostingBucket.bucketName,
            description: 'The name of the S3 bucket',
            exportName: 'BucketName',
        });
    }
}
So lets talk about this file. First notice that the class that we are creating extends the AWS Construct object. This is generally a best practices as Constructs are what compose a Stack.
Also, notice before the class definition we have defined a path as:
const path = "./resources/build";This is going to be where our react project’s built output goes. If you remember, we added that right after we initially created the react app in the npm build script.
Second, the first thing we do is create an S3 bucket with the following:
const hostingBucket = new Bucket(this, "FrontendBucket", {
  autoDeleteObjects: true,
  blockPublicAccess: BlockPublicAccess.BLOCK_ALL,
  removalPolicy: RemovalPolicy.DESTROY,
});
The S3 bucket will hold our built React application.
Note the next thing we do is create our CloudFront distribution:
const distribution = new Distribution(this, "CloudfrontDistribution", {
  defaultBehavior: {
    origin: new S3Origin(hostingBucket, { originAccessIdentity }),
    viewerProtocolPolicy: ViewerProtocolPolicy.REDIRECT_TO_HTTPS,
  },
  defaultRootObject: "index.html",
  errorResponses: [
    {
      httpStatus: 404,
      responseHttpStatus: 200,
      responsePagePath: "/index.html",
    },
  ],
});
This CloudFront distribution will create the CDN that connects to our S3 bucket. Notice that it marks the default object as index.html as that is the entrypoint of the built application. Also note that there are fields for error responses and default behavior. These behaviors can be tweaked, but generally define what happens when a user accesses the CloudFront distribution.
Finally, we create the full deployment to S3 with the distribution with:
new BucketDeployment(this, "BucketDeployment", {
  sources: [Source.asset(path)],
  destinationBucket: hostingBucket,
  distribution,
  distributionPaths: ["/*"],
});
This BucketDeployment object encapsulates the full process of:
- copying a built react project into S3
- clearing a CDN cache so only the newest deployed site is pulled
Notice the sources attribute is set to the built React project via that path variable. Also note that there is a distributionPaths parameter passed at the end. By passing [/*] to the distributionPaths parameter we are telling the CDK to clear out the CDN’s cache on deployment. This is important, because if you did not do this, then cached files may be incorrectly served by the CDN until they expire.
Having the BucketDeployment object is really nice because all of this is done in just these few lines of code. The alternate way to do this would be to use the AWS CLI to do this in the terminal via the sync command. You could also manually do this in the AWS console.
The last part of this file outputs things that are generated from the CDK app:
new CfnOutput(this, "CloudFrontURL", {
  value: distribution.domainName,
  description: "The distribution URL",
  exportName: "CloudfrontURL",
});

new CfnOutput(this, "BucketName", {
  value: hostingBucket.bucketName,
  description: "The name of the S3 bucket",
  exportName: "BucketName",
});
With all of this in place, the last part is to add this newly created construct to our Stack definition. First, lets rename lib/infra-stack.ts to be lib/deploy-react-app-stack.ts to align with the name of what we’re doing. Additionally modify lib/deploy-react-app-stack to be the following:
import * as cdk from 'aws-cdk-lib';
import { Construct } from 'constructs';
import { DeploymentService } from './deployment-service';

export class DeployReactAppStack extends cdk.Stack {
    constructor(scope: Construct, id: string, props?: cdk.StackProps) {
        super(scope, id, props);

        new DeploymentService(this, 'deployment');
    }
}
We will also need to update the bin/infra.ts file to include the renamed stack name. So change bin/infra to be:
#!/usr/bin/env node
import "source-map-support/register";
import * as cdk from "aws-cdk-lib";
import { DeployReactAppStack } from "../lib/deploy-react-app-stack";
const app = new cdk.App();
new DeployReactAppStack(app, "DeployReactAppStack", {
/* If you don't specify 'env', this stack will be environment-agnostic.
* Account/Region-dependent features and context lookups will not work,
* but a single synthesized template can be deployed anywhere. */
/* Uncomment the next line to specialize this stack for the AWS Account
* and Region that are implied by the current CLI configuration. */
// env: { account: process.env.CDK_DEFAULT_ACCOUNT, region: process.env.CDK_DEFAULT_REGION },
/* Uncomment the next line if you know exactly what Account and Region you
* want to deploy the stack to. */
// env: { account: '123456789012', region: 'us-east-1' },
/* For more information, see https://docs.aws.amazon.com/cdk/latest/guide/environments.html */
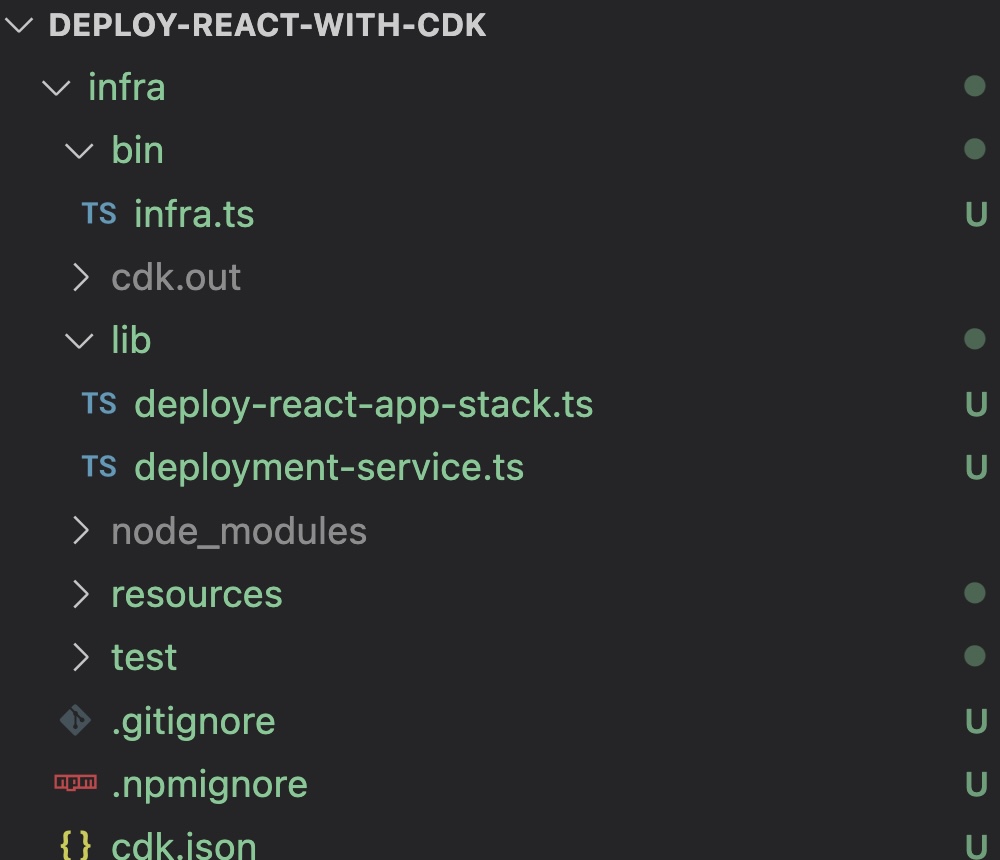
});The last step is to add a resources folder inside the infra folder. This will house our built react app. A common convention you see with CDK apps is to have a resources folder that houses reusable functions and other objects that the constructs may use.
When we’re done, your CDK app folder should look like the following:
Deploying the full Project
So now we have all the pieces ready to go for our project. Assuming that you’ve already got the AWS CLI setup and the CDK CLI installed, we can proceed.
Some common commands you see with CDK apps is cdk synth, cdk deploy, cdk remove.
cdk synthcreates the CloudFormation template that you will usecdk deployactually runs the CloudFormation template
I usually like to script all of this out so I can do it one command. Open the package.json file at the root of your project and add the following script:
"deploy": "npm install && npm run build && cd infra && npm install && npm run cdk-synth && npm run cdk-deploy"Now with this all setup, you should be good to go ahead and run npm run deploy and watch the CDK build and deploy your app!
The first thing you’ll notice is that you’ll be shown a screen that includes questions about IAM Policies. This outlines any security changes that you’re looking to create:
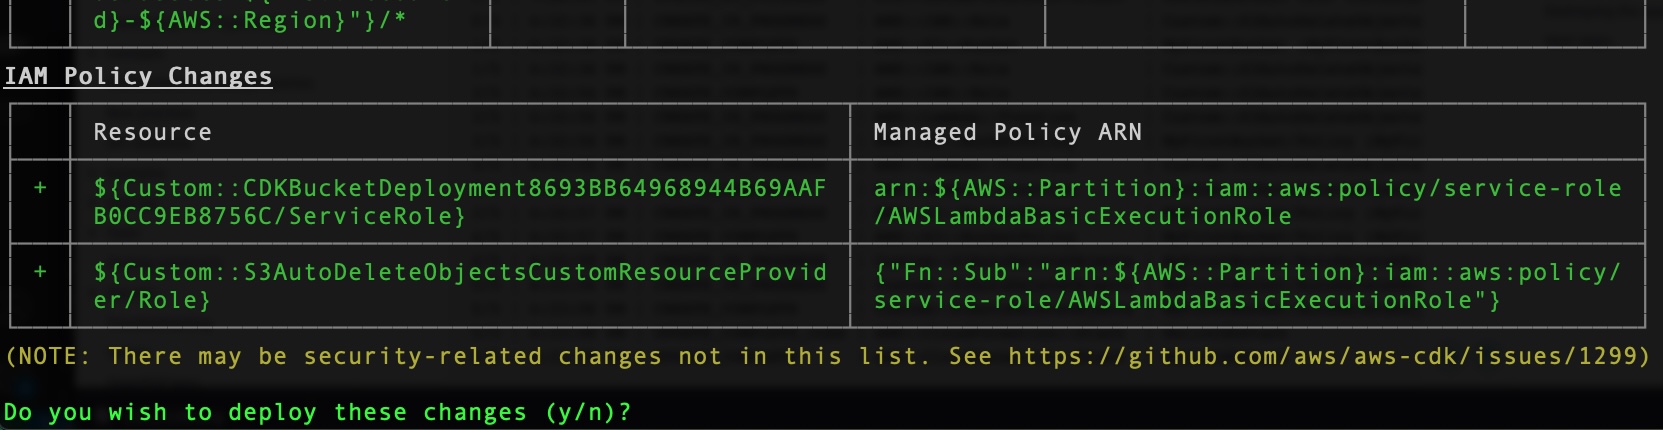
Type “y” to accept the changes and the deployment will begin. From here you should see output from the stack showing progress:

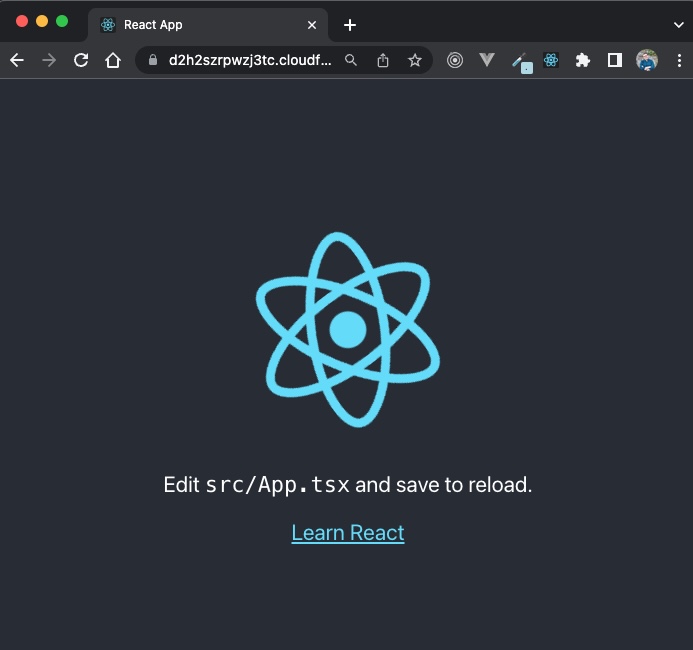
When the deployment completes, you’ll see the Cloudfront URL output. Go ahead and paste that into a browser and you’ll see your React App!

Showing the CDN Cache Clear
So one last thing that you could do is to show the CDN cache clearing. If you modify the src/App.tsx file to be the following:
import React from "react";
import logo from "./logo.svg";
import "./App.css";

function App() {
  return <h1>Hello!</h1>;
}

export default App;
Now run npm run deploy again and you’ll see the CDK app deploying updates to your stack.
When the updates complete, open up the CloudFront URL and you should see your changes deployed.
Cleaning Up
From here you can build out more on your React app, or if you’re done you can delete your stack directly from the CDK. Go to the “infra” folder in your terminal and run the following:
cdk destroy
Type “y” to accept the destroy command, and AWS will destroy your stack and remove the created resources.

Wrapping Up
In this post I walked through how to deploy a React app with the AWS CDK. I introduced the AWS CDK and showed how you can easily add it to your React projects. I encourage you to check out the documentation on the AWS CDK and try it on your next project.