
Upgrading Rhythm and Binary
Please note that RhythmAndBinary.com no longer exists as of 08/14/2023. I have since moved the posts to andrewevans.dev.
I recently upgraded this site (rhythmandbinary.com) and learned a lot in the process. This post covers my experience and some of the things I learned.
Upgrading Packages
This step is fairly straightforward as I basically just upgraded the packages the project uses. The NextJS docs do a great job of walking you through upgrading to the newer versions of NextJS. Most of this was just doing things like this:
npm i next@latest react@latest react-dom@latest eslint-config-next@latestI actually went from next 10.0.5 to 12.3.4. I went with version 12 since 13 is the newest and I wanted to give it some more time before I fully adopted it.
When doing the upgrade, I only ran into a few small issues with the remark and remark-html packages as they had done updates to the way they exported their modules so I’d have to do things like:
// original
import remark from "remark";

// upgraded
import { remark } from "remark";
I was also pretty surprised because just upgrading the NextJS packages (and react) resulted in no real issues. I’ve been on projects where package upgrades forced you to make breaking changes to an existing application, but in this case everything was fine.
Adding TypeScript
I’ve become a pretty big fan of TypeScript and wanted to upgrade this project from JavaScript to TypeScript. NextJS made this super easy because they have their CLI set to automatically detect a tsconfig.json file (check out more about on their docs). All I had to do was add a tsconfig.json file to the project root, then run npm run dev which runs the project locally (just “next” if you run it without the npm script) and the CLI told me what to do after that.
The instructions just had me install Typescript along with some types for the packages I was using. If you’d like to see what NextJS looks like when you do this check out their docs. Most of the work from here was just me updating each .js file into a .ts file.
I created types for most of the associated fields that I passed between components. This work was incremental as I had to identify the fields that I was passing between the different pages. I ended up grouping the types and interfaces into Post values and Prop values. The Post values are used as the post information is passed between components, and the Prop values were specific to each of the “page” components.
Here are some examples from the post interfaces I created:
export interface PostContent {
    title: string;
    pubDate: string;
    sorted: number;
    slug: string;
    content: string;
    snippet: string;
    heroImage: string;
}

export interface TotalPost {
    index: number;
    page: PostContent[];
    selected: boolean;
}
Here are some examples from the page props I created:
export interface PreivewPageProps {
    page: PostPage;
}

export interface HomePageProps {
    postPages: TotalPost[];
}
When you upgrade a JavaScript project to TypeScript, one of the best parts is that you can do it incrementally. So you can install the types etc. and not break things all at once. I basically just went file by file, and then created types accordingly. The end result was cleaner components, and I had a better idea of how data was structured when making changes.
Improving Performance
It had been a while since I had worked on the internals of my site. I thought this was a great opportunity to review how the site was working, and ways I could improve it.
If you’re not familiar with NextJS, basically it provides a lot of ways to optimize rendering of your projects. You can do this either clientside with prerendering, or you can do Server Side Rendering (SSR) where content is loaded on each page request. The prerendering functionality creates HTML pages at build time, and minimimizes the JavaScript that has to be interpreted when pages load. Prerendering improves load times and Search Engine Optimization (SEO) as the prerendered content is easier for webcrawlers to find.
NextJS has an API of functions that run at build time to do the prerendering. I make use of the getStaticProps and getStaticPaths to retrieve and render HTML content at build. The content that that makes up my site is mainly markdown files, so within getStaticProps and getStaticPaths I have logic that retrieves the files from disk (locally) and then converts it into HTML files that will be part of the finished build. This is pretty cool because when combined with code splitting, this makes each page load pretty fast. It also lets me make my project’s repo serve as a content manager in lieu of having to use a DB like in traditional CMS systems.
In my project my call to getStaticPaths creates the list of paths that the site has, and then getStaticProps generates the HTML content that will be displayed on the pages. The following is basically what I have setup:
// get static paths runs first to determine all possible routes
// https://nextjs.org/docs/basic-features/data-fetching/get-static-paths
export async function getStaticPaths() {
    const slugs: string[] = getPostSlugs().map((slug) => {
        return formatSlug(slug);
    });

    return {
        paths: slugs.map((slugValue: any) => {
            return {
                params: {
                    id: slugValue,
                },
            };
        }),
        fallback: false,
    };
}

// get static props runs with the paths returned from getStaticPaths to prerender pages
export async function getStaticProps(context: GetStaticPropsContext) {
    const post: any = getPostBySlug(context.params.id, PostFields);
    const content = await markdownToHtml(post.content || '');

    return {
        props: {
            post: {
                ...post,
                content,
            },
        },
    };
}
The function getPostSlugs and getPostBySlug retrieve the files from the local file system, and also converts the markdown files into HTML. The result is an array of data that is used on the pages components:
export function getPostBySlug(
    slug: string,
    fields: fieldName[] = []
): PostSlug {
    const realSlug = formatSlug(slug);
    const fullPath = join(postsDirectory, `${realSlug}.md`);
    const fileContents = fs.readFileSync(fullPath, 'utf8');
    const { data, content } = matter(fileContents);
    const { title, date, heroImage, snippet } = data;

    return {
        title,
        pubDate: format(new Date(date), 'MMMM d, yyyy'),
        sorted: getTime(new Date(date)),
        slug: realSlug,
        content: fields.includes('content') ? content : null,
        heroImage: fields.includes('heroImage') ? heroImage : null,
        snippet,
    };
}
The markdownToHtml uses remark and remark-html to convert the markdown content into HTML. To do the actual markdown to HTML conversion, I recommend checking out the example in the NextJS blog starter.
When you run the site locally, the NextJS compiler also reports on page performance if there is a large amount of content generated. I saw this message on my HomePage and found that I was retrieving all of the data for my posts in the getStaticProps function, when I really just needed things like the title for that page.

I adjust the fields I passed in to the prerendering functions, and this made the size of the page much smaller and faster to load. Despite the large amount of content on a blog site, the combination of code splitting and prerendering make page loads very performant. I really like this because I can keep my content in static files without having to rely on a database or some other mechanism to store everything.
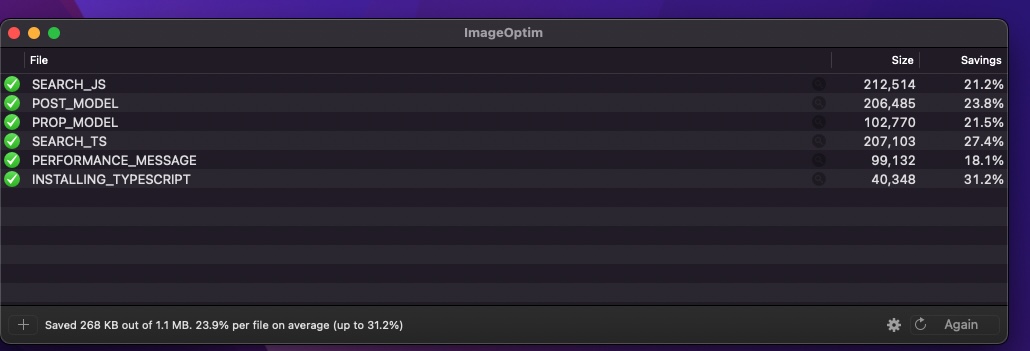
Optimizing Images
Additionally, I also realized that I had not optimized the images that I use on my posts. I found a free tool called ImageOptim that did most of this work for me, and actually removed about 50MB of the total site’s generated content. This was really great as it made images smaller and easier to load and improved the user experience greatly.
To use ImageOptim, you basically just install it and then run it on your pictures directory. Here is a screenshots of ImageOptim in action:
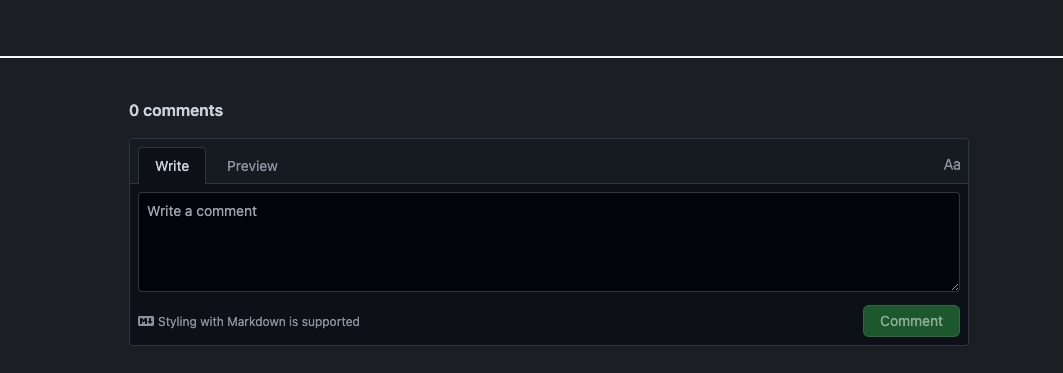
Adding Commenting
In the older version of my project I had a custom implementation of a commenting system. Unfortunatley, this was error prone and I realized that I was looking for a simpler solution. After some googling, I found GitHub Discussions and giscus. After following the steps laid out in How to use GitHub Discussions as Your Blog’s Chat System I was able to connect a repo with my site and wire up a pretty simple discussion system.
Basically, the giscus widget displays a component at the bottom of the page that allows users to comment. The widget has an ID that connects the url with the discussion, and basically allows a nice clean discussion component that you can put at the bottom of your pages. This is free and super easy to setup. I was very happy with how it worked out.
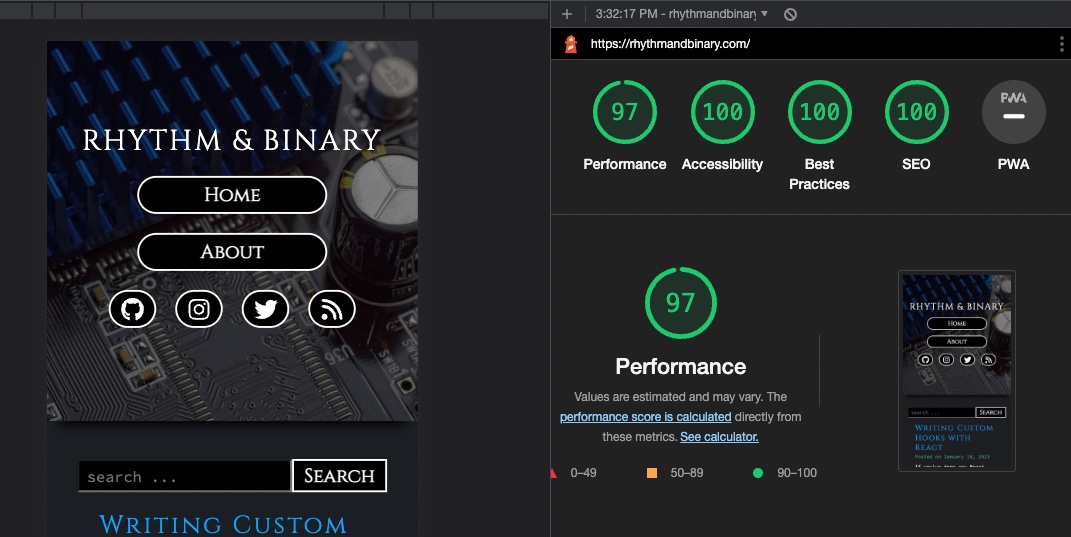
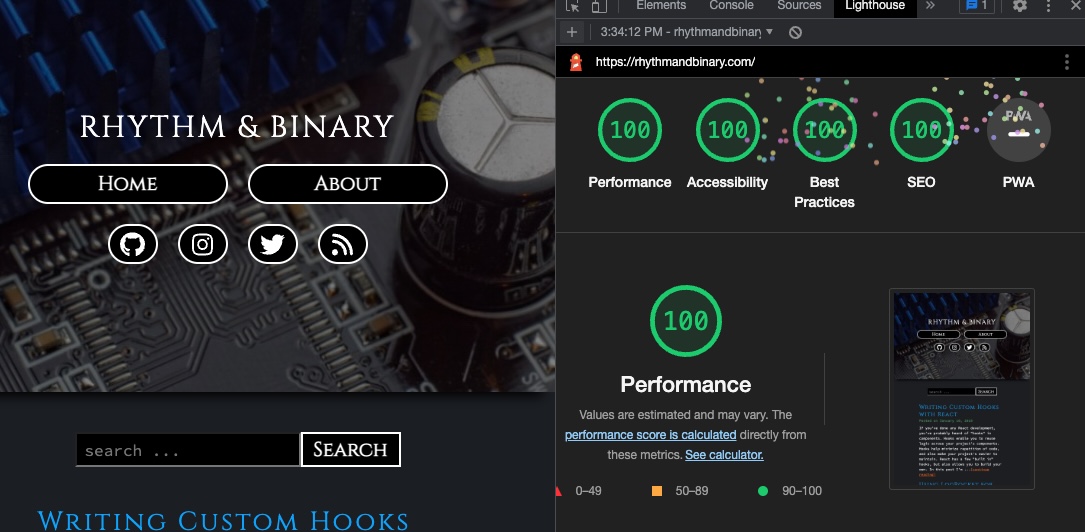
LightHouse Scores
There are several ways you can measure a site’s performance. Other than the stuff I was doing with the NextJS compiler, I also ran the site through lighthouse. I was super happy to have postive results in both the mobile and desktop runs. I thought it was cool too because the 100% across the board on the desktop made fireworks appear at the top in the Chrome extension. This score is great proof that the combination of what I did in the above sections resulted in strong performance.
Lighthouse scores on mobile:
Lighthouse scores on desktop (with fireworks 🎉🎉):
Wrapping Up
One of the best parts of maintaining your own projects is being able to improve them over time. I’ve gone through a few iterations of rhythmandbinary.com, and am very happy with how everything has turned out. The upgrade process was fun as I cleaned up a lot of code that either I wasn’t using or was not performing well. I also learned a few things in the process about NextJS and how to leverage their tools for the best performance.