
Azure Service Bus Intro
Azure Service Bus is a powerful technology that I’ve been able to work with lately. I wanted to write a post to cover the basics of how it works, and also have an example pattern that can be used in projects. This post will cover a high level of how Azure Service Bus works, and then I’ll share a small project I created that uses it.
What is Azure Service bus?
Azure Service Bus is a managed messaging service that applications can use to manage application workflows and distributed systems. A simpler explanation is that Azure Service Bus is a service that manages how parts of an application communicate. If you are familiar with AWS SQS Queues they are fairly similar. Azure Service Bus offers a slightly different approach, but the overall concepts are the same.
Azure Service Bus uses a queue to intake messages which can then be received by a consuming application. The actual message is a container with data in a structured format like JSON, XML, and others. On a very basic level, one would normally have a producing application that writes the messages to a queue, and then a consuming application that receives the messages and removes them from a queue.
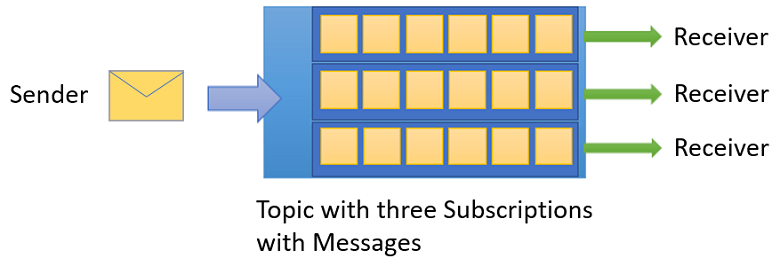
There are a lot of different options when using Azure Service Bus, but the two overall methods are Queues and Topics. A Queue is basically what was described above, and essentially takes in messages that are later consumed. A Topic follows a publish/subscriber model where a message that is sent is then passed onto any subscribing application.
When creating an Azure Service Bus instance, you create a namespace which is a container for all of your messages. You can have multiple queues and topics within the same namespace.
If messages are unable to be sent to any receiver they go to the Dead Letter Queue (DLQ) which is a secondary subqueue within your instance of Azure Service Bus. When messages go to the DLQ, you can inspect them and remove them when you want to.
The Microsoft Azure Service Bus overview page has some great visuals for these concepts.
Here is a visual for the Queue (image credit).

Here is a visual for the Topic (image credit).
Patterns to use with Azure Service Bus
Azure Service Bus lends itself nicely to distributed systems. Distributed systems here meaning an application that is composed of several connected parts. Azure Service Bus lets you manage the interactions, and also help to balance loads if you have many client applications attempting to do a business process.
The Azure Documentation has an article on how the Service Bus implements the Compensating Transaction pattern.
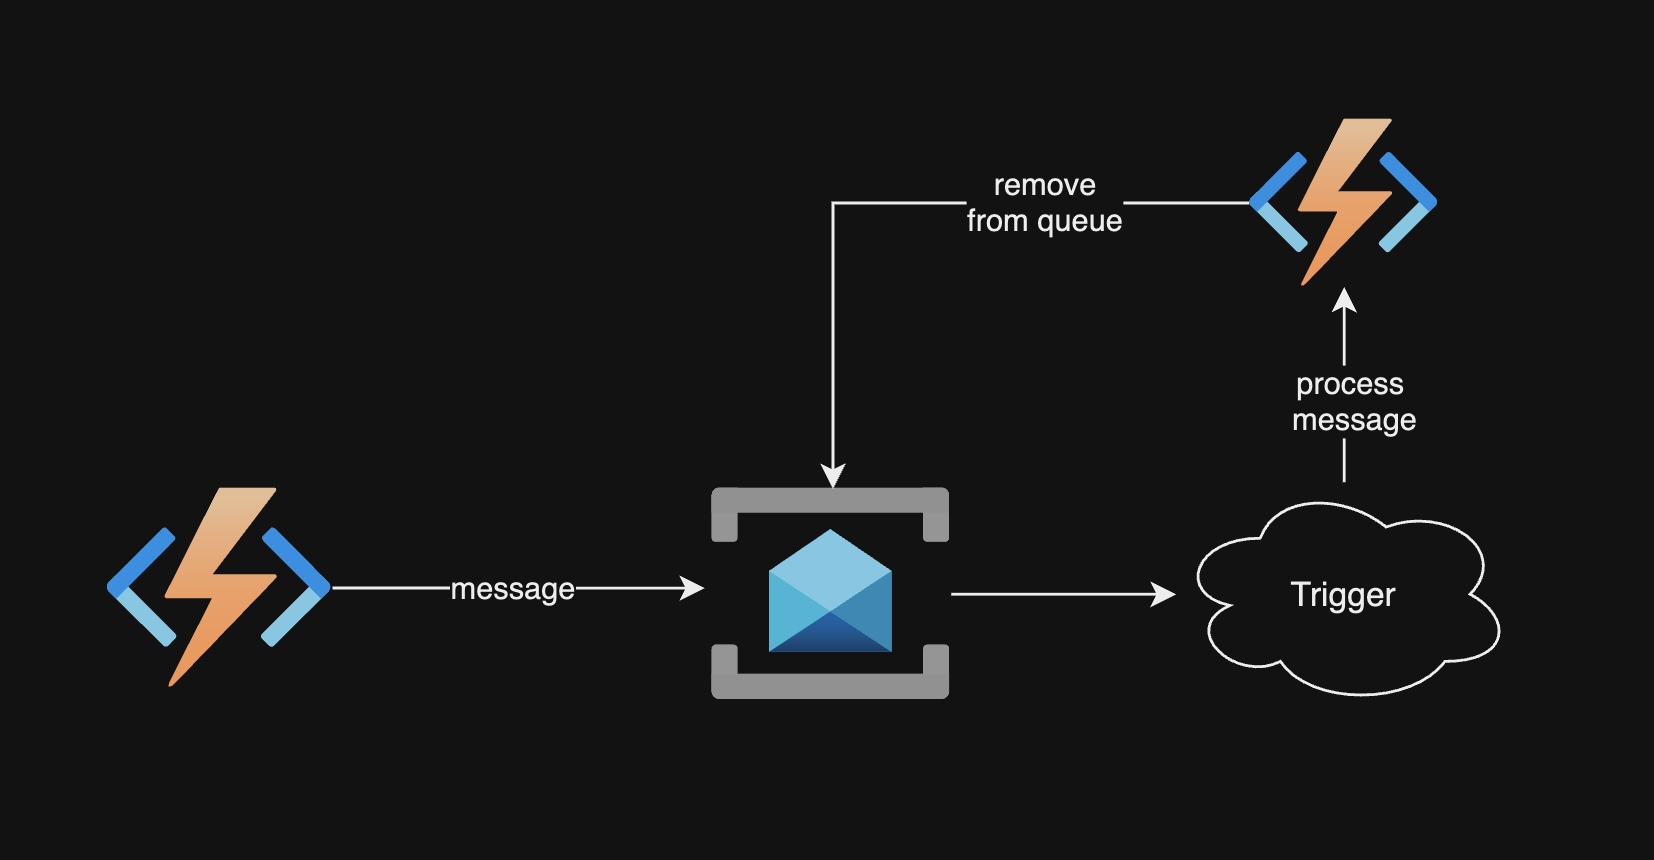
As I stated in the earlier sections, you would typically have something that (1) produces messages and sends them to a queue and (2) a consumer that acts on those messages via a trigger. The consumer can remove the message from a queue, or just read in the message. This is a powerful feature in the case that you have many consumers needing to see a message simultaneously.
In general, use of the queue in the Azure Service Bus allows for async interactions (or interactions that do not have to happen simultaneously). This means that all pieces of your application do not have to be “online” at the same time when moving through a business process.
Additionally, you can also defer messages that are sent into a queue. This can be great for application throttling.
Other features of Azure Service Bus include:
- grouping operations into a transaction so that multiple things happen on the same message
- scheduled delivery
- auto forwarding
- message filtering
- auto delete of messages
- duplicate detection of messages
- much more
A very common pattern is to have a mechanism like an azure function to send a message to a queue and then have an Azure Service Bus trigger send the message received to another azure function for processing.
In the next section I’ll show an example based on one of the Microsoft Tutorials. This will showcase how to interact with the Azure Service Bus in code.
A Simple Queue Example
The following example is very simple, but shows what the code looks like and how you can trace messages passed between a producer and a consumer. The examples in this section are with .NET C#, but you can also do the same with Java, JavaScript, and Python(see tutorial).
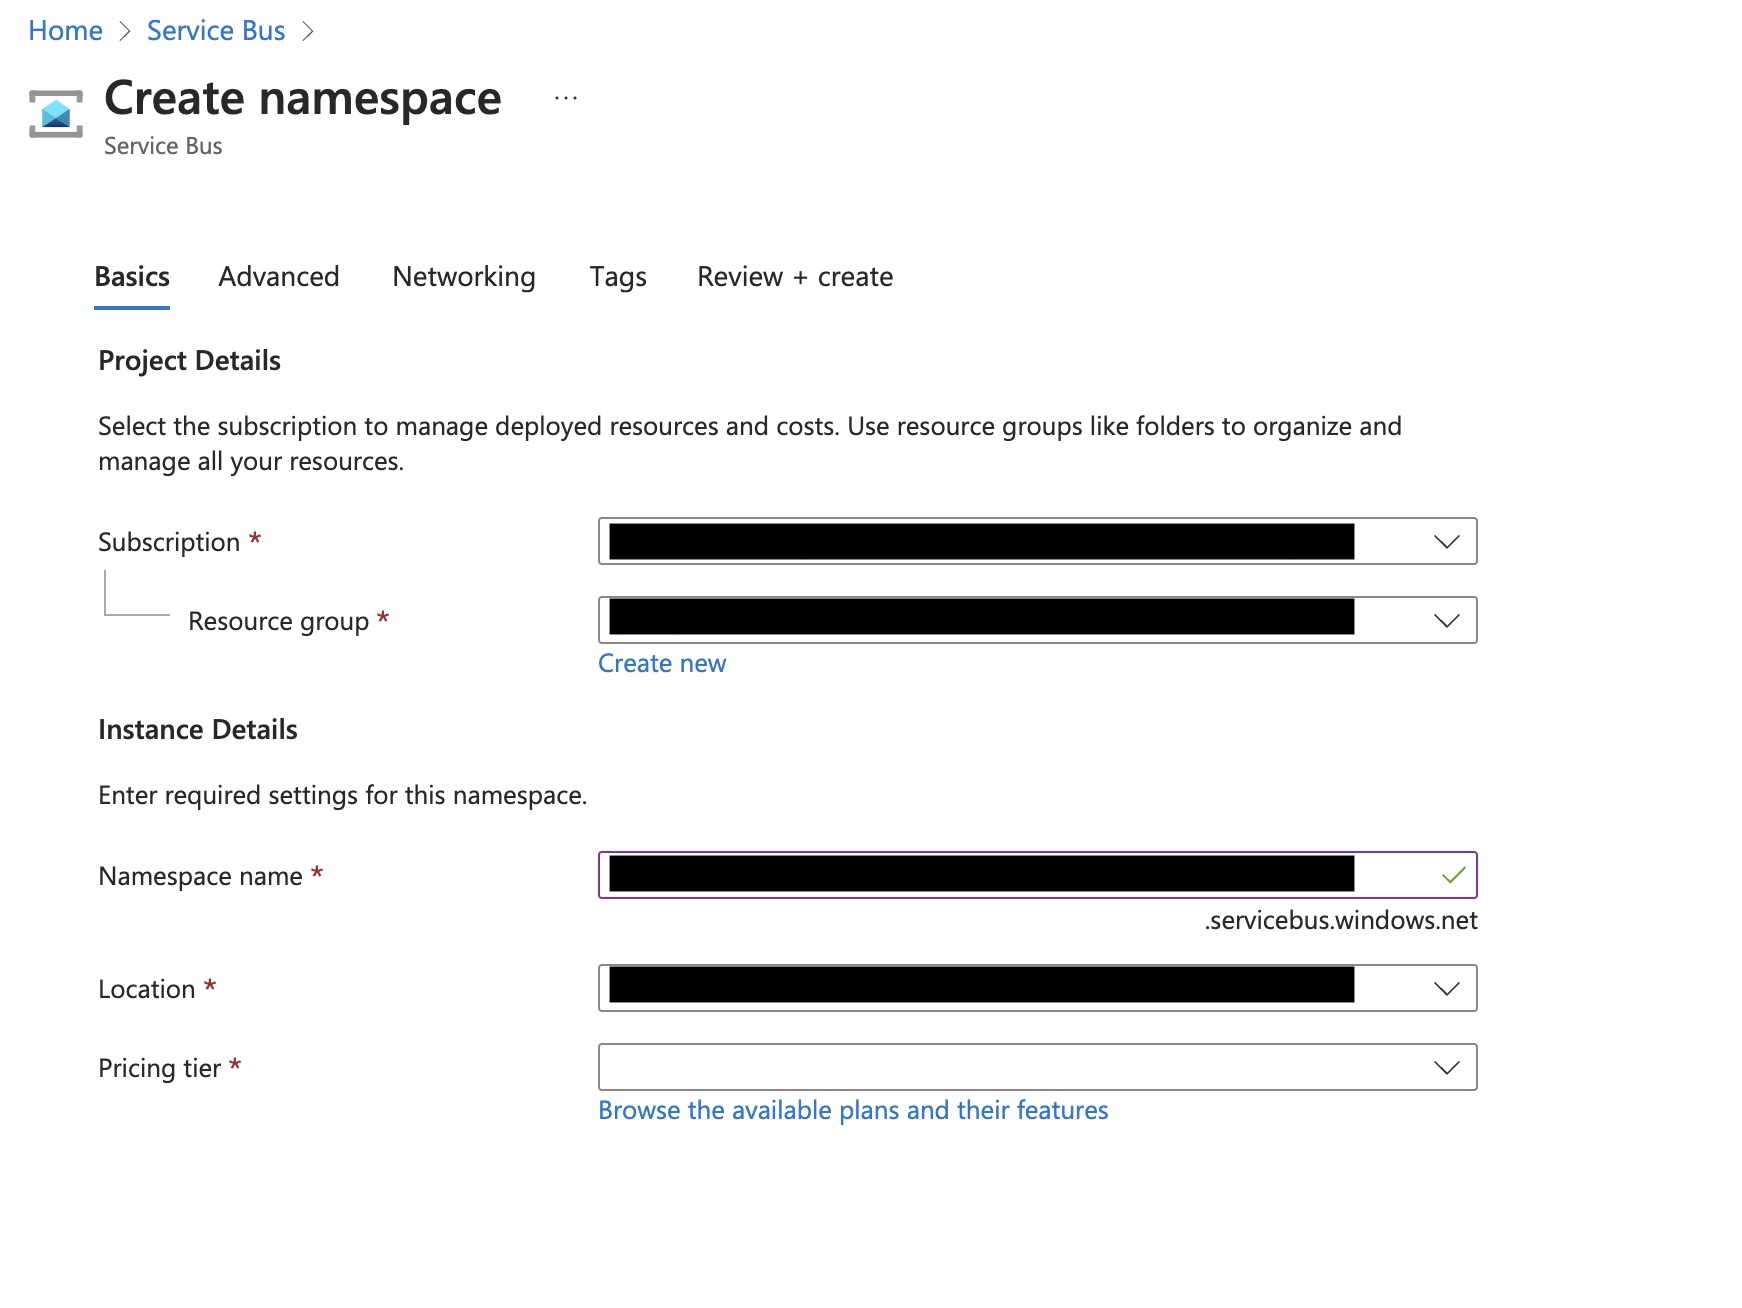
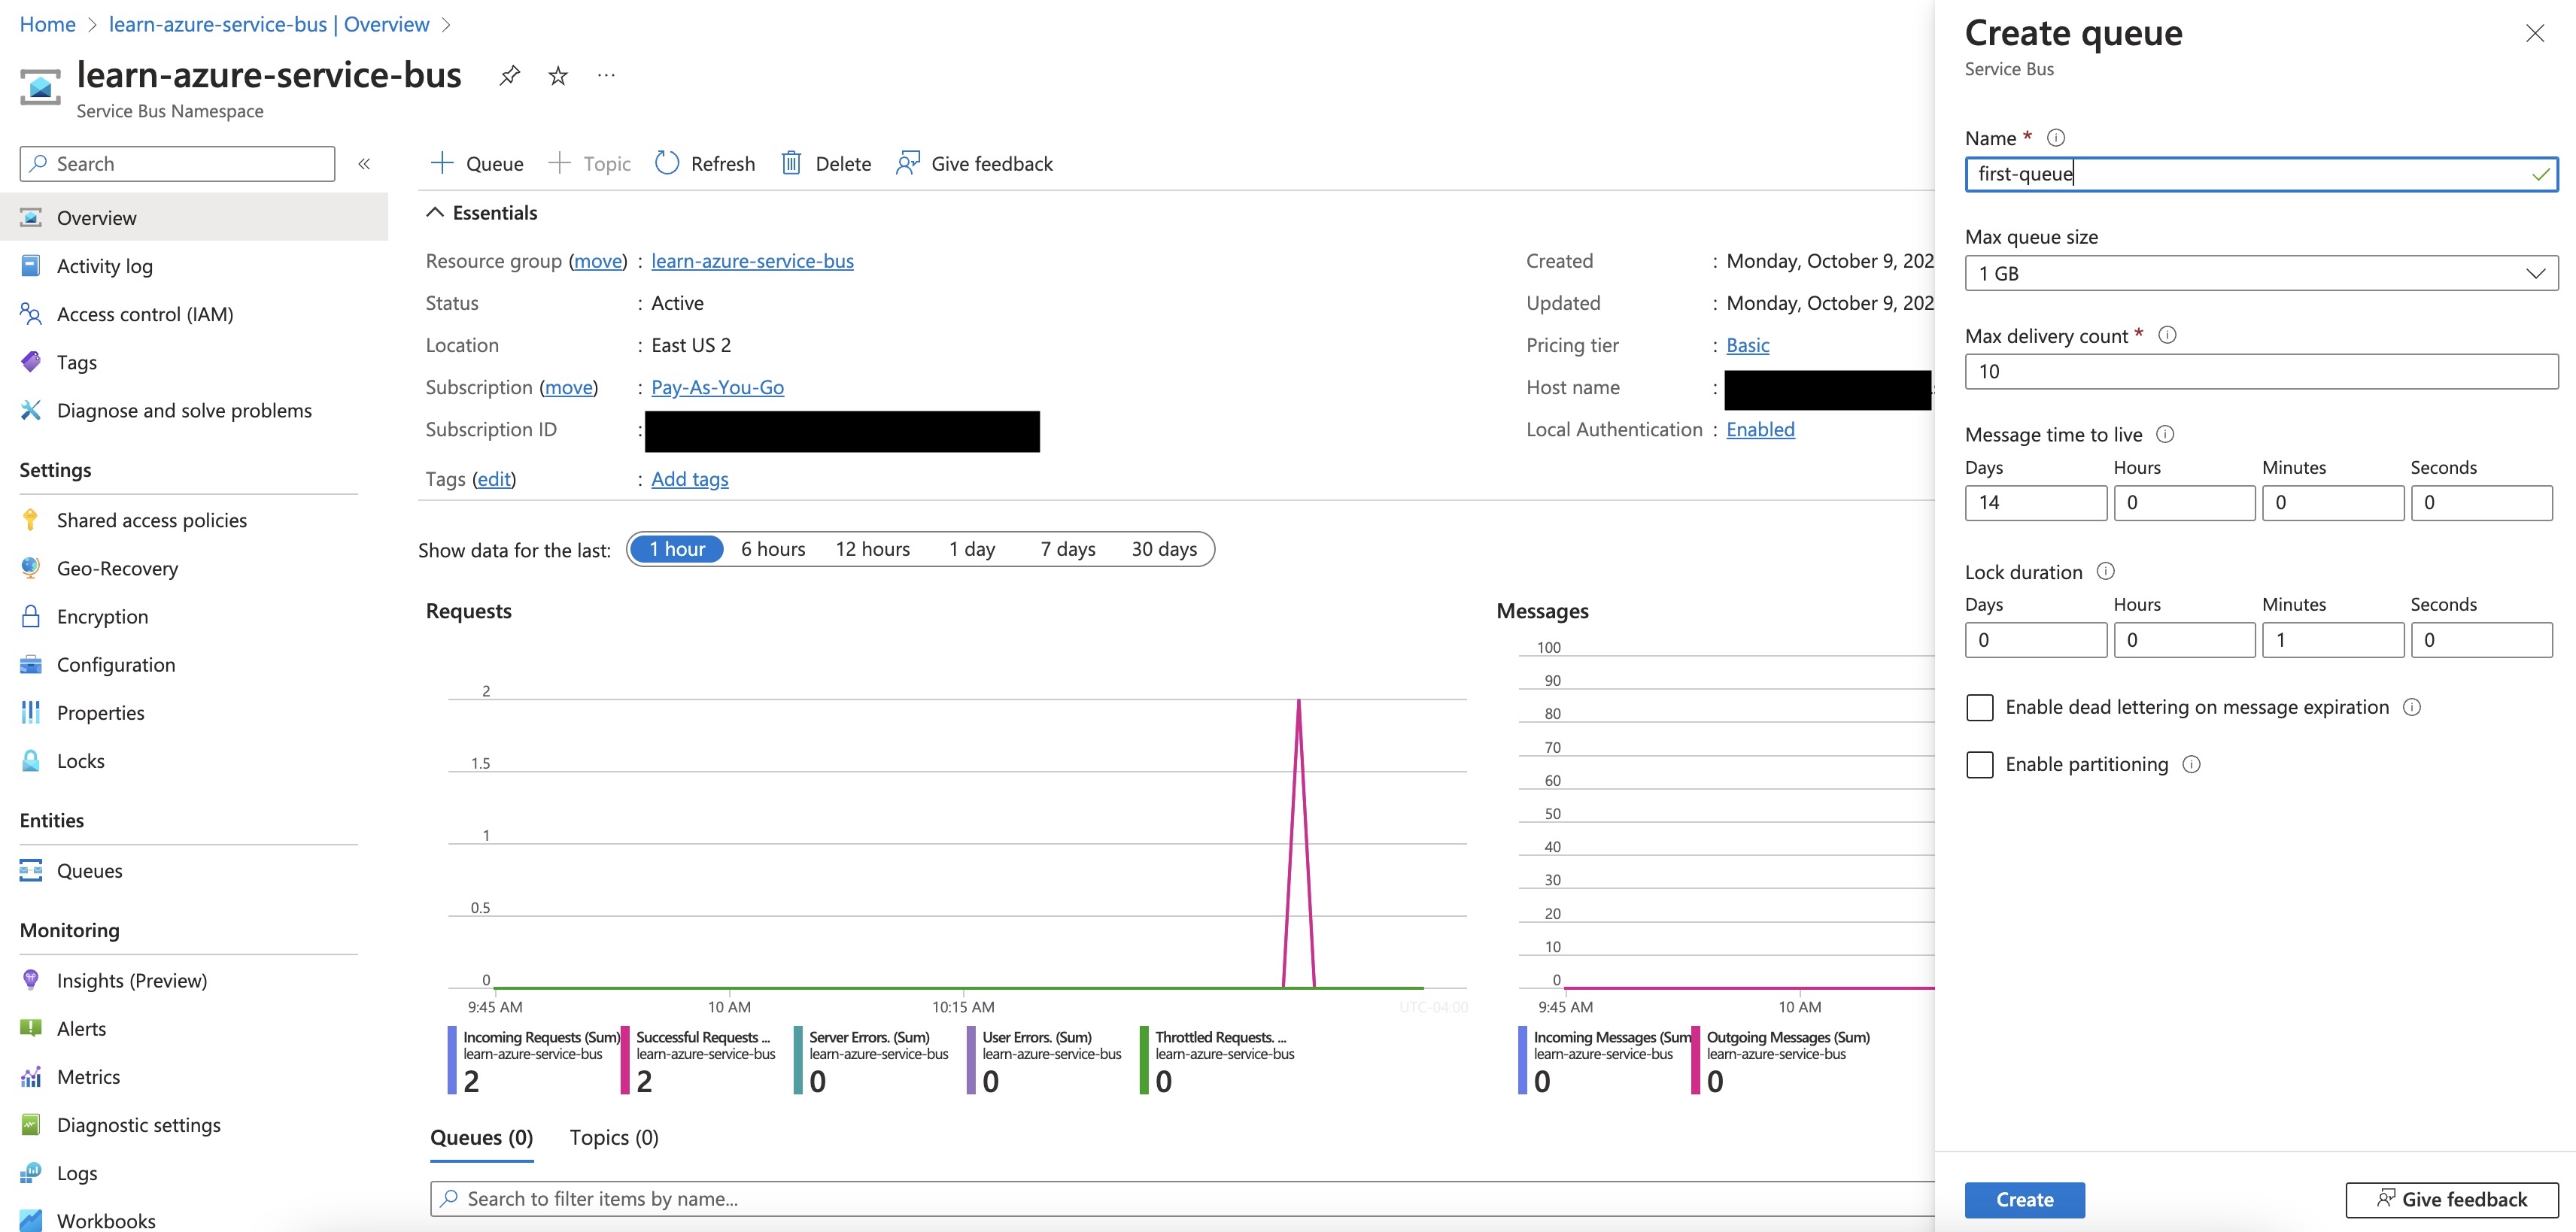
First, go create an Azure Service Bus Queue in the Azure Portal. To do this, you just need to create the service. The fields in the create screen are self explanatory. When I did this example I picked the Basic pricing tier, but its up to whatever your project needs are.
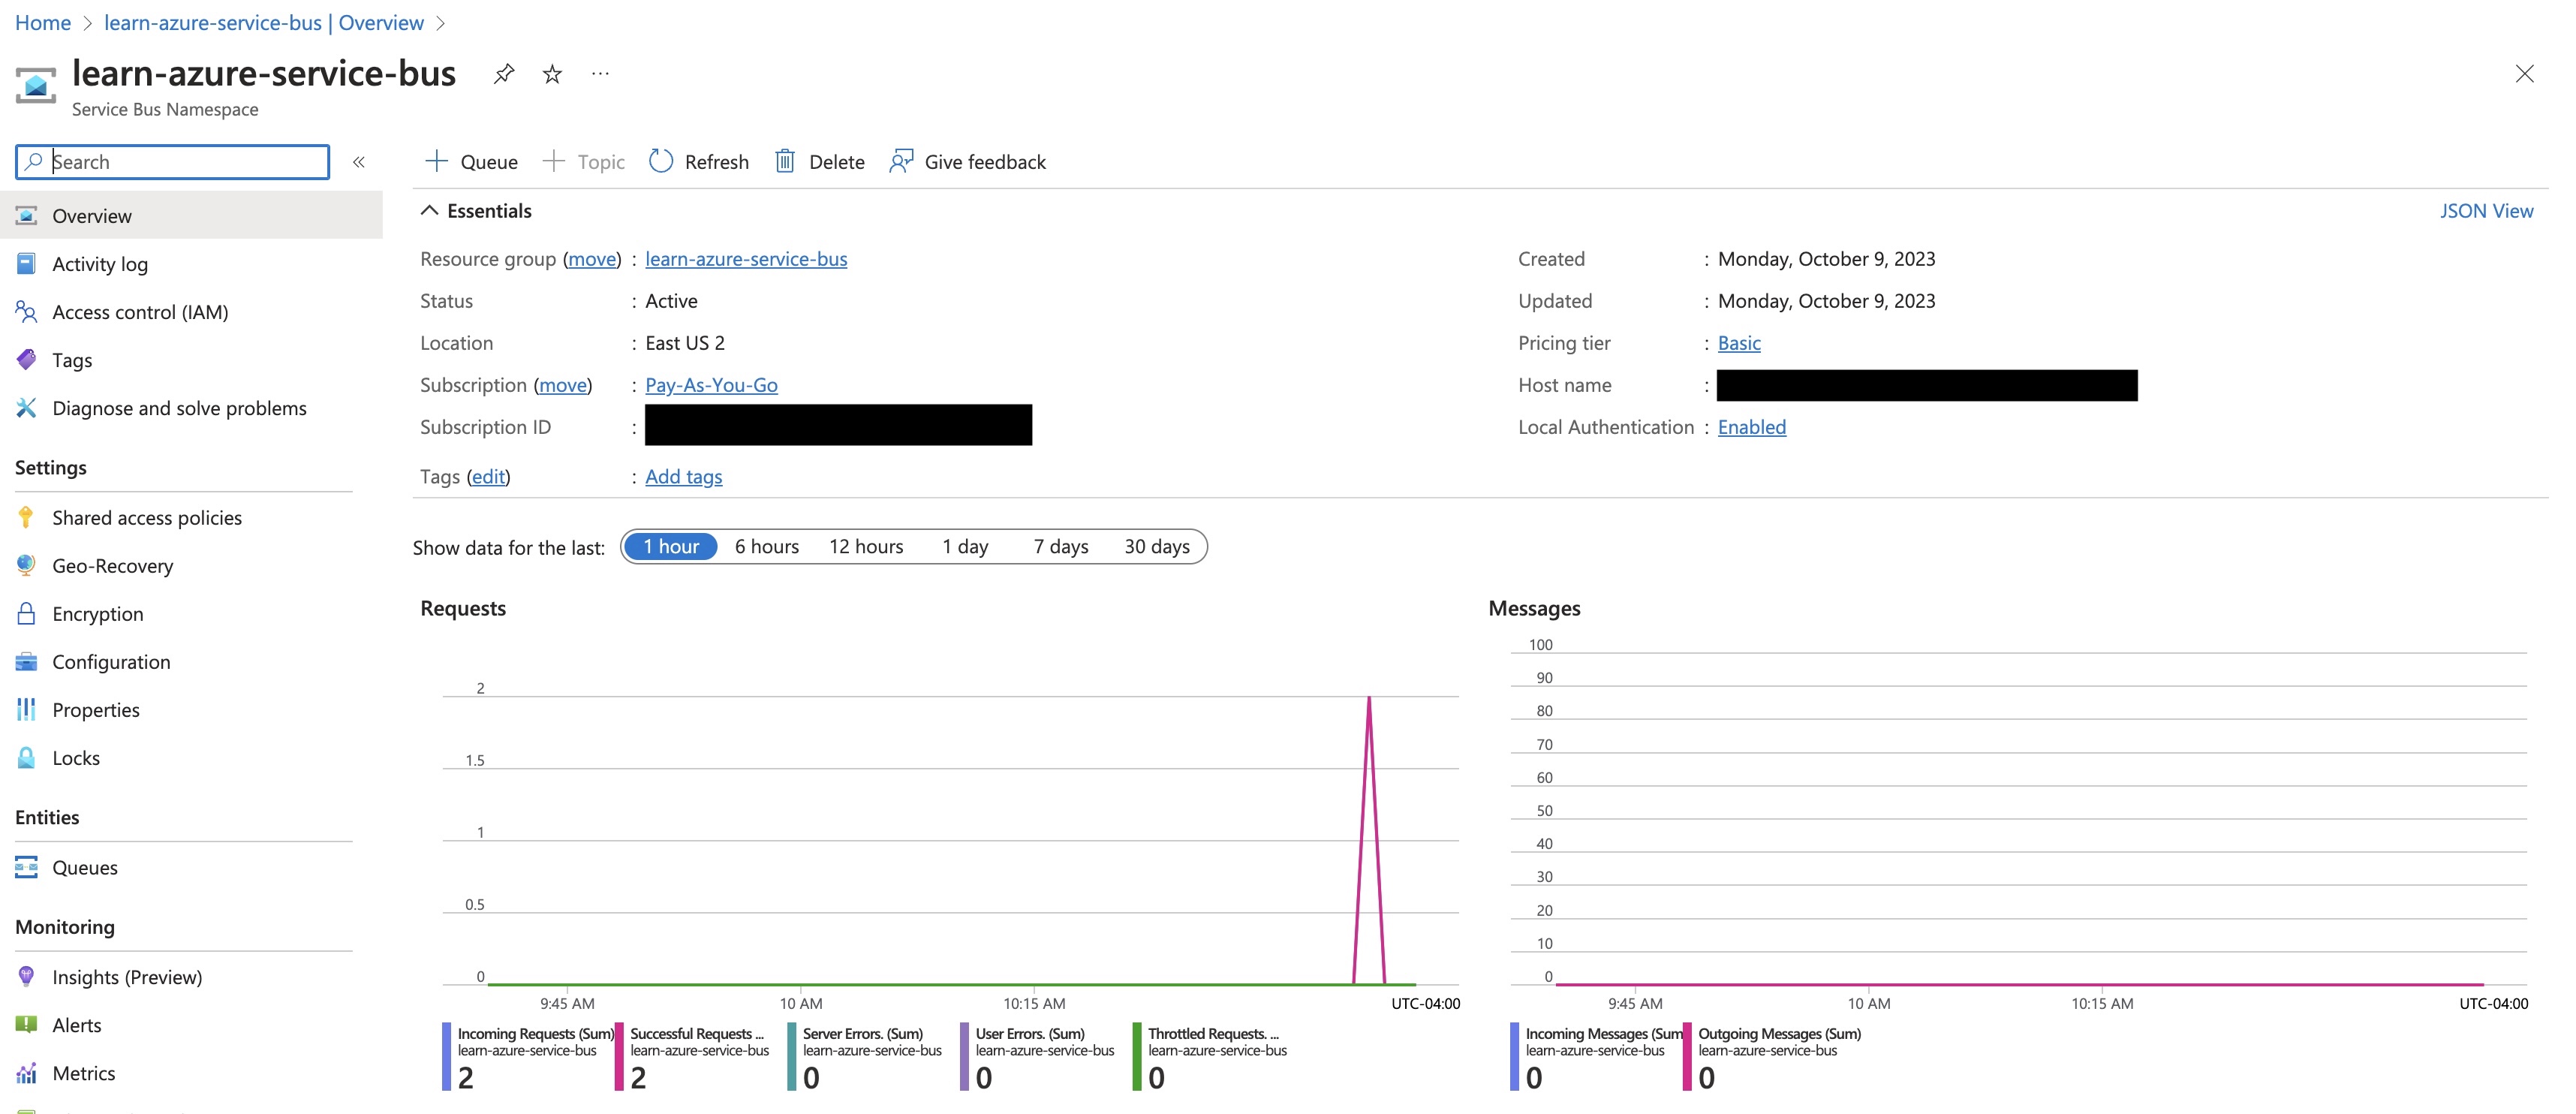
Once the service is created, click the + Queue button and create your first queue.
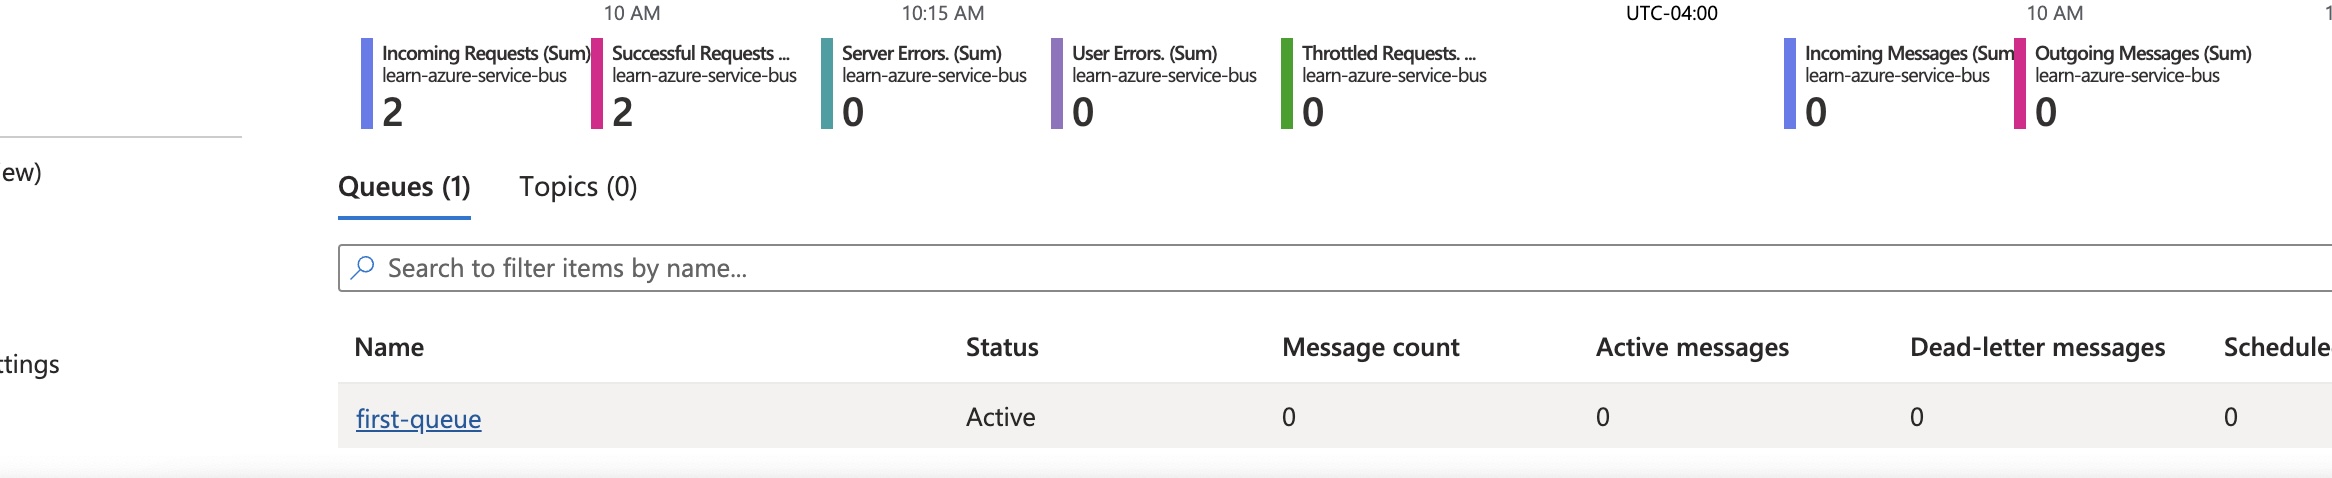
When the queue is created, you can scroll to the bottom of the page and see it. If you click it, you’ll see the details of any messages that may be in it (more on that in a second).
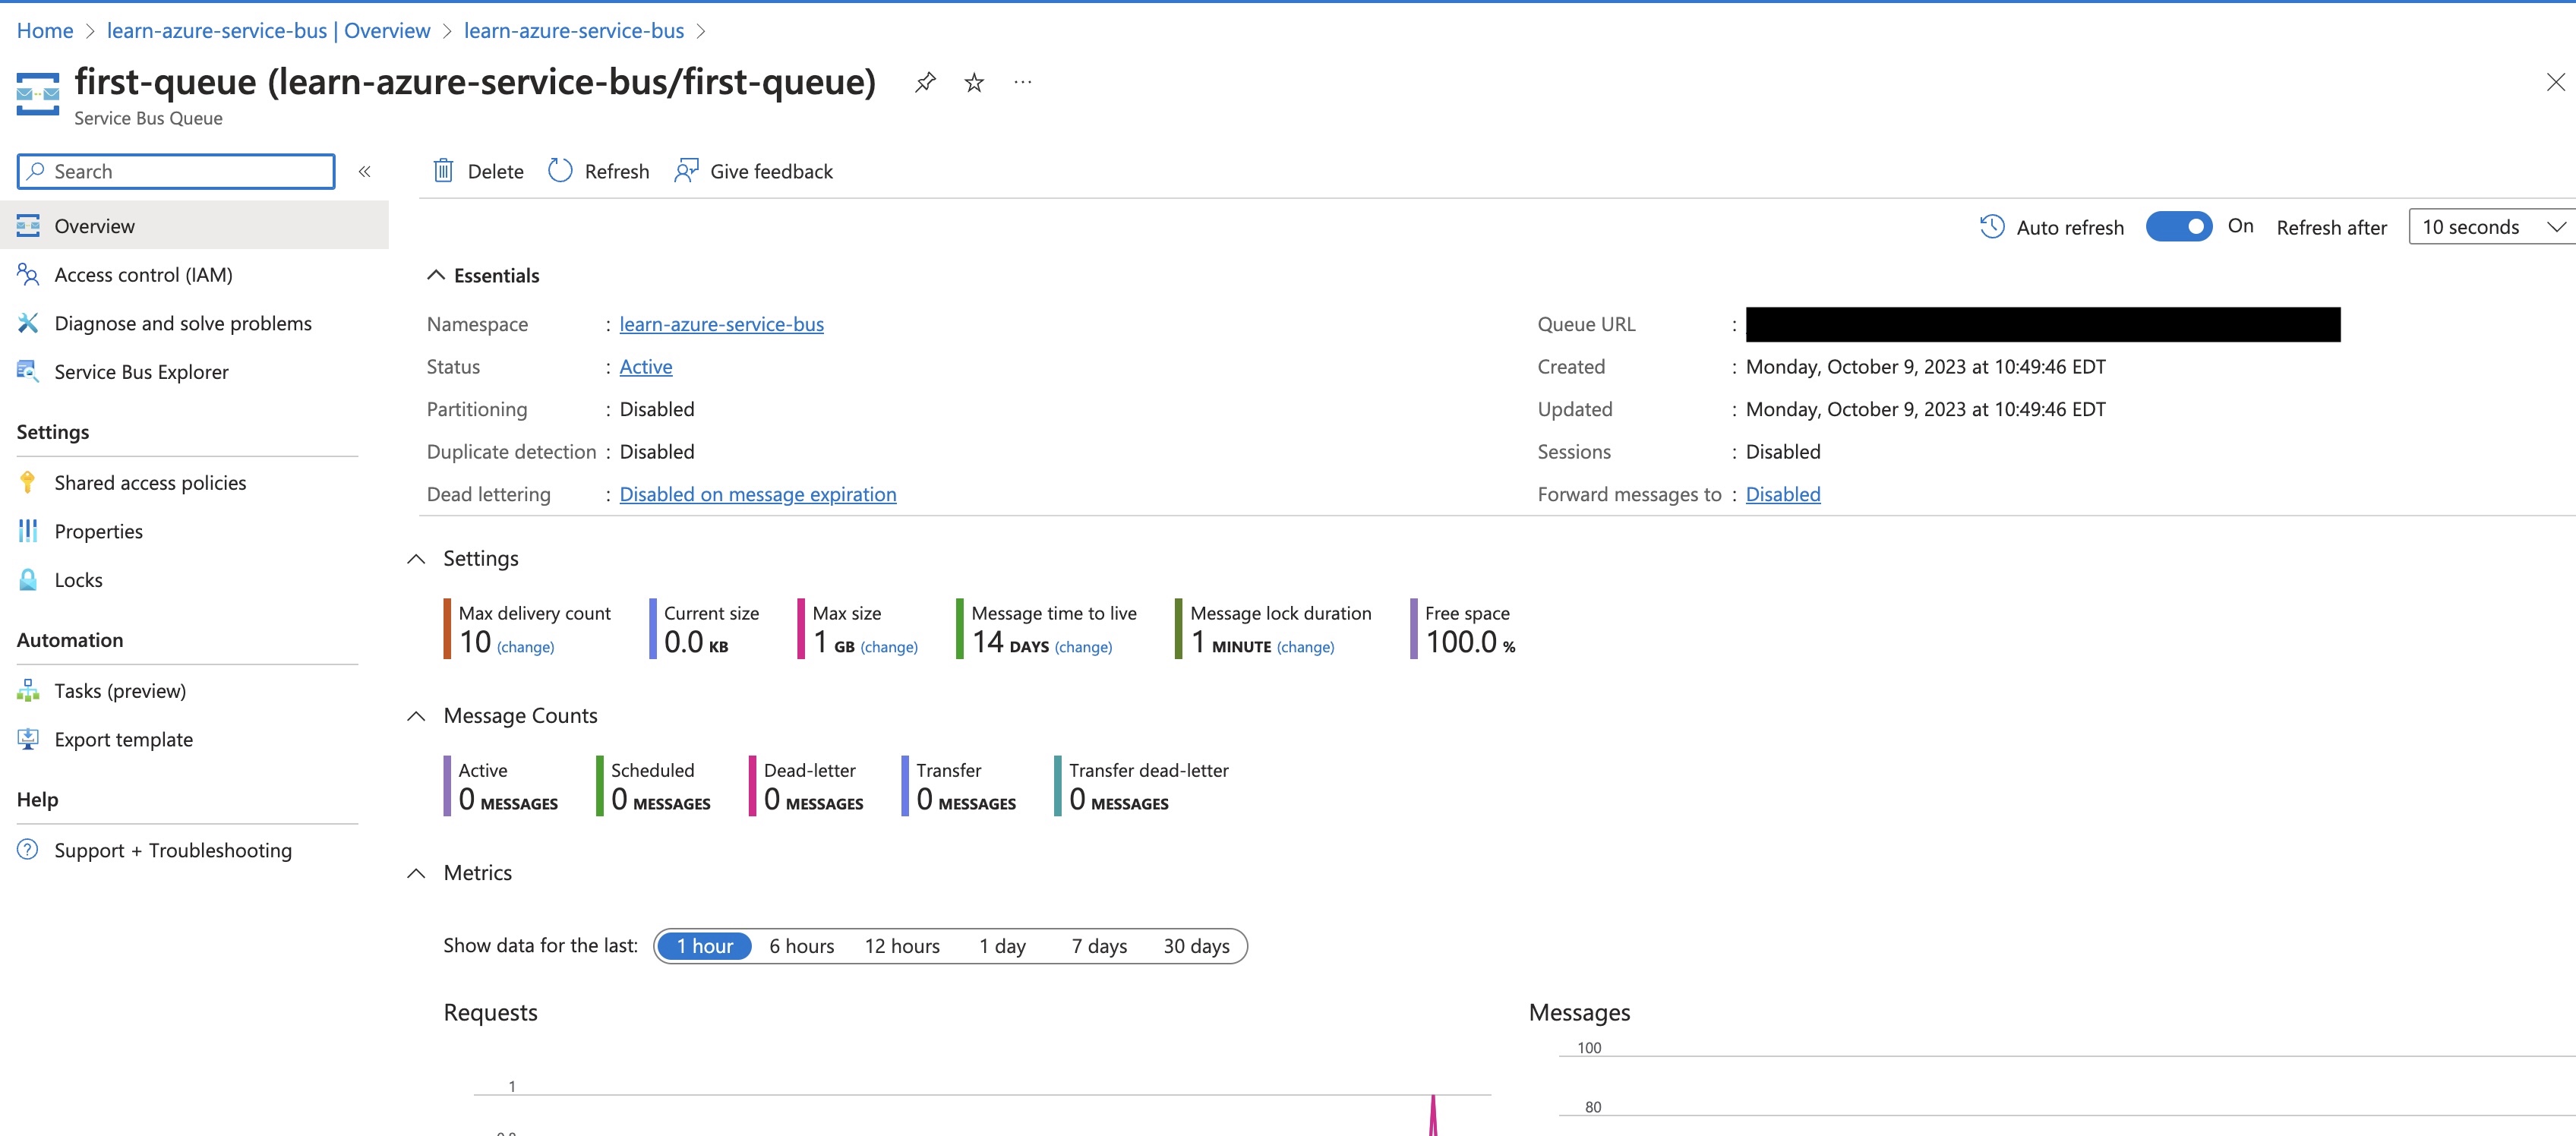
With all of this created, you can now create producer and consumer programs to see the messages go in and out.
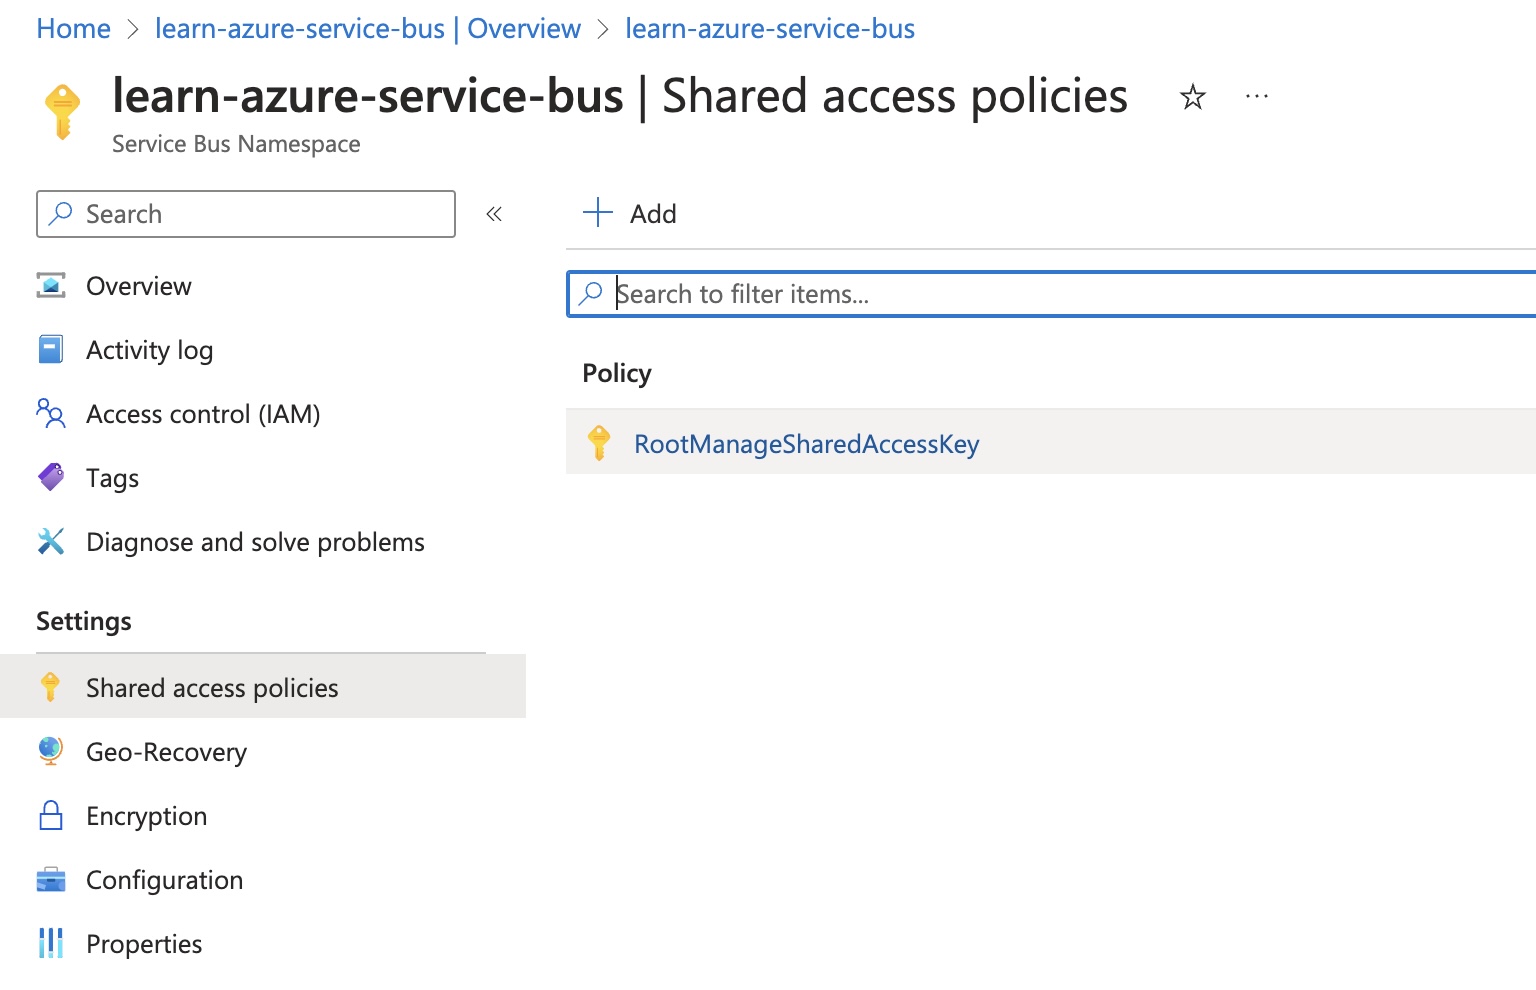
In both cases, you need a way to connect your program to the Azure Service Bus you created. You can either do this with a user and role or just with a connection string. Since this is a simple “hello world” style program, the connection string is the easier route.
Go back to the service page (not the queue page) and click the Shared access policies button with the lock icon on the left hand navigation. Then click RootManageSharedAccessKey to view the connection strings for the service.
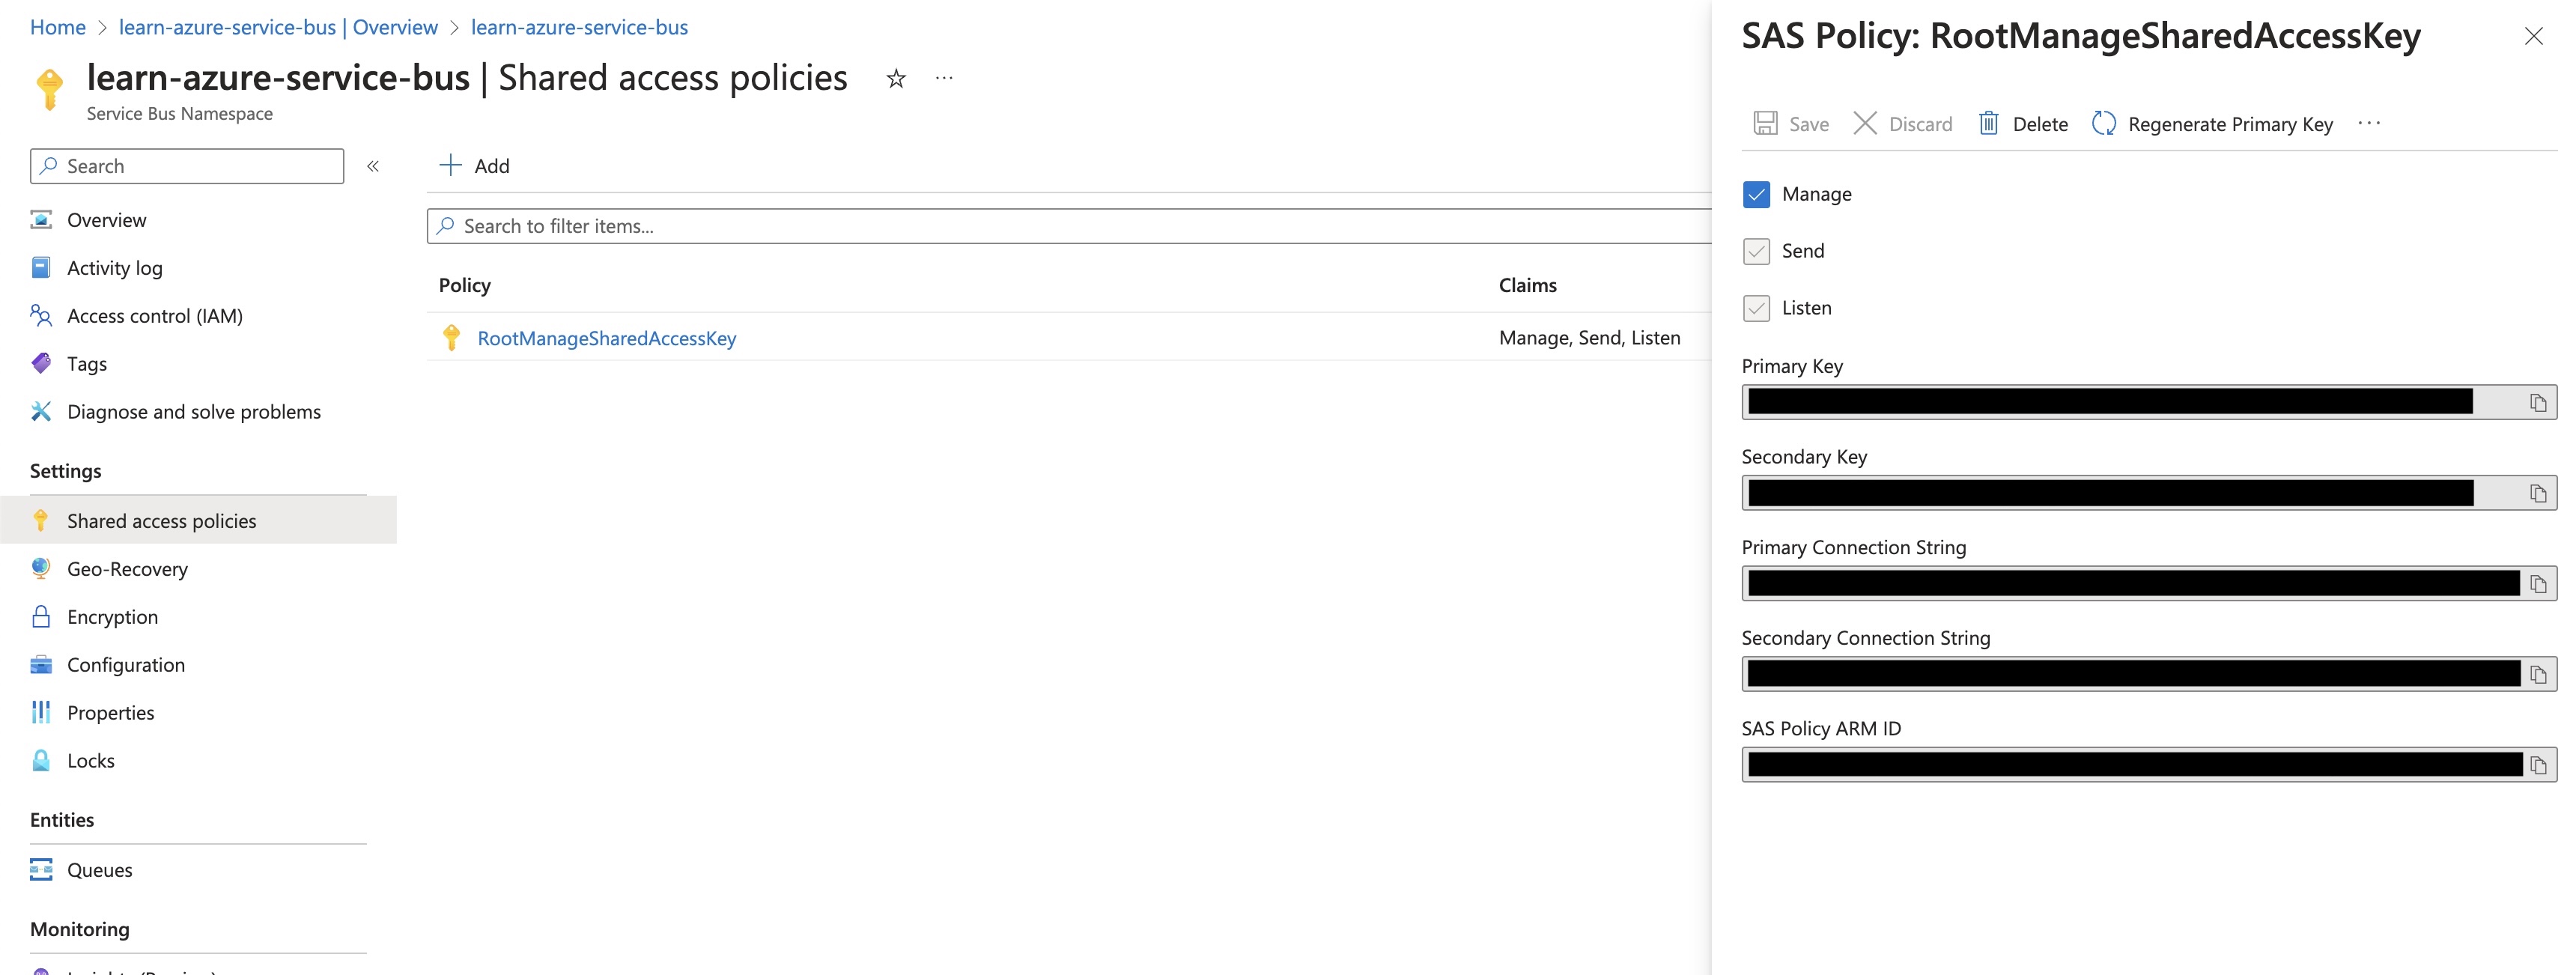
Following the Microsoft Tutorial, you can take the values created and put them into a C# console app similar to the following:
using Azure.Messaging.ServiceBus;

ServiceBusClient client;
ServiceBusSender sender;
const int numOfMessages = 3;
var connectionString = "<YOUR_AZURE_SERVICE_BUS_CONNECTION_STRING_GOES_HERE>";
var queueName = "<YOUR_QUEUE_NAME_GOES_HERE>";

var clientOptions = new ServiceBusClientOptions()
{
    TransportType = ServiceBusTransportType.AmqpWebSockets
};

client = new ServiceBusClient(connectionString, clientOptions);
sender = client.CreateSender(queueName);

// create a batch
using ServiceBusMessageBatch messageBatch = await sender.CreateMessageBatchAsync();

for (int i = 1; i <= numOfMessages; i++)
{
    // try adding a message to the batch
    if (!messageBatch.TryAddMessage(new ServiceBusMessage($"Message {i}")))
    {
        // if it is too large for the batch
        throw new Exception($"The message {i} is too large to fit in the batch.");
    }
}

try
{
    // Use the producer client to send the batch of messages to the Service Bus queue
    await sender.SendMessagesAsync(messageBatch);
    Console.WriteLine($"A batch of {numOfMessages} messages has been published to the queue.");
}
finally
{
    // Calling DisposeAsync on client types is required to ensure that network
    // resources and other objects are properly cleaned up.
    await sender.DisposeAsync();
    await client.DisposeAsync();
}

Console.WriteLine("Press any key to end the application");
Console.ReadKey();
Once you’ve ran the program, (I ran mine with the dotnet cli and dotnet run) you should see the following:
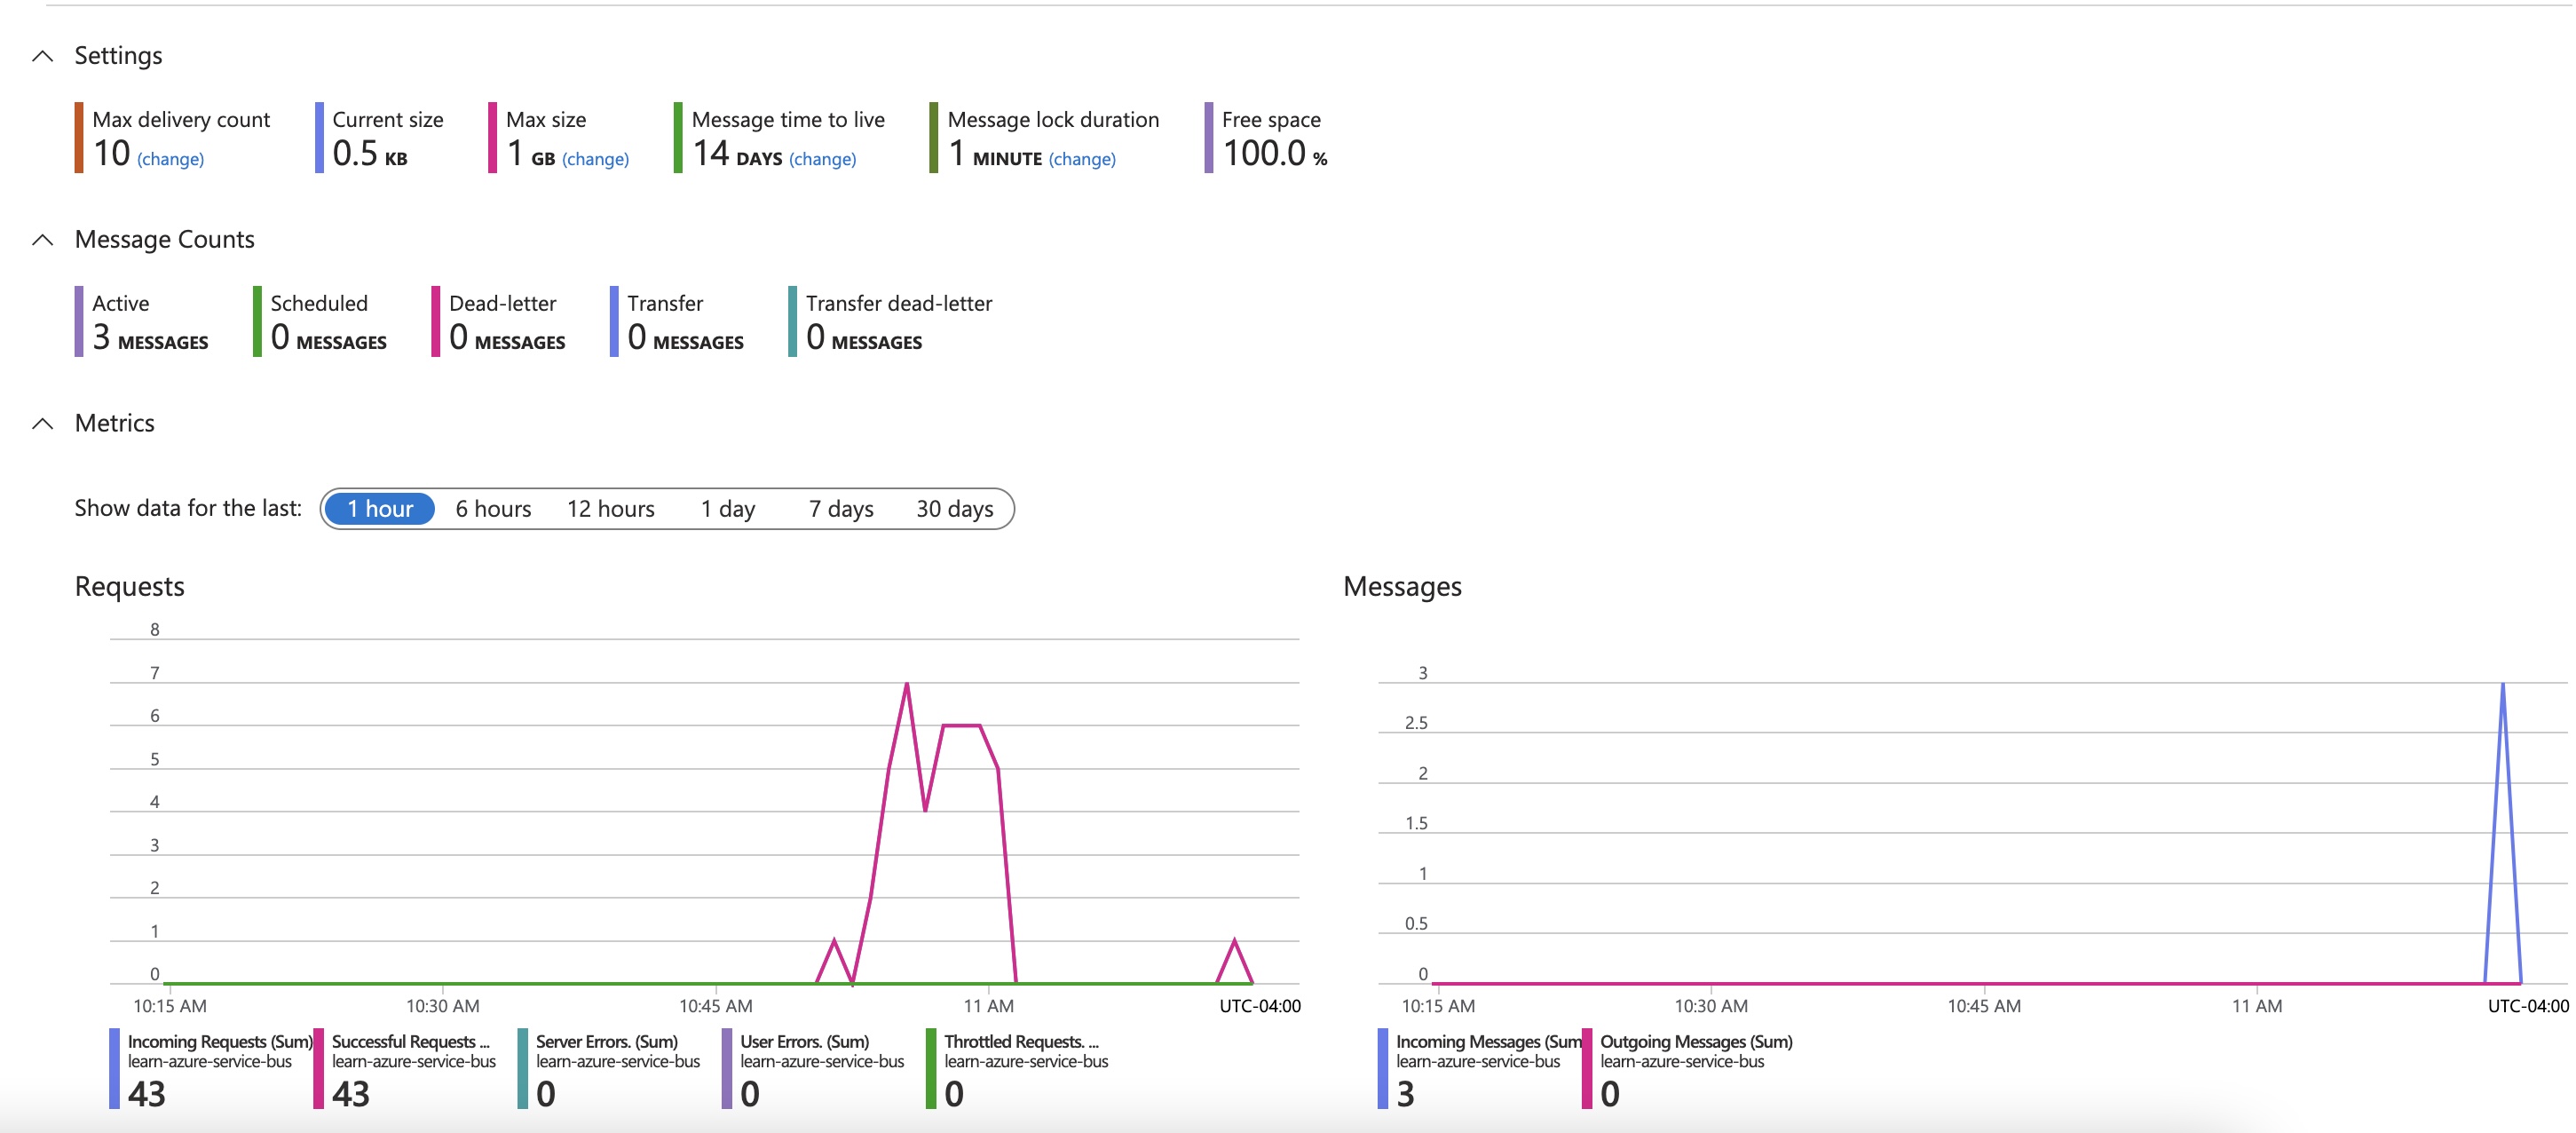
A batch of 3 messages has been published to the queue.
Press any key to end the application
Now if you go to the Queue in your instance of Azure Service Bus, you can immediately see that messages have come across.
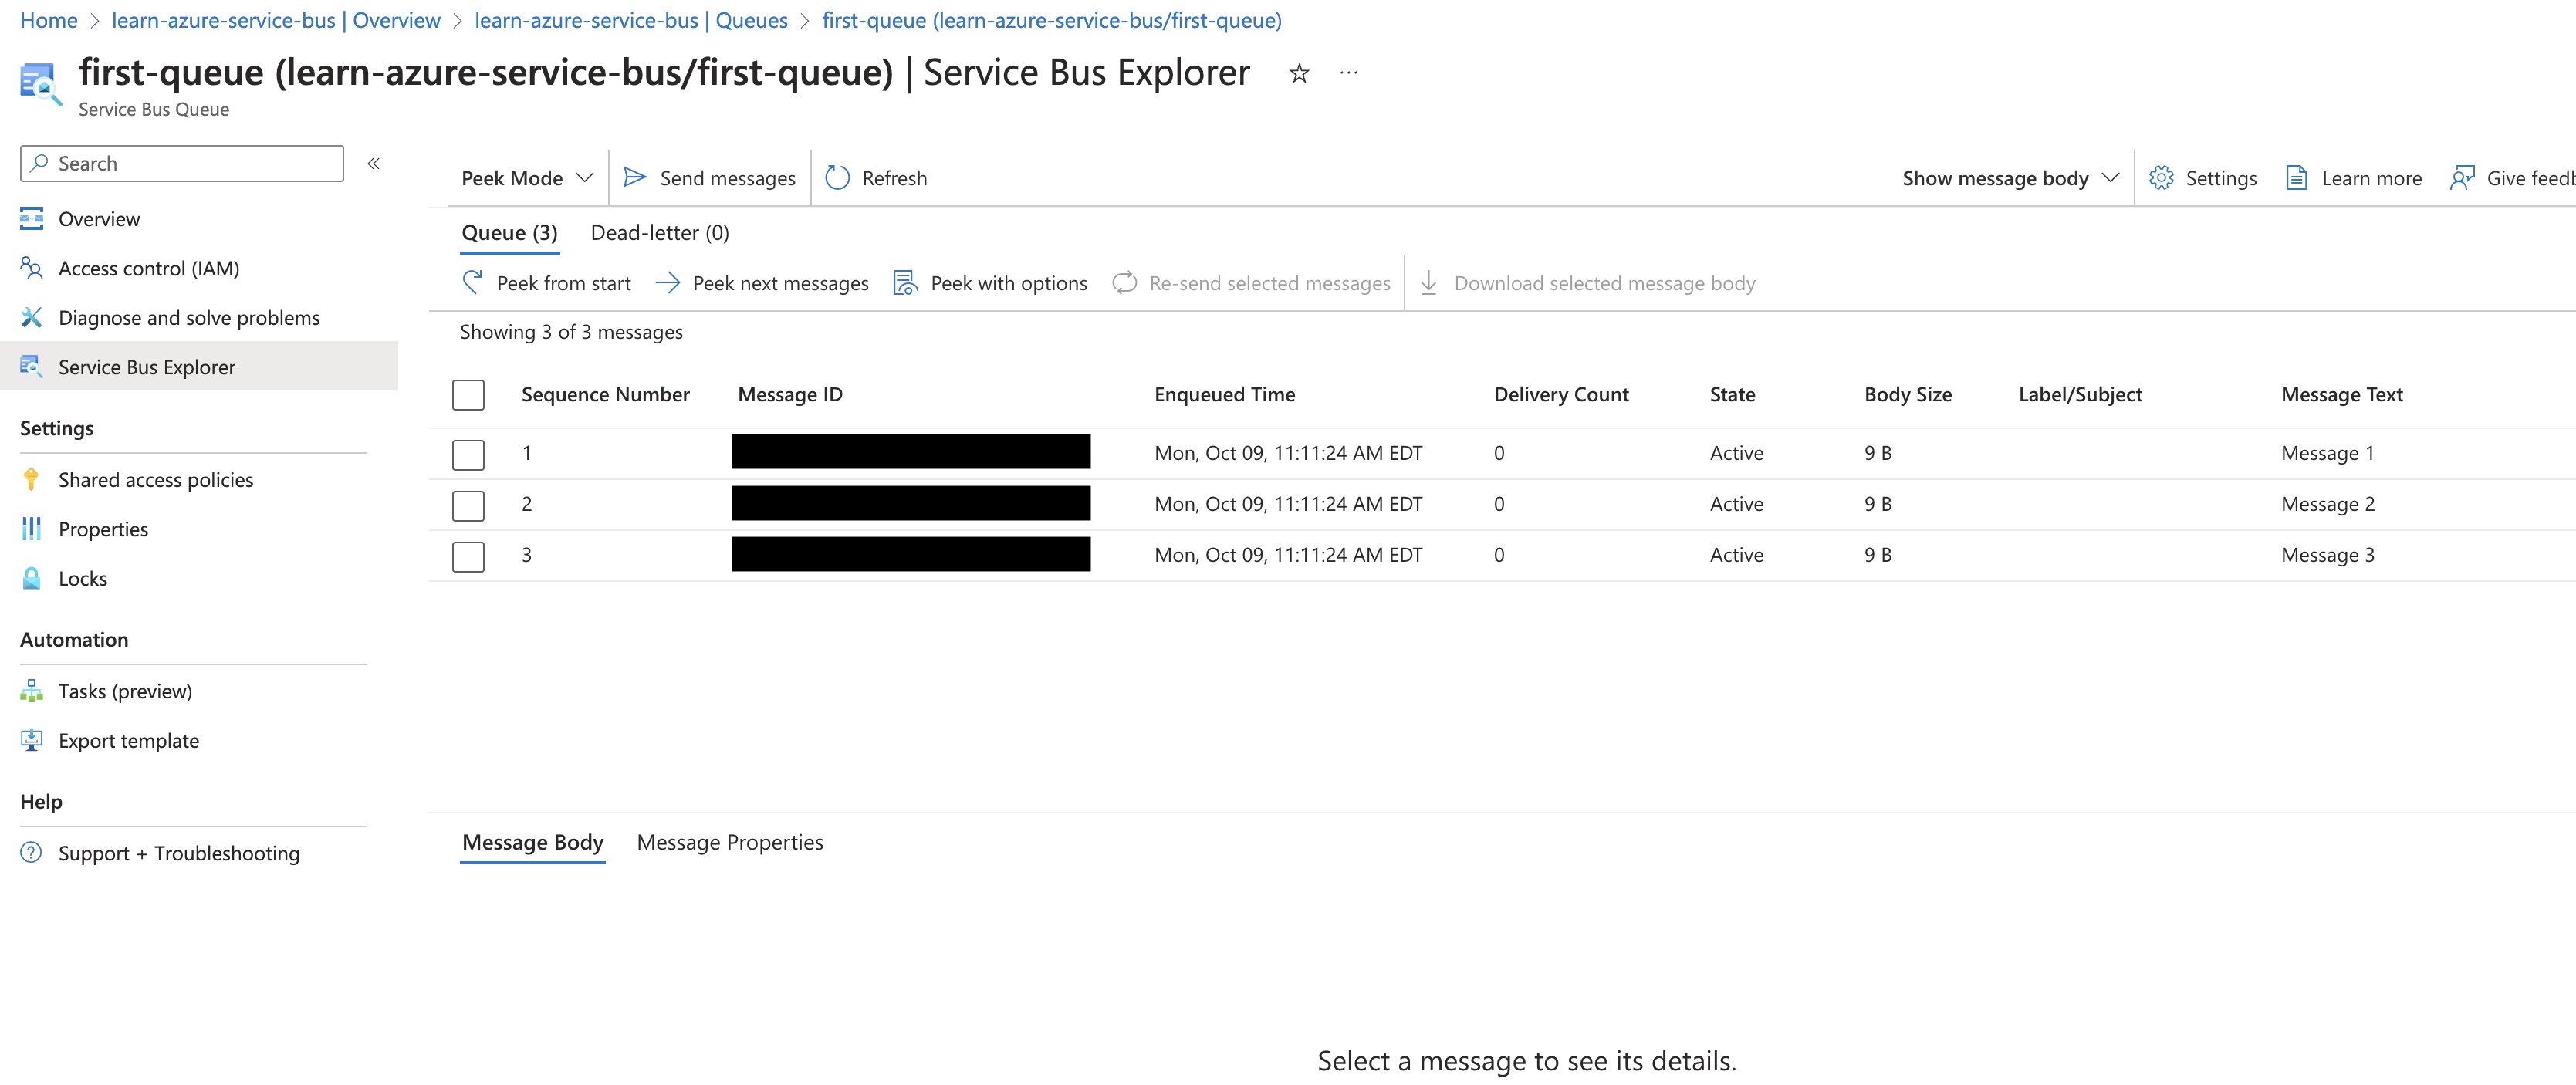
If you click into the Service Bus Explorer and click the peek from start option, you can see details about the 3 messages you created.
Now, to receive the messages (and take them off the queue) you can write a second similar program that reads in the messages and does something with them.
Following the Microsoft Tutorial:
using Azure.Messaging.ServiceBus;
using System;
using System.Threading.Tasks;
var connectionString = "<YOUR_AZURE_SERVICE_BUS_CONNECTION_STRING_GOES_HERE>";
var queueName = "<YOUR_QUEUE_NAME_GOES_HERE>";
ServiceBusClient client;
ServiceBusProcessor processor;
var clientOptions = new ServiceBusClientOptions()
{
TransportType = ServiceBusTransportType.AmqpWebSockets
};
client = new ServiceBusClient(connectionString, clientOptions);
processor = client.CreateProcessor(queueName, new ServiceBusProcessorOptions());
try
{
processor.ProcessMessageAsync += MessageHandler;
processor.ProcessErrorAsync += ErrorHandler;
// start processing
await processor.StartProcessingAsync();
Console.WriteLine("Wait for a minute and then press any key to end the processing");
Console.ReadKey();
// stop processing
Console.WriteLine("\nStopping the receiver...");
await processor.StopProcessingAsync();
Console.WriteLine("Stopped receiving messages");
}
finally
{
// Calling DisposeAsync on client types is required to ensure that network
// resources and other objects are properly cleaned up.
await processor.DisposeAsync();
await client.DisposeAsync();
}
// handle received messages
async Task MessageHandler(ProcessMessageEventArgs args)
{
string body = args.Message.Body.ToString();
Console.WriteLine($"Received: {body}");
// complete the message. message is deleted from the queue.
await args.CompleteMessageAsync(args.Message);
}
// handle any errors when receiving messages
Task ErrorHandler(ProcessErrorEventArgs args)
{
Console.WriteLine(args.Exception.ToString());
return Task.CompletedTask;
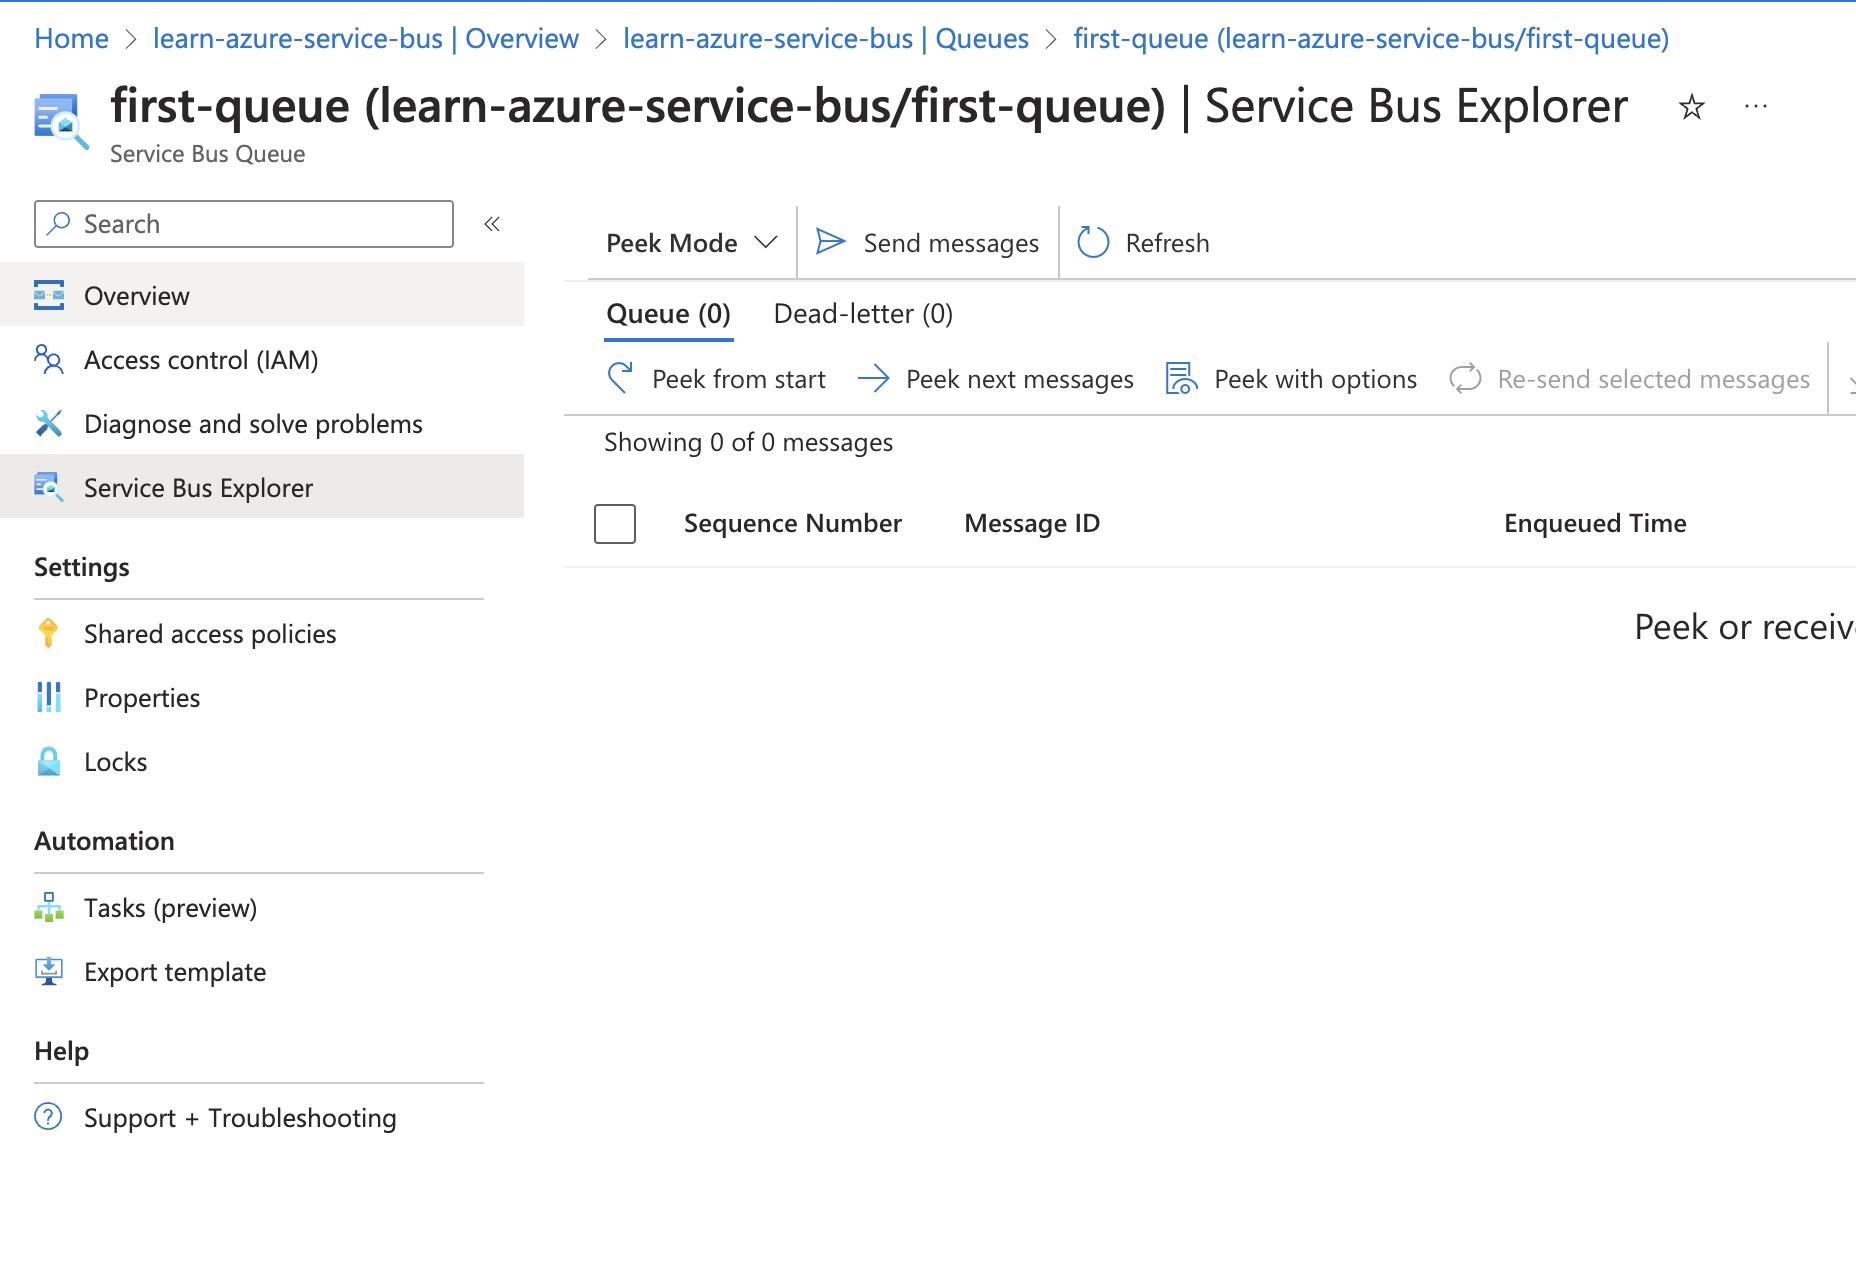
}Once you’ve ran the program, (I ran mine with the dotnet cli and dotnet run) you should see the following:
Wait for a minute and then press any key to end the processing
Received: Message 1
Received: Message 2
Received: Message 3
Then going back and looking at your queue, you’ll see the messages gone.
A More Realistic Example
So far I’ve covered how Azure Service Bus works, and walked through a few of the fundamentals. I’ve also showed a simple example that you can run with the Microsoft Tutorials.
To show a more realistic example, let’s look at a small project I created to get notifications about my dog Harvey and our 2 cats (Chessie and Rey). Just as a disclaimer, I know this is also a very simple project, but it showcases connected processes similar to what you’d see in a larger scale implementation.
Here are some pictures of Harvey, Chessie, and Rey (more at the bottom of the post):

Harvey

Chessie and Rey (on one of their birthdays of course)
The problem I wanted to solve is to create a way to notify my wife when I did things like feed the cats, feed the dog etc. We did this manually with notes or text messages, but I thought it’d be fun to have an automated way of doing this. Since I was learning about Azure Service Bus, I decided to create a very simple application that uses the Service Bus with Functions to send notifications via Twilio.
At a high level this is what I built:
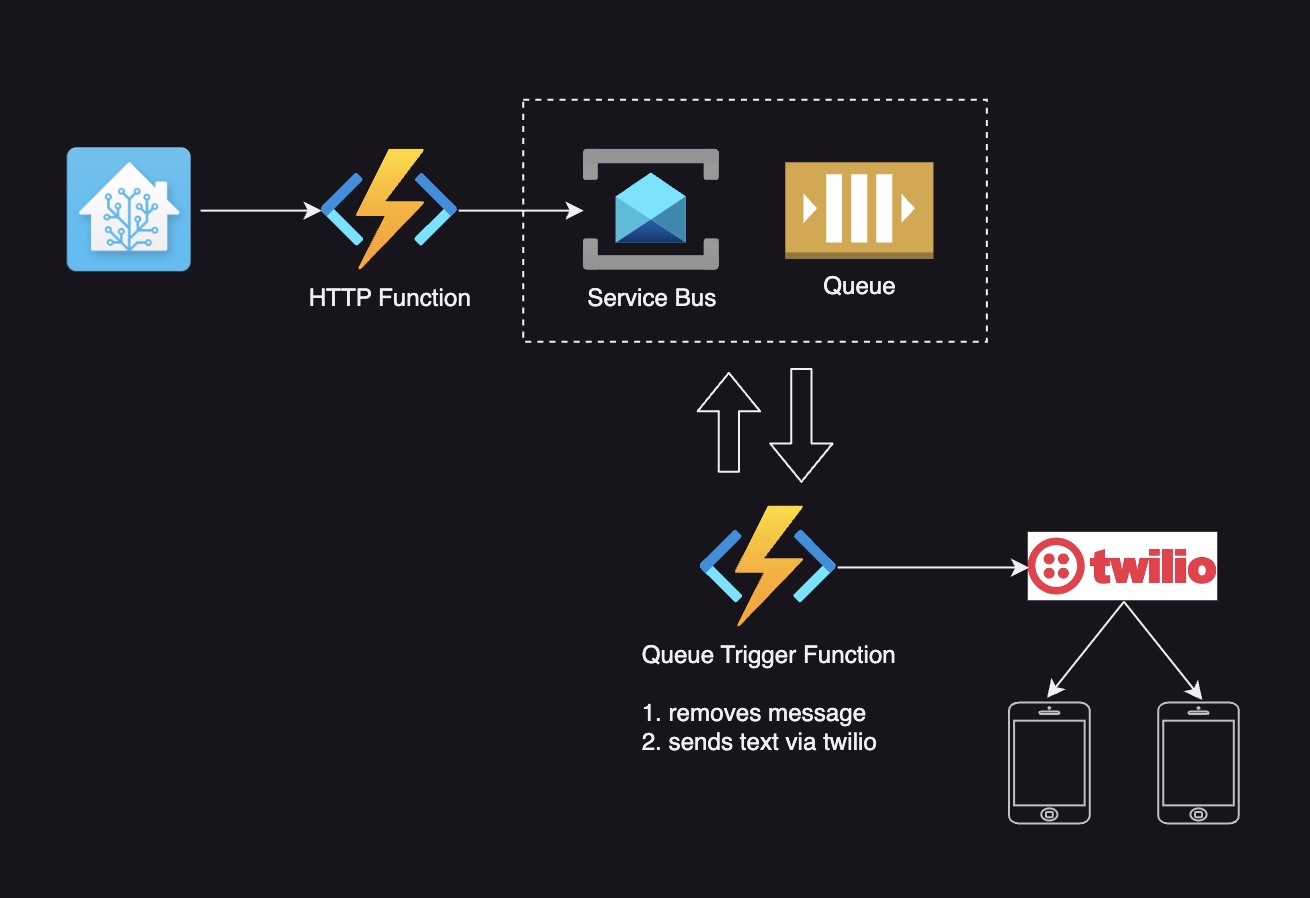
In total, these are all the pieces:
- Home Assistant to have a dashboard with a UI
- Twilio Account to handle sending text messages
- HTTP Azure Function that sends a message to a Service Bus Queue
- Service Bus Queue that receives messages
- Service Bus Trigger Azure Function that receives messages and then (based on a numeric value) sends a corresponding text message via Twilio’s APIs to my wife and I’s phones
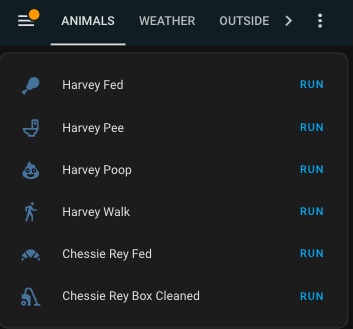
In order to create a frontend for this, I used Home Assistant. Connecting API calls to Home Assistant is beyond the scope of this post, but is done through adding values to the configuration files that run an instance. I created a dashboard that looks like this:
Both functions that I have written were in TypeScript. I’m only sharing selected portions of my project. If you’d like to write your own TypeScript functions, please refer to the typescript tutorial and the Azure Service Bus Trigger Function tutorial.
The HTTP function that I wrote, (1) takes in a command value from the request body, and (2) selects the enum value and sends it to a Queue as a message. The portions of the HTTP function that do this look like the following:
import {
    HttpRequest,
    InvocationContext,
} from '@azure/functions';
import { ServiceBusClient } from '@azure/service-bus';

// enum for the commands
enum CommandValue {
    'Harvey Fed' = 0,
    'Harvey Pee' = 1,
    'Harvey Poop' = 2,
    'Harvey Walk' = 3,
    'Chessie Rey Fed' = 4,
    'Chessie Rey Box Cleaned' = 5,
}

// retrieve command value from body
const retrieveCommandFromBody = async (
    request: HttpRequest,
    context: InvocationContext
) => {
    const body = await request.text();
    const parsedBody = JSON.parse(body);
    context.log(`parsed body sent is ${parsedBody}`);
    if (parsedBody.command === undefined) {
        context.log(
            'error when called function, unable to process with no command'
        );
        throw new Error('unable to process with no command');
    }
    const selectedCommand = CommandValue[parseInt(parsedBody.command)];
    if (selectedCommand === undefined) {
        context.log('error when called function, command value is not valid');
        throw new Error('command value is not valid');
    }

    return selectedCommand;
};

// send command value to the service bus queue
const sendMessage = async (command: string, context: InvocationContext) => {
    // create client and sender for connecting to the service bus
    const sbClient = new ServiceBusClient(
        process.env.AzureServiceBusConnectionString
    );
    const sender = sbClient.createSender(process.env.AzureServiceBusQueueName);

    try {
        await sender.sendMessages([{ body: command }]);
        await sender.close();
    } catch (error) {
        context.log(error);
        throw new Error(error);
    } finally {
        await sbClient.close();
    }

    context.log(`message was successfully sent with ${command}`);
};
The Azure Service Bus Trigger Function that I wrote (1) takes the message off the queue and (2) uses Twilio to send it as a text message. The function is very small, and just looks like the following:
const twilio = require('twilio');
const client = twilio(
process.env.TWILIO_ACCOUNT_SID,
process.env.TWILIO_AUTH_TOKEN
);
export const sendMessage = async (message: string, toNumber: string) => {
await client.messages.create({
body: message,
from: process.env.TWILIO_ACCOUNT_PHONE_NUMBER,
to: toNumber,
});
};
export async function AzureServiceBusQueueTrigger(
message: unknown,
context: InvocationContext
): Promise<void> {
context.log('Service bus queue function processed message:', message);
const actualMessage = message as string;
let textMessage = '';
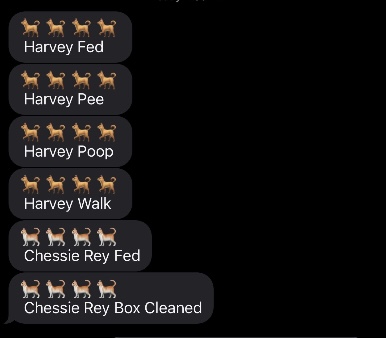
if (actualMessage.includes('Harvey')) {
textMessage = `🐕 🐕 🐕 🐕 \n ${actualMessage}`;
} else {
textMessage = `🐈 🐈 🐈 🐈 \n ${actualMessage}`;
}
context.log(`message that is to be sent ${textMessage}`);
try {
await sendMessage(textMessage, process.env.PHONE_1);
context.log('sent message to PHONE_1 successfully');
} catch (error) {
context.log('unable to send message to PHONE_1');
context.log(error);
}
try {
await sendMessage(textMessage, process.env.PHONE_2);
context.log('sent message to PHONE_2 successfully');
} catch (error) {
context.log('unable to send message to PHONE_2');
context.log(error);
}
}Finally, when the messages are sent, here are some example text messages:
As I said in the intro, I know this is a very simple application. However, hopefully this example shows how you could do something similar with a more complex set of interactions.
Conclusion
In this post I went over some basics about the Azure Service Bus. I walked through ways you could utilize the service in a distributed application, and demonstrated a simple example in code. I also included a more realistic example where I used a Service Bus to notify my wife when we take care of our pets. I hope you were encouraged by reading this post to learn more about Azure Service Bus. It is a very powerful technology, and a relatively simple process to get started. For projects both small and large, the use of Azure Service Bus can definitely be beneficial. In this post I only touched on a few features, but there are a lot of other potential things with Service Bus that you could utilize for your applications. I highly recommend reviewing Microsoft’s Documentation on Azure Service Bus and trying it out for yourself.
As promised, here are some additional pictures of Harvey, Chessie and Rey. Thanks for reading my post!