
Intro to Azure Search
Azure AI Search (formerly Azure Cognitive Search) enables teams to improve the process of searching and analyzing data. Azure AI Search has a wide array of capabilities. I have been using Azure Search with an application I maintain, and wanted to put together a post that covers how Azure Search works and some of its features at a high level. The following post will walkthrough setting up Azure AI Search on a dataset, and how you can start utilizing Azure AI Search for your projects.
How does Search work?
Before I go into how Azure Search works, it helps to understand how you would approach implementing a full text search.
Most commerce websites have a “full text search” capability, and are a good example. When you “search” with these websites, applications take in text input and attempt to match that input to data in a data source like a NoSQL database or other storage mechanism. This is done through parsing data, and attempting to find a match based on operators like ”==” or ”!=” etc.
With any search service, you have (1) data and then (2) how you query the data. Consider using Amazon.com for example. Amazon.com has a lot of data between product listings, reviews, and more. When trying to search Amazon.com your search would include products but not necessarily reviews or other information. If Amazon wanted to expand their search to include the reviews (or more), they could modify their implementation to take in reviews and attempt to search based on both their list of products and product reviews. Further, when actually conducting a search in Amazon.com, what you input will find similar values (also known as “fuzzy search”). You could also be given the opportunity to do things like filtering, where you pick specific brands or results within a price point. The combination of these options act as query parameters to refine how the search is conducted.
It’s also important to understand “fuzzy” searching, as that comes up a lot in search discussions. This is whereby an application searches not just on exact matches, but also similar matches within the parameters provided. For example, if you searched “soccer balls” this would return results that should include the text “soccer balls.” However, if you searched “soccer balls2” without a fuzzy search you would get back results with “soccer balls2” but not with “soccer balls.” If you ran the same query with “soccer balls2” in a fuzzy search, you would get results that match on “soccer balls” and “soccer balls2” since the terms are similar.
One final thing to note when generally speaking about “search” is optimizations. The reason services like Azure Search exist is because directly searching data with mechanisms like SQL queries are not always optimal. If you’re using SQL in particular, there are issues with things like resource use or needing enhancements like database indexes. As data sources get larger, scaling also becomes a challenge. Services like Azure Search exist to provide optimizations for faster performance, scaling, and much more.
How does Azure AI Search work?
Azure Search implements the fundamentals of search with additional features that help teams optimize their search experience. Azure Search has also recently integrated with Azure AI Services, Azure OpenAI, and machine learning to provide additional intelligence in search results.
Azure Search starts with a data source, and then uses indexes (which you define) to “crawl” the data. Crawling here meaning building a data set from that original data source that is optimized and provides (potentially) faster queries with further customizations that teams can leverage in their applications. To update the dataset, you create an indexer which queries and updates the data periodically. Ultimately, you get a subset of your data that is customized based on how you want your users to interact with it. This is different than just a straight retrieval of all of your data, and can have major performance gains when doing queries.
The indexes setup the ability to interact with data at the field level. Each field you define in an index has different attributes for what you want to do with it. For example, if you wanted users to be able to filter a query on a specific field you would mark that field as “filterable.” There are several options available. Copying the section from the field attributes in the Azure Search documentation:
| Attribute | Description |
|---|---|
| ”searchable” | Full-text or vector searchable. Text fields are subject to lexical analysis such as word-breaking during indexing. If you set a searchable field to a value like “sunny day”, internally it’s split into the individual tokens “sunny” and “day”. |
| “filterable” | Referenced in $filter queries. Filterable fields of type Edm.String or Collection(Edm.String) don’t undergo word-breaking, so comparisons are for exact matches only. For example, if you set such a field f to “sunny day”, $filter=f eq ‘sunny’ finds no matches, but $filter=f eq ‘sunny day’ will. |
| ”sortable” | By default the system sorts results by score, but you can configure sort based on fields in the documents. Fields of type Collection(Edm.String) can’t be “sortable”. |
| “facetable” | Typically used in a presentation of search results that includes a hit count by category (for example, hotels in a specific city). This option can’t be used with fields of type Edm.GeographyPoint. Fields of type Edm.String that are filterable, “sortable”, or “facetable” can be at most 32 kilobytes in length. |
| ”key” | Unique identifier for documents within the index. Exactly one field must be chosen as the key field and it must be of type Edm.String. |
| ”retrievable” | Determines whether the field can be returned in a search result. This is useful when you want to use a field (such as profit margin) as a filter, sorting, or scoring mechanism, but don’t want the field to be visible to the end user. This attribute must be true for key fields. |
In the next section I will go through an example setting up an index with fields.
An Example of Azure Search
It helps to view an example. I’ll take some data from a previous post I wrote about python scripting with Cosmos DB that includes a set of Electric Vehicles (EV). In that post I loaded a free dataset into a Cosmos Collection that I’ll use in the following example.
In order to setup the actual Azure Search instance, the index, and the indexer there are a few ways. I recommend following the Microsoft Tutorial to get started.
In the case of my example, I first made my Azure Search instance point to my Cosmos DB collection and do the following query:
Select c.id, c.VIN, c.State, c.ModelYear, c.Make, c.Model, c._ts From c WHERE c._ts > @HighWaterMark ORDER BY c._tsThe query I’m using here is very simple because the data is not very complex. What you select with this query will be become the dataset that runs your Azure Search instance. There are many more advanced things you could do with this query like using Cosmos DB’s CONCAT statement to create fields that are actually combinations of values. The setup here is very flexible and can work with many scenarios.
With my query all setup, next I created an index on the data that looks like the following:
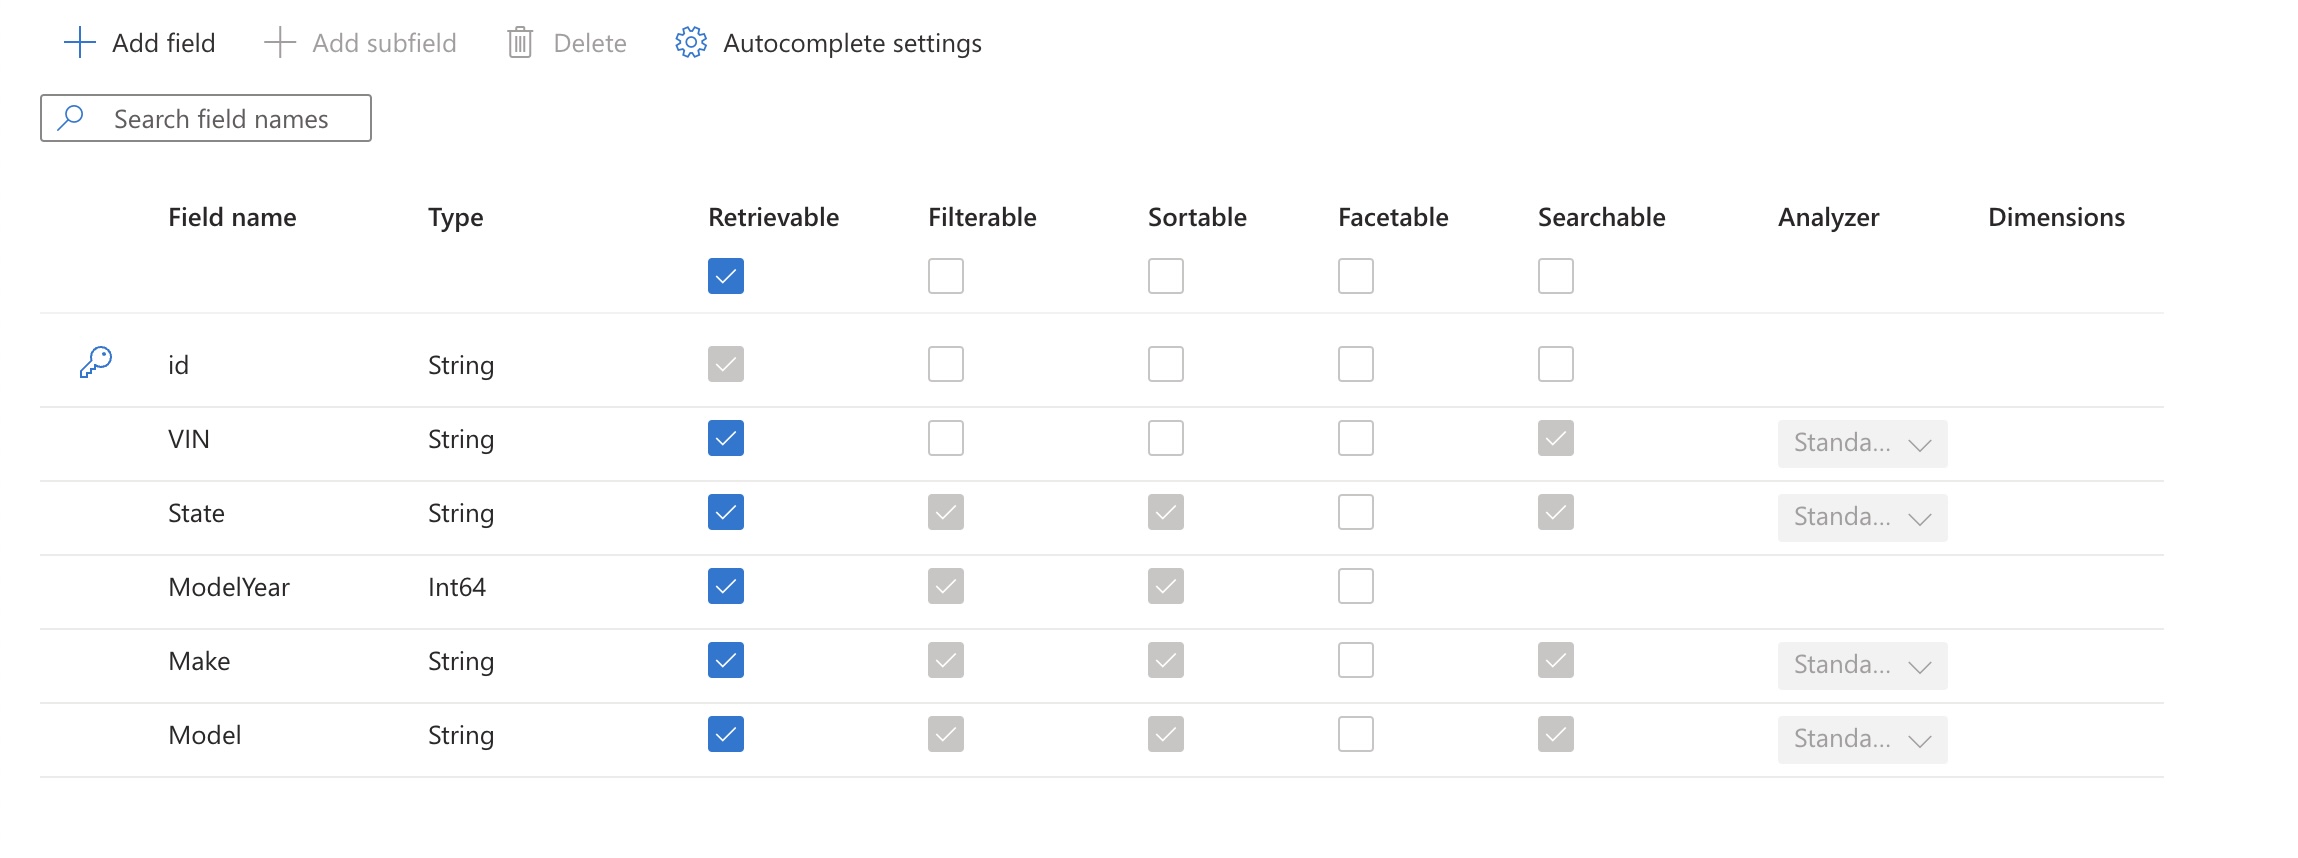
As you can see in my index, I have different properties for the different fields. Some examples include:
- I can
searchon VIN but notsortorfilter - I can
filter,search, andsorton State, Make, and Model - I can only
retrieveid - I can only
filterandsearchbased onModelYear
With the index in place, I also defined an indexer that I just run manually. I could alternatively have defined this to run on a schedule.
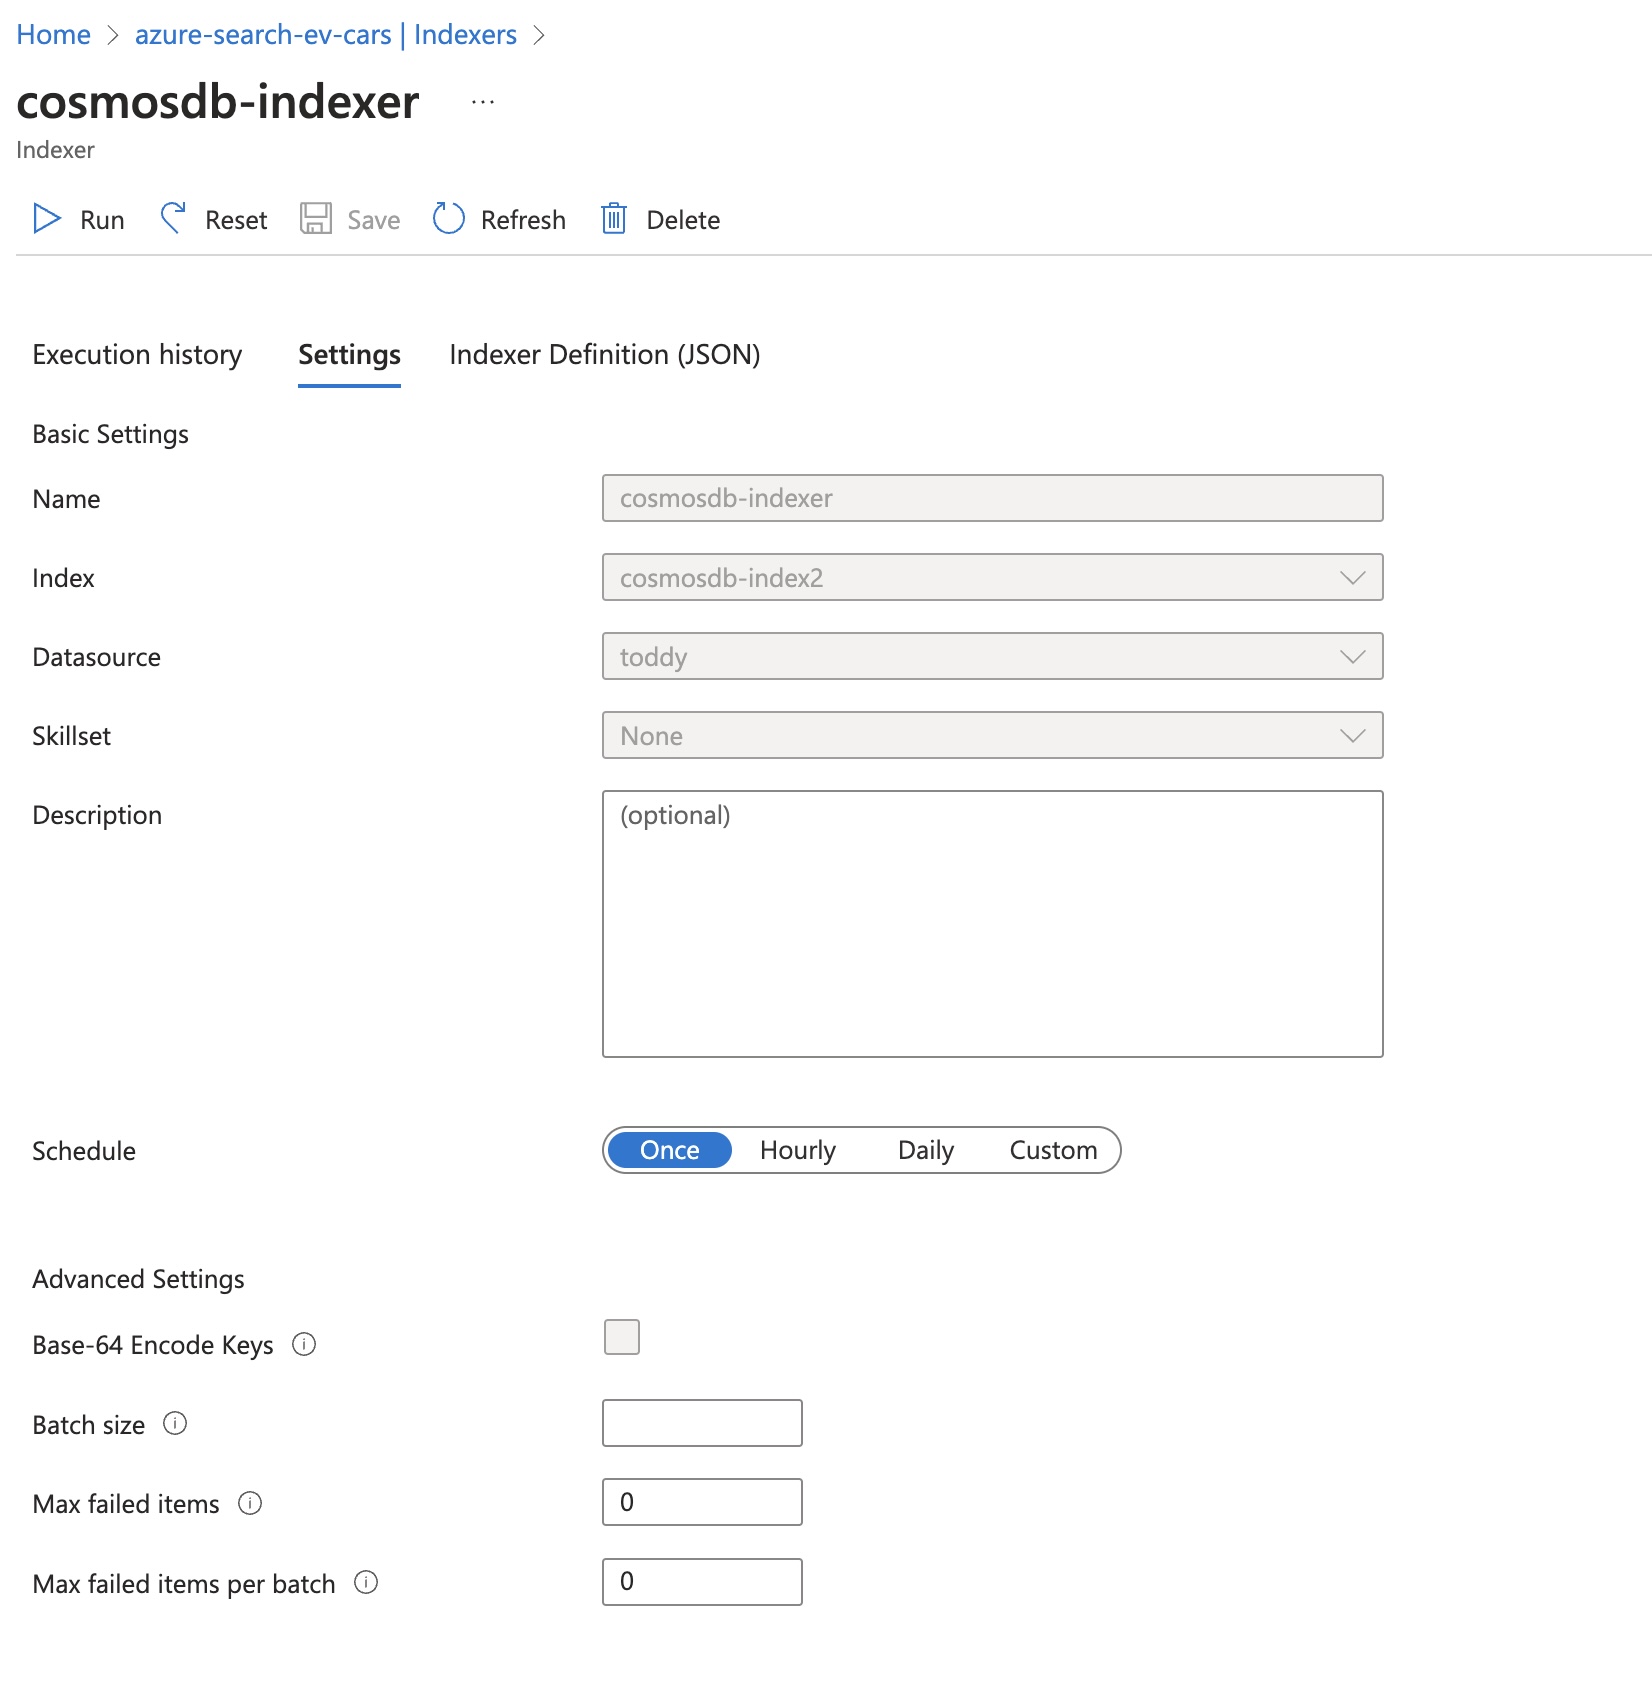
Note I called my datasource “Toddy” as a fun reference to my son. I think it made the datasource better.
Azure provides information about the runs of your indexer as well with a nice graph:
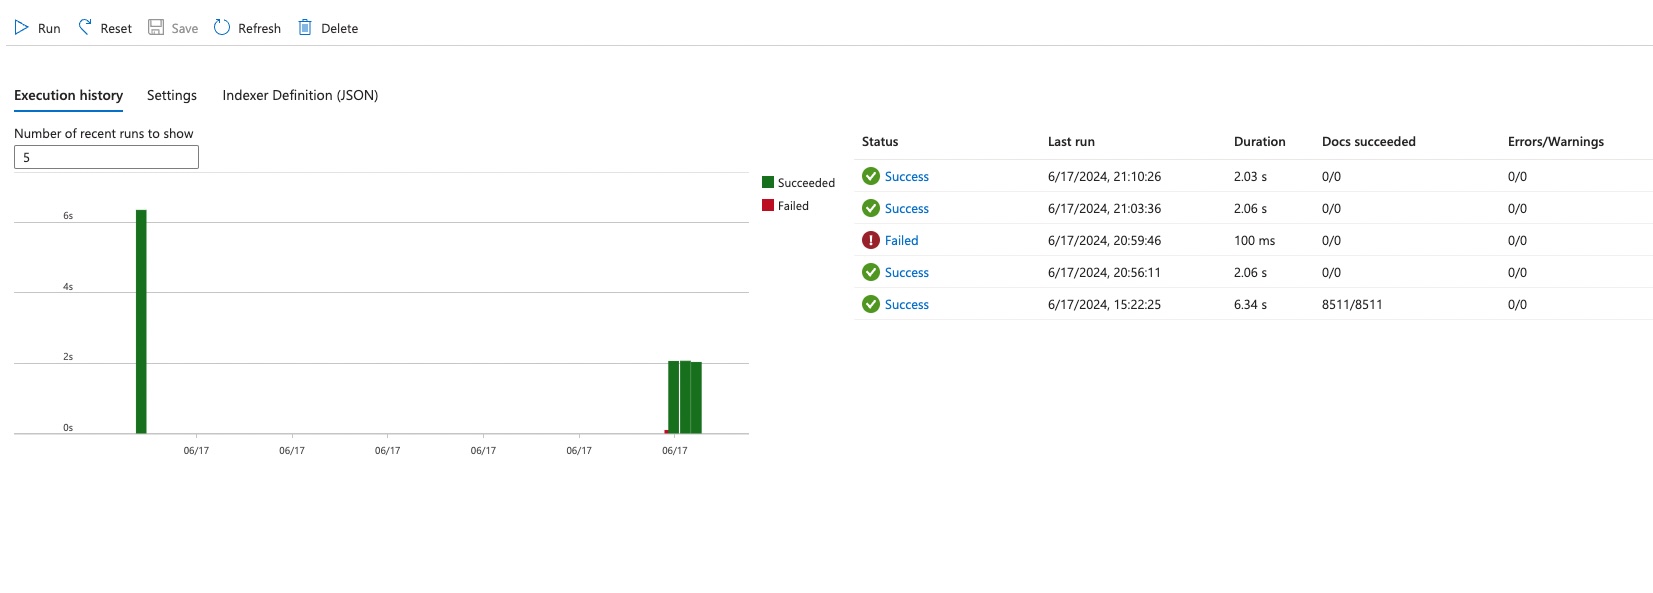
After running the index one time, I can now do queries using the search explorer. I can do an example query like the following:
{
  "search": "*"
}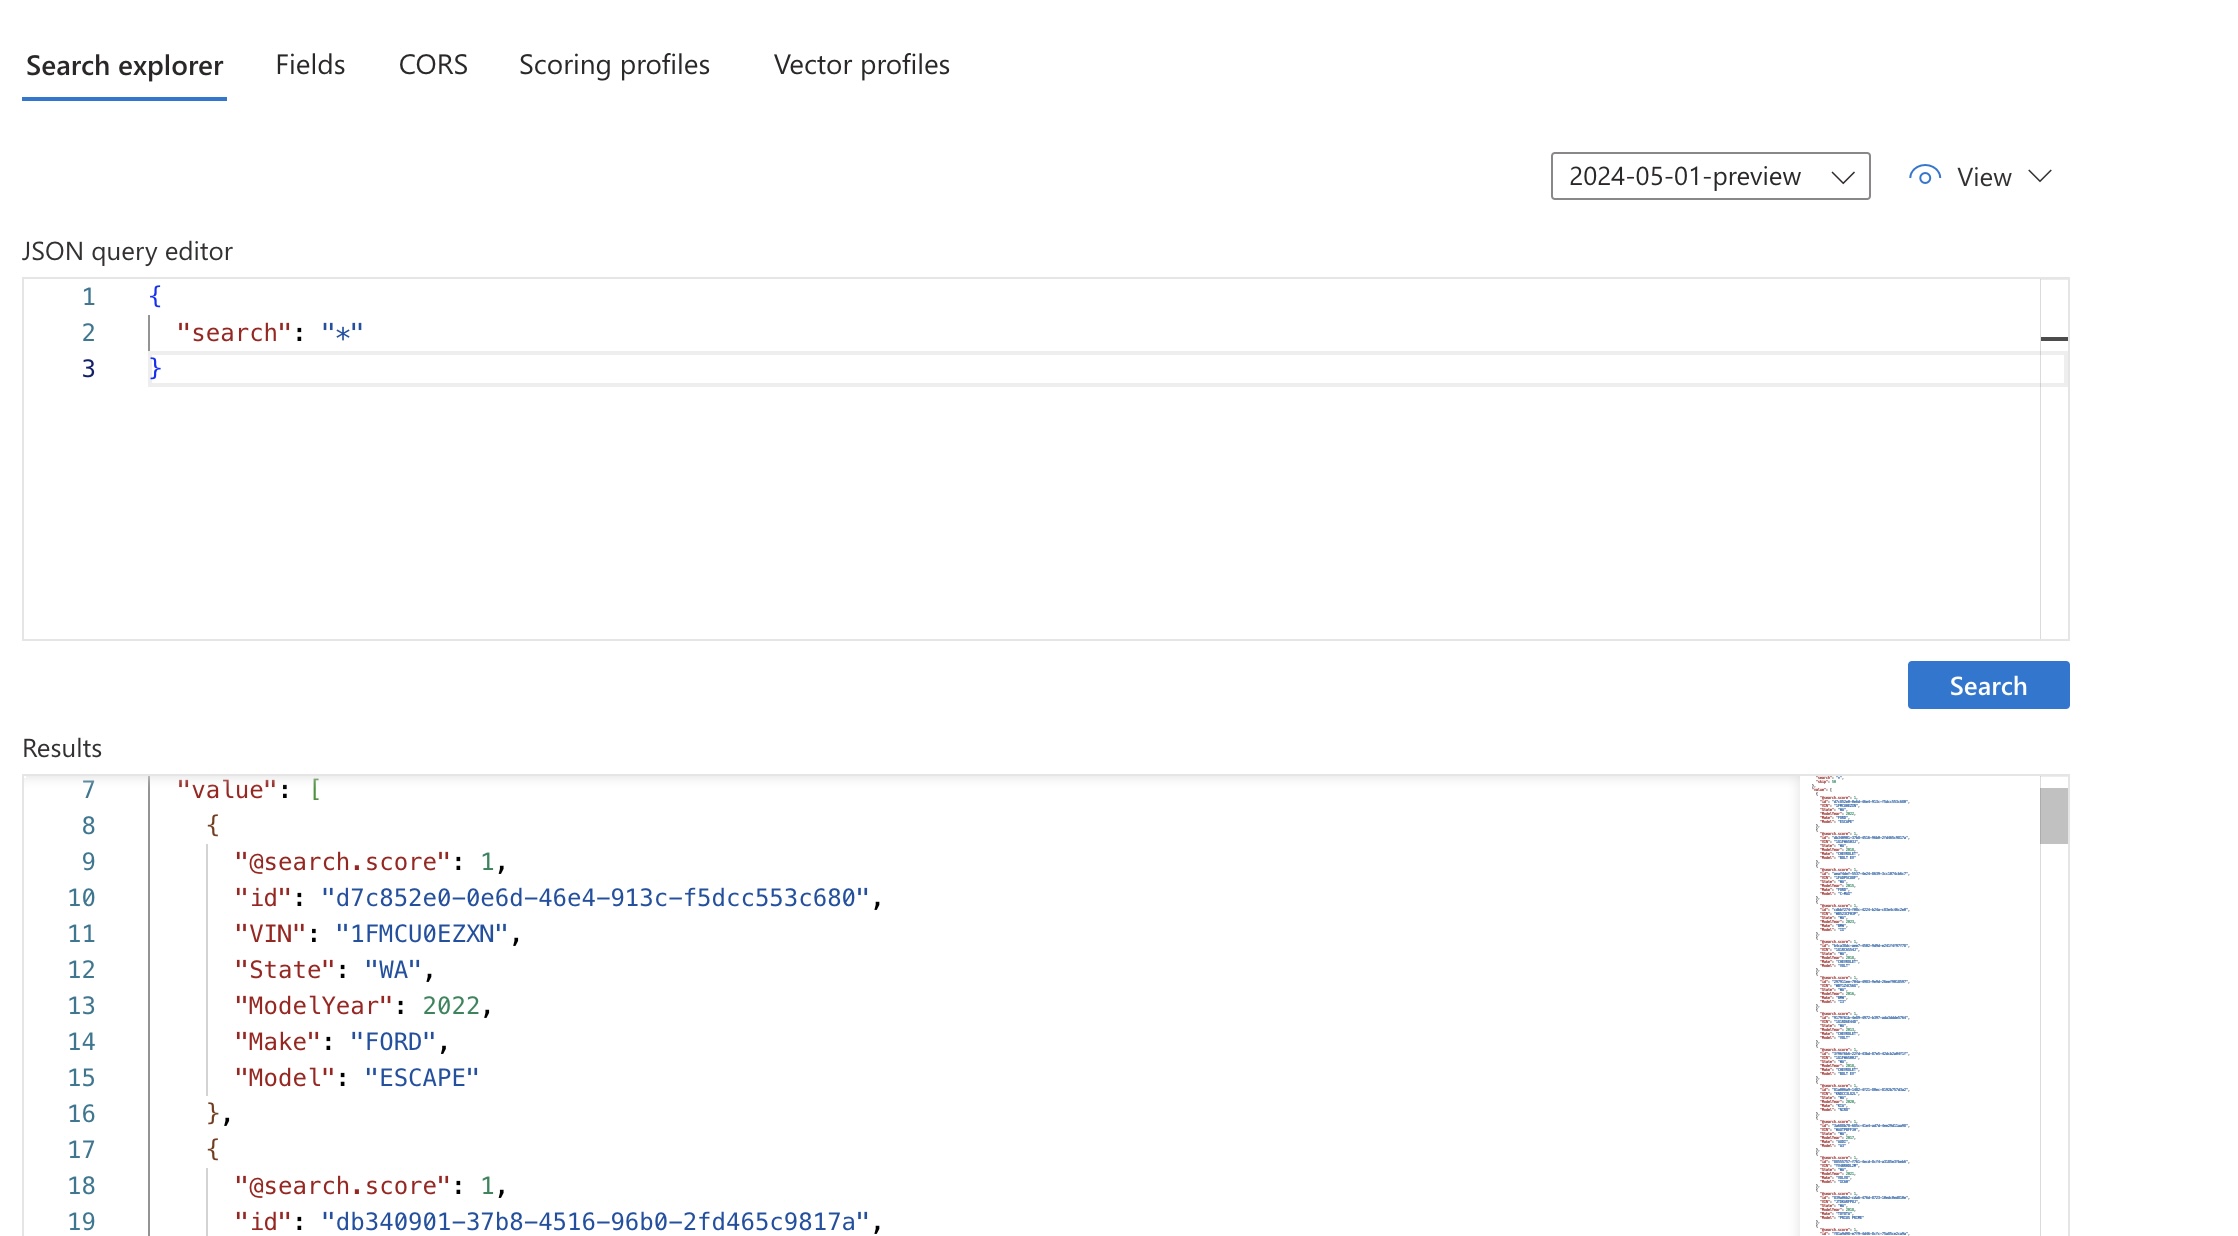
In that case I just passed the wildcard character * to select everything. If I wanted to do a more refined search, I could pass operators based on the different types of fields.
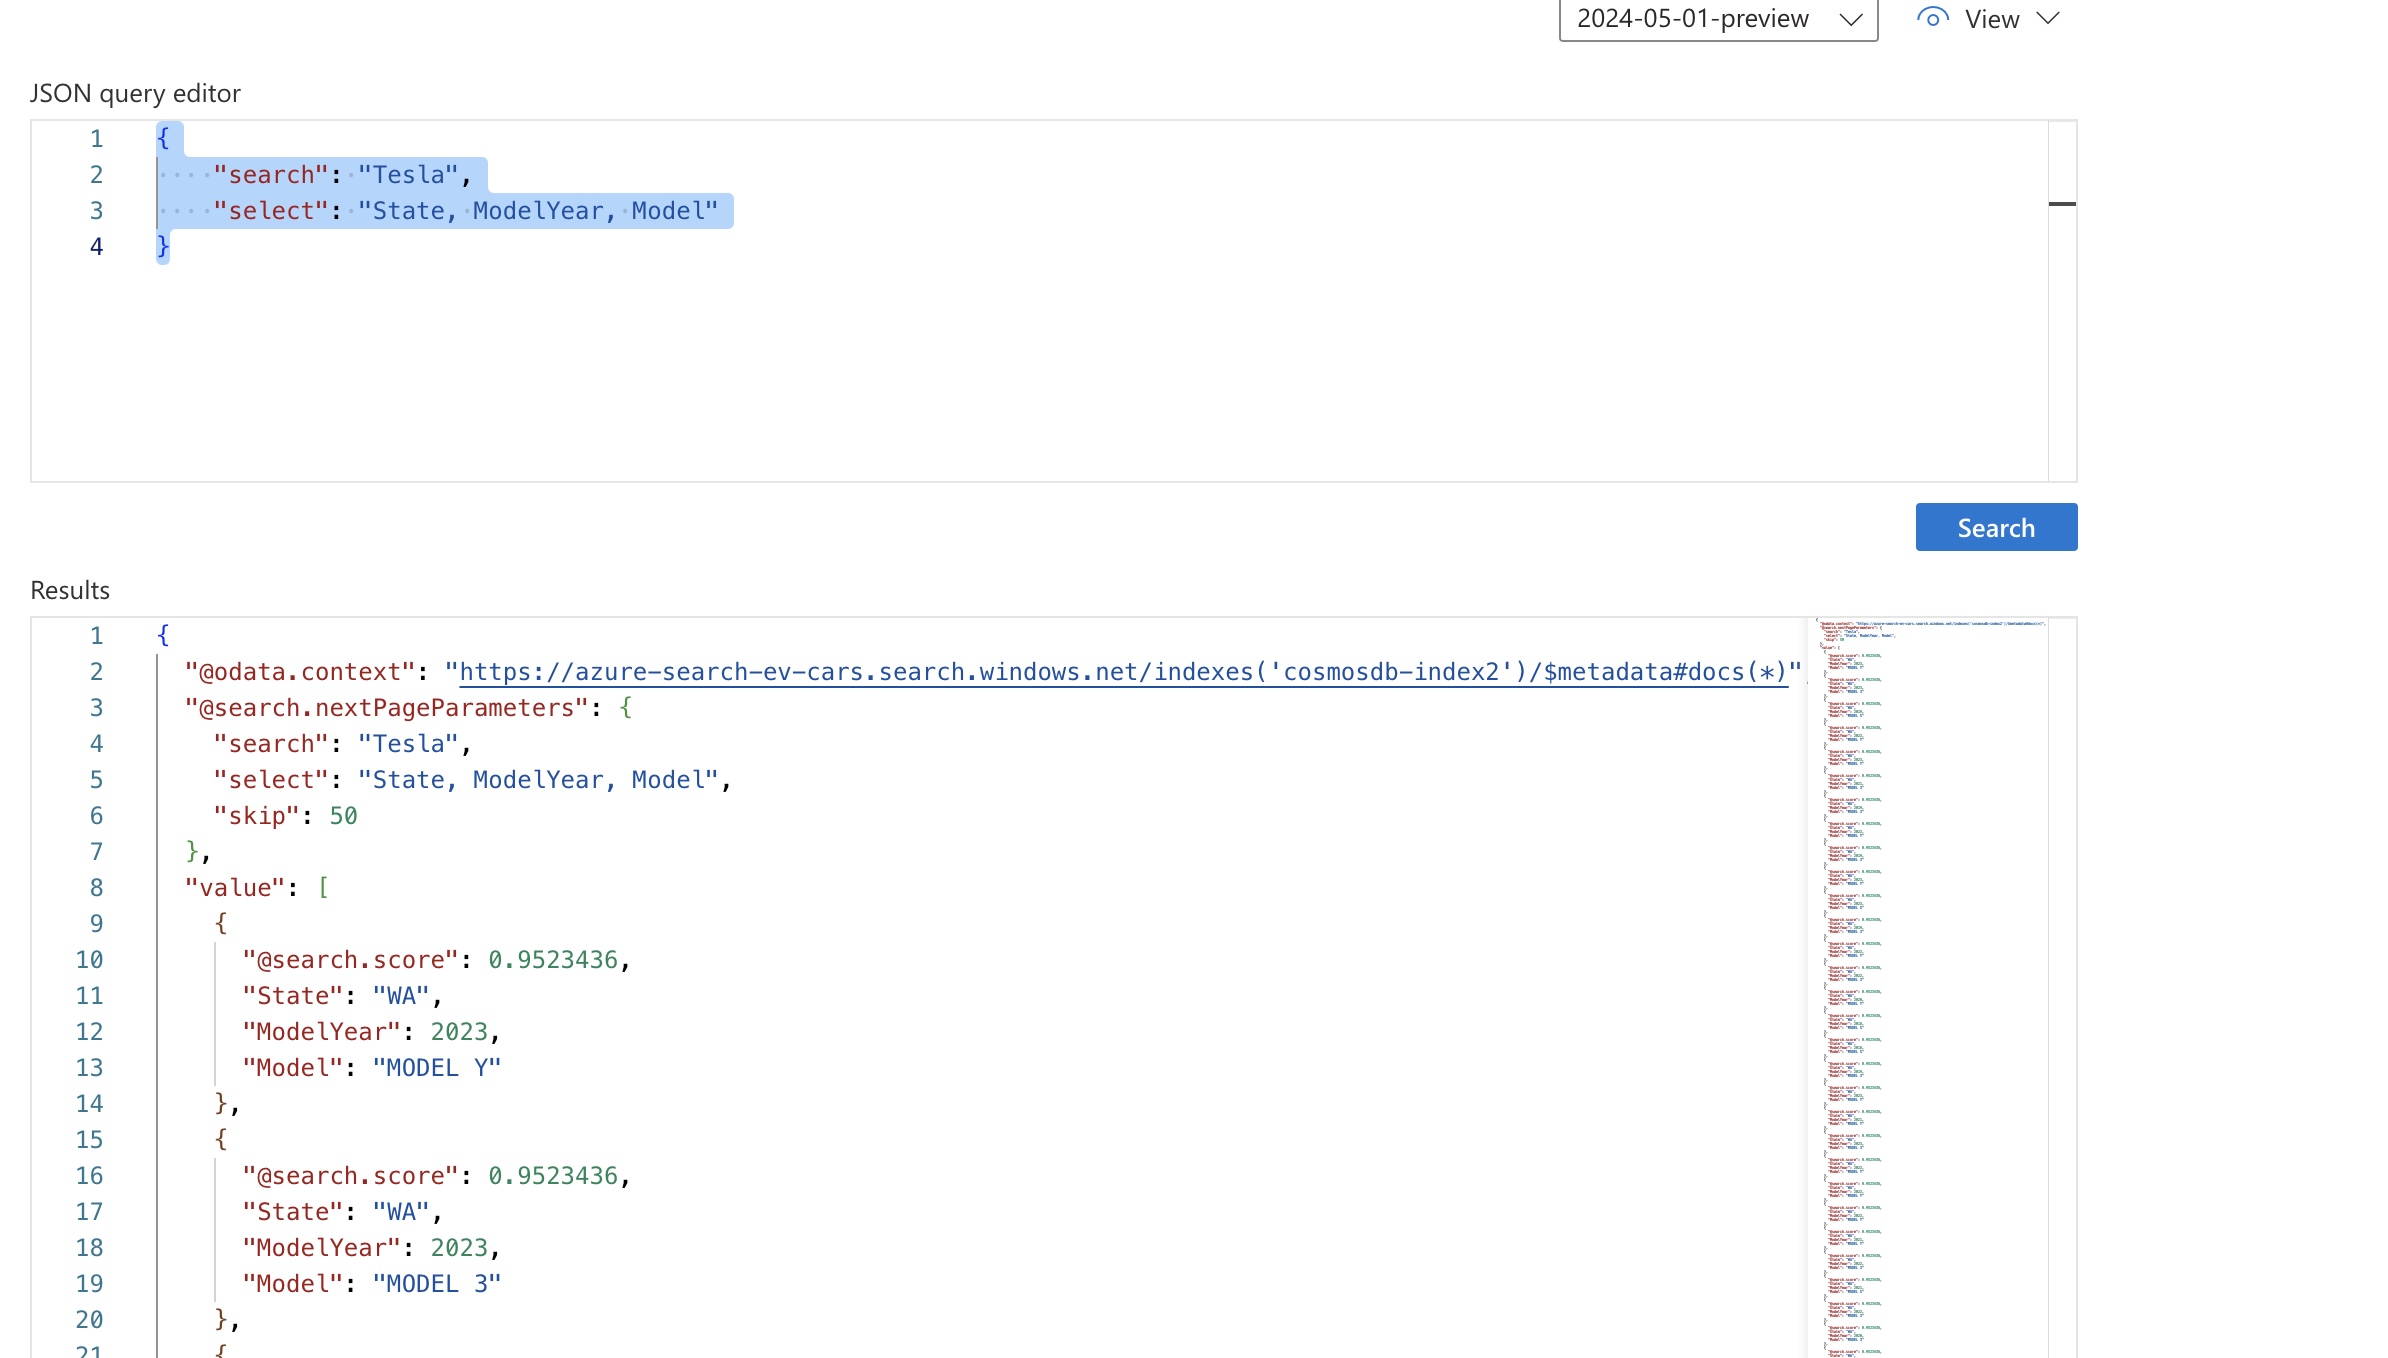
Here’s a search for all Tesla vehicles that returns their State, ModelYear, and Model:
{
  "search": "Tesla",
  "select": "State, ModelYear, Model"
}
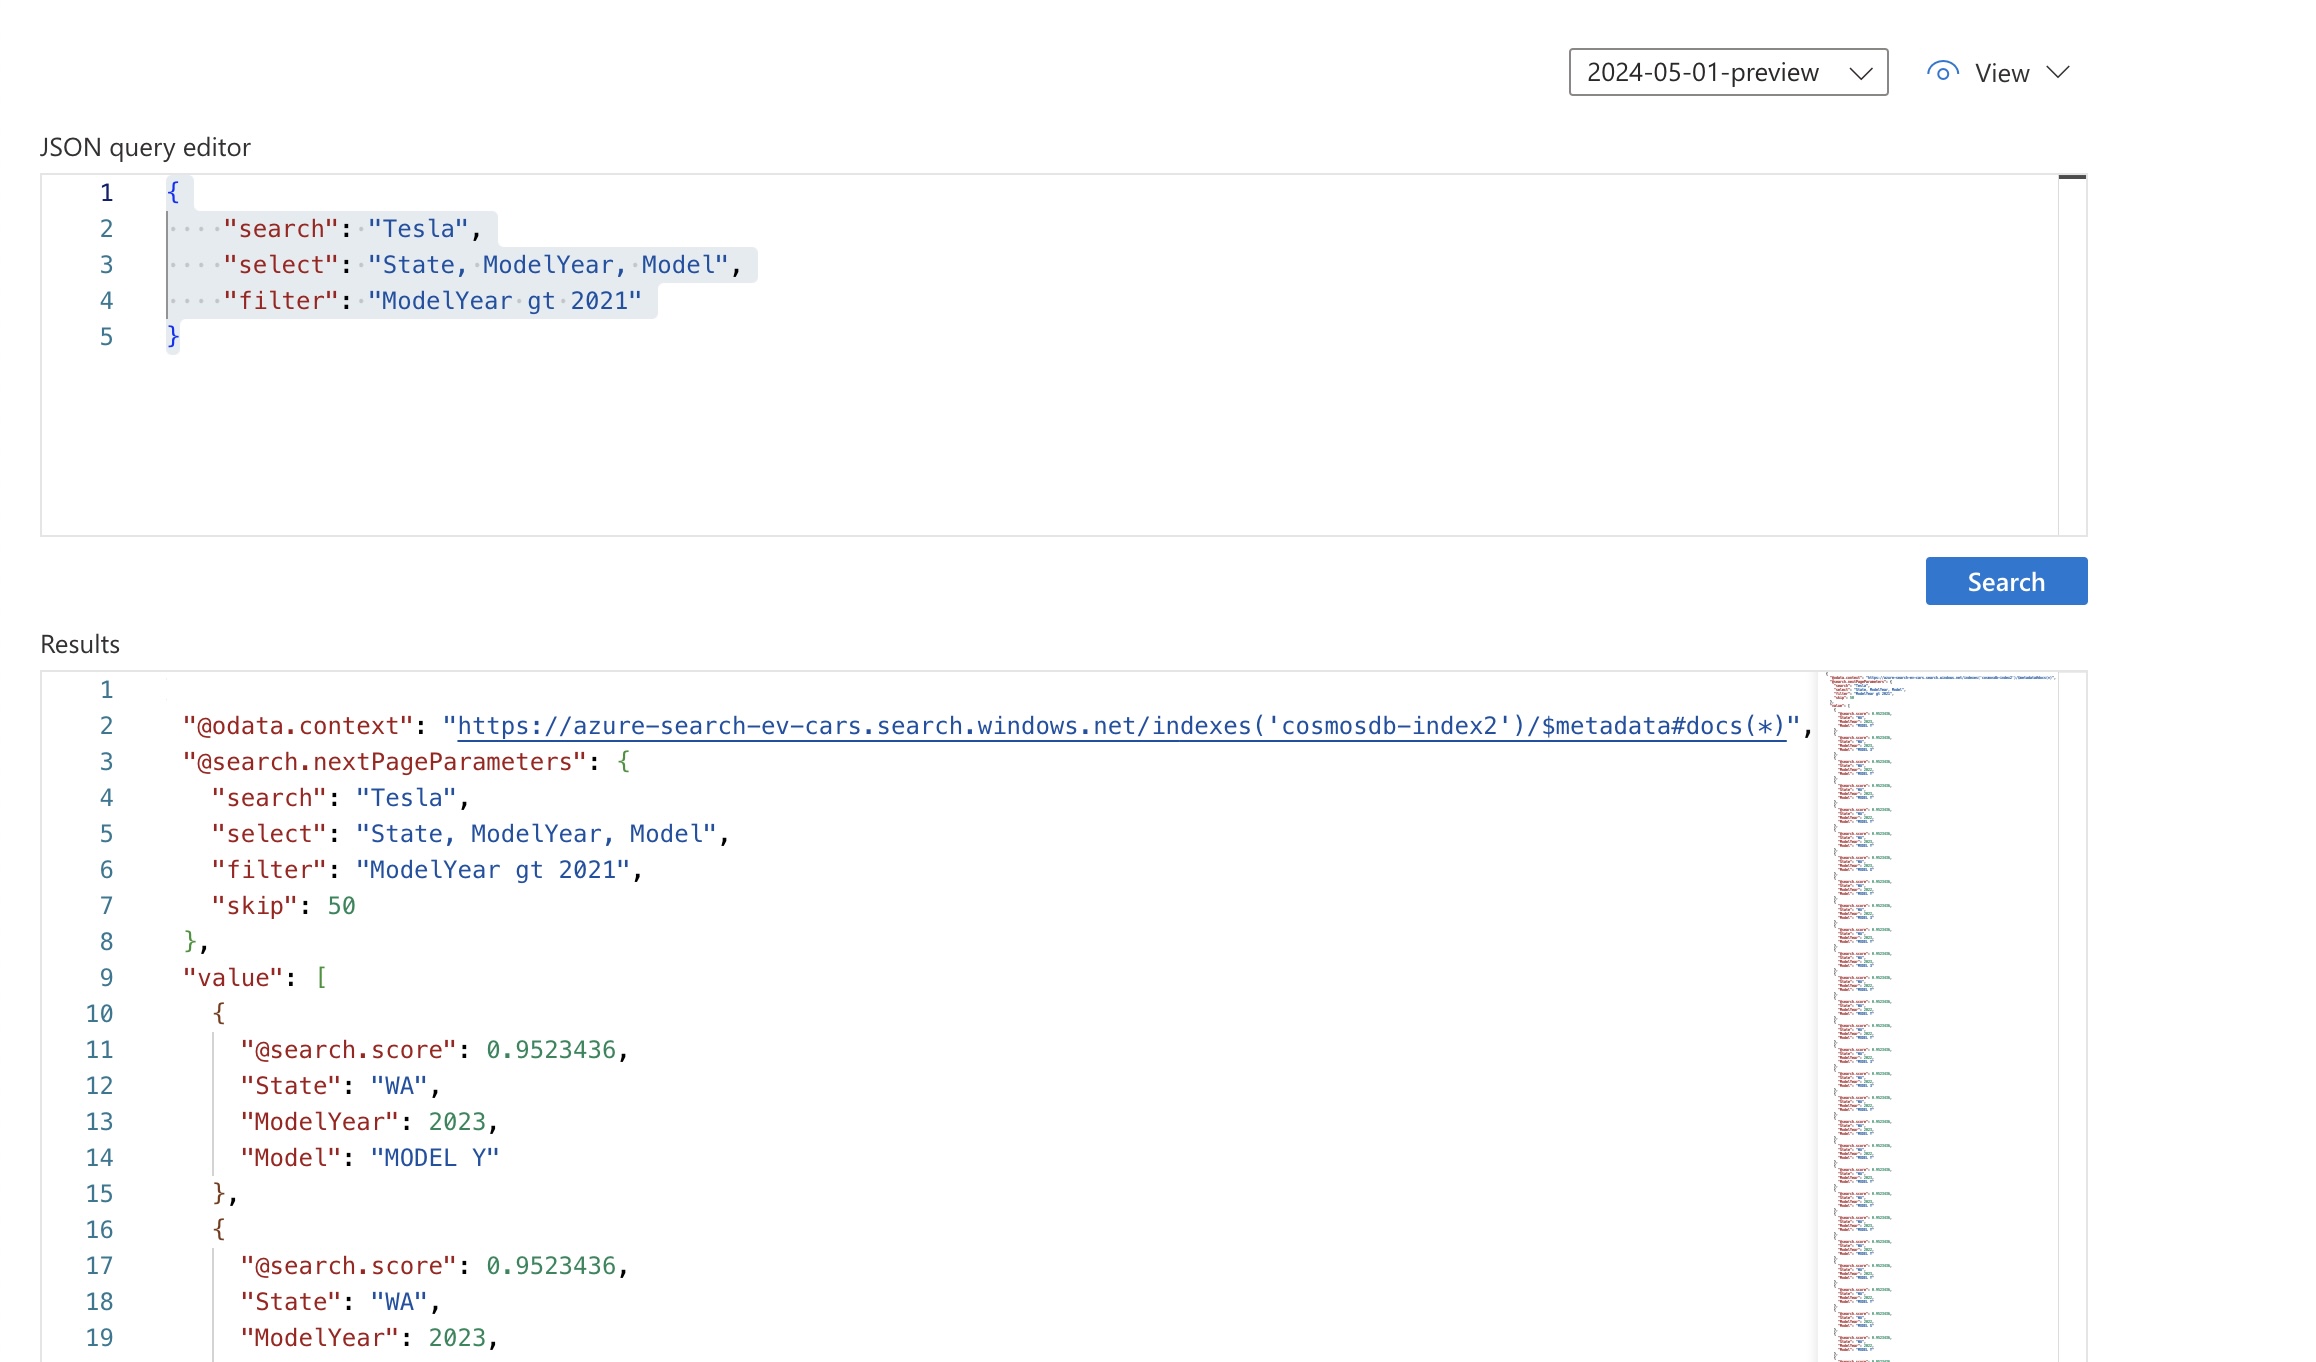
If I wanted to filter the results and only get ModelYear values greater than 2021, I could do the following:
{
  "search": "Tesla",
  "select": "State, ModelYear, Model",
  "filter": "ModelYear gt 2021"
}
We should also look at the data that is being returned from these queries. When I did the search with the wildcard character * you’ll note that the data returned looked like similar to the following:
{
  "@search.score": 1,
  "id": "d7c852e0-0e6d-46e4-913c-f5dcc553c680",
  "VIN": "1FMCU0EZXN",
  "State": "WA",
  "ModelYear": 2022,
  "Make": "FORD",
  "Model": "ESCAPE"
}
The fields that were retrieved are all from the Cosmos DB collection, but the field @search.score is a measure of how that result compared to the others retrieved. There are more advanced ways to look into this value and I recommend checking out the Microsoft Article on how scoring works.
Azure Faceted Search
A more advanced concept with Search is to use Search Faceted Navigation. Facets allow you to control (server side) navigation that you would present to a Frontend that uses Azure Search.
In my example of a list of EV cars, I created a second index that included some fields that use Facets:
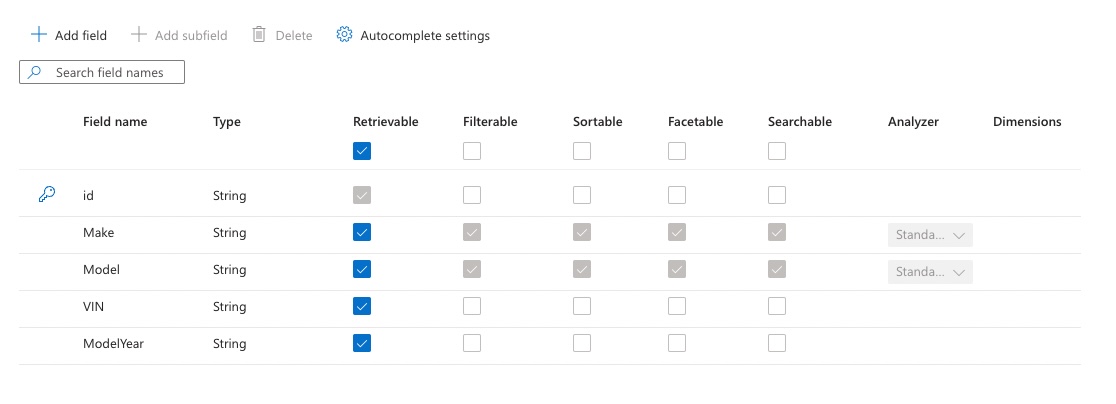
With that index in place, I then am able to run a query where I specify one of the Faceted values:
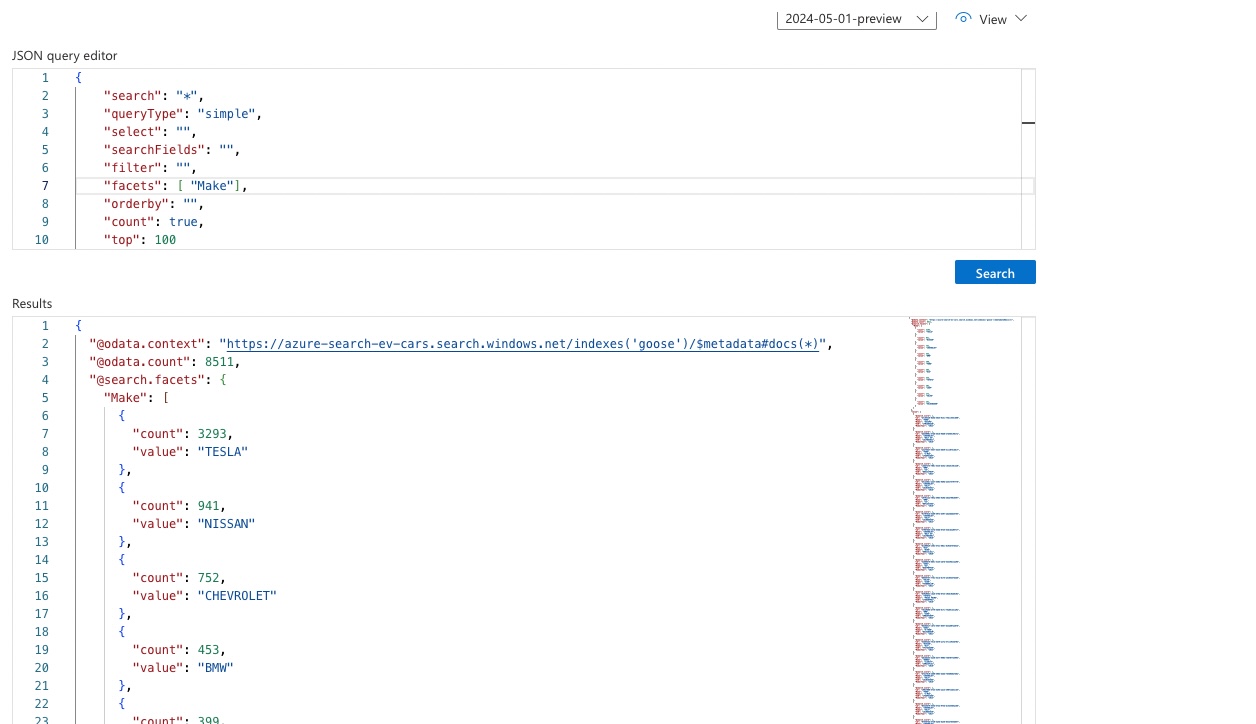
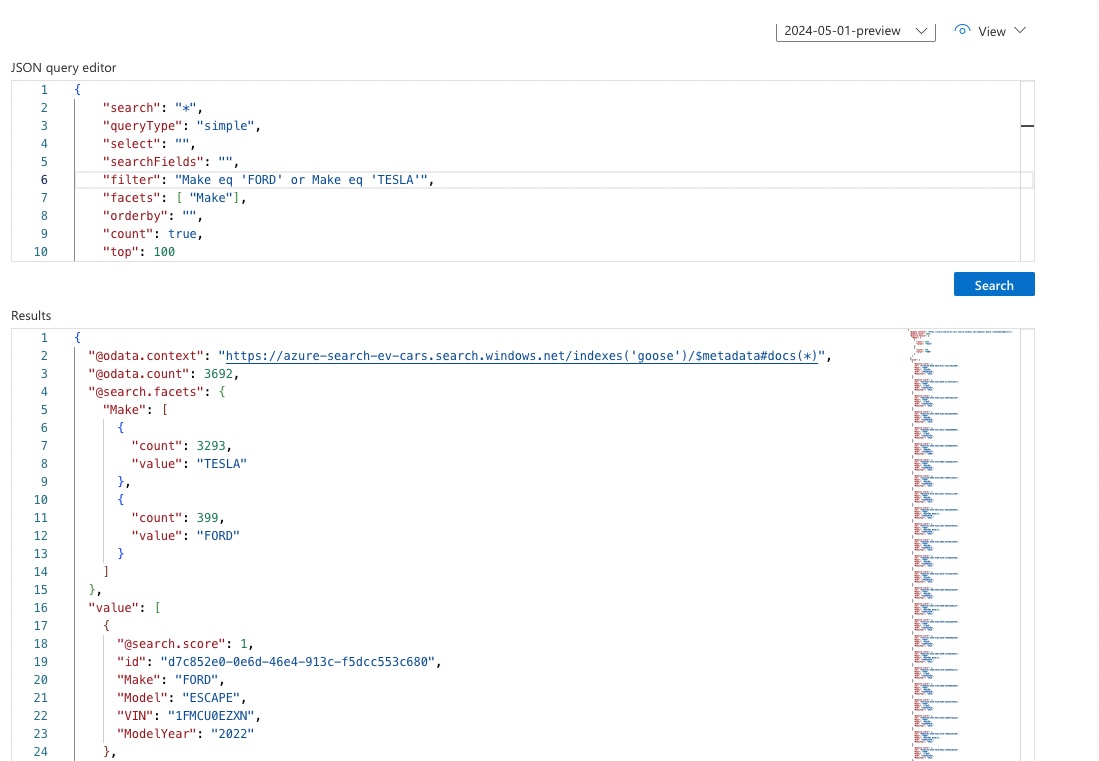
If you notice in the response there is a “facets” value that includes the Faceted field and a total. This provides data that could be used by a Frontend to show totals for specific values within the query result.
To provide a more refined search, I can then specify a filter to use with the facets:
There is a lot more that you can do with Facets. I recommend you check out the Microsoft Documentation.
Calling Azure Search from an API
Azure has SDKs that are available for interacting with the Search Service. The Azure Search Nuget Package provides the integrations necessary for you to use Azure Search with your C# applications.
Once you have created your project and included the Azure Search Nuget Package, you can call the service directly in your projects. Just to play around with this locally, I modified the Azure quickstart for .NET to suit the vehicles collection I had been working with.
I first created a class to represent the vehicles:
using System;
using System.Text.Json.Serialization;
using Azure.Search.Documents.Indexes;
using Azure.Search.Documents.Indexes.Models;

namespace AzureSearch.Quickstart
{
    public partial class Vehicle
    {
        [SimpleField(IsKey = true, IsFilterable = true)]
        public string? Id { get; set; }

        [SearchableField(IsSortable = true)]
        public string? VIN { get; set; }

        [SearchableField(AnalyzerName = LexicalAnalyzerName.Values.EnLucene)]
        public string State { get; set; }

        public int ModelYear { get; set; }

        [SearchableField(IsFilterable = true, IsSortable = true)]
        public string? Make { get; set; }

        [SearchableField(IsFilterable = true, IsSortable = true)]
        public string Model { get; set; }
    }
}
I then modified the program’s Main method to setup the package with the proper configuration:
using System;
using System.Text.Json;
using Azure;
using Azure.Search.Documents;
using Azure.Search.Documents.Indexes;
using Azure.Search.Documents.Indexes.Models;
using Azure.Search.Documents.Models;

namespace AzureSearch.Quickstart

{
    class Program
    {
        static void Main(string[] args)
        {
            // setup the configuration based on values from Azure
            string serviceName = "<AZURE_SEARCH_INSTANCE_NAME>";
            string apiKey = "<AZURE_SEARCH_API_KEY>";
            string indexName = "<AZURE_SEARCH_INDEX_NAME>";

            // create the actual client
            Uri serviceEndpoint = new Uri($"https://{serviceName}.search.windows.net/");
            AzureKeyCredential credential = new AzureKeyCredential(apiKey);
            SearchIndexClient adminClient = new SearchIndexClient(serviceEndpoint, credential);
            SearchClient srchclient = new SearchClient(serviceEndpoint, indexName, credential);

            // call the queries wrapped in a method
            Console.WriteLine("Starting queries...\n");
            RunQueries(srchclient);

            // End the program
            Console.WriteLine("{0}", "Complete. Press any key to end this program...\n");
            Console.ReadKey();
        }
    }
}
The example program writes values out to the console. I modified it to only show the values that were not null since the queries retrieved different sets of values:
// Write search results to console
private static void WriteDocuments(SearchResults<Vehicle> searchResults)
{
    foreach (SearchResult<Vehicle> result in searchResults.GetResults())
    {
        Vehicle vehicle = result.Document;
        Type type = vehicle.GetType();
        System.Reflection.PropertyInfo[] properties = type.GetProperties();

        string output = "{";
        foreach (System.Reflection.PropertyInfo property in properties)
        {
            object value = property.GetValue(vehicle);
            if(value != null){
                output += $"\"{property.Name}\":\"{value}\",";
            }
        }
        output += "}";
        Console.WriteLine(output);
    }

    Console.WriteLine();
}
With the client created and the output method setup, I then modified the queries in the RunQueries method similar to how we did in the search explorer.
// here is the first query we did with selecting all the values
SearchOptions options;
SearchResults<Vehicle> response;

// specify options like query size
options = new SearchOptions()
{
    IncludeTotalCount = true,
    Filter = "",
    OrderBy = { "" },
    Size = 10
};

options.Select.Add("VIN");
options.Select.Add("State");
options.Select.Add("ModelYear");
options.Select.Add("Make");
options.Select.Add("Model");

// passing in a wildcard character like we did in the search explorer
// also note I had to pass in a class based implementation of the vehicle values
response = srchclient.Search<Vehicle>("*", options);
The above will result in the following console output:
{"VIN":"1FMCU0EZXN","State":"WA","ModelYear":"2022","Make":"FORD","Model":"ESCAPE",}
{"VIN":"1G1FW6S03J","State":"WA","ModelYear":"2018","Make":"CHEVROLET","Model":"BOLT EV",}
{"VIN":"1FADP5CU8F","State":"WA","ModelYear":"2015","Make":"FORD","Model":"C-MAX",}
{"VIN":"WB523CF03P","State":"WA","ModelYear":"2023","Make":"BMW","Model":"IX",}
{"VIN":"1G1RC6S54J","State":"WA","ModelYear":"2018","Make":"CHEVROLET","Model":"VOLT",}
{"VIN":"WBY1Z4C56G","State":"WA","ModelYear":"2016","Make":"BMW","Model":"I3",}
{"VIN":"1G1RD6E44D","State":"WA","ModelYear":"2013","Make":"CHEVROLET","Model":"VOLT",}
{"VIN":"1G1FW6S00J","State":"WA","ModelYear":"2018","Make":"CHEVROLET","Model":"BOLT EV",}
{"VIN":"KNDCC3LG2L","State":"WA","ModelYear":"2020","Make":"KIA","Model":"NIRO",}
{"VIN":"WAUTPBFF3H","State":"WA","ModelYear":"2017","Make":"AUDI","Model":"A3",}
Here is the second query I did looking for Tesla vehicles:
options = new SearchOptions()
{
    IncludeTotalCount = true,
    Filter = "",
    OrderBy = { "" },
    Size = 10
};

options.Select.Add("State");
options.Select.Add("ModelYear");
options.Select.Add("Model");

response = srchclient.Search<Vehicle>("Tesla", options);
Writing the values out to the console, resulted in the following values:
{"State":"WA","ModelYear":"2023","Model":"MODEL Y",}
{"State":"WA","ModelYear":"2023","Model":"MODEL 3",}
{"State":"WA","ModelYear":"2019","Model":"MODEL S",}
{"State":"WA","ModelYear":"2022","Model":"MODEL Y",}
{"State":"WA","ModelYear":"2023","Model":"MODEL Y",}
{"State":"WA","ModelYear":"2021","Model":"MODEL 3",}
{"State":"WA","ModelYear":"2019","Model":"MODEL 3",}
{"State":"WA","ModelYear":"2022","Model":"MODEL Y",}
{"State":"WA","ModelYear":"2019","Model":"MODEL 3",}
{"State":"WA","ModelYear":"2023","Model":"MODEL Y",}
Another example query I had was Tesla cars older than 2021.
options = new SearchOptions()
{
    Filter= "ModelYear gt 2021",
    Size = 10
};

options.Select.Add("State");
options.Select.Add("ModelYear");
options.Select.Add("Model");

response = srchclient.Search<Vehicle>("Tesla", options);
Writing this out to the console resulted in output similar to the following:
{"State":"WA","ModelYear":"2023","Model":"MODEL Y",}
{"State":"WA","ModelYear":"2023","Model":"MODEL 3",}
{"State":"WA","ModelYear":"2022","Model":"MODEL Y",}
{"State":"WA","ModelYear":"2023","Model":"MODEL Y",}
{"State":"WA","ModelYear":"2022","Model":"MODEL Y",}
{"State":"WA","ModelYear":"2023","Model":"MODEL Y",}
{"State":"WA","ModelYear":"2023","Model":"MODEL X",}
{"State":"WA","ModelYear":"2022","Model":"MODEL Y",}
{"State":"WA","ModelYear":"2022","Model":"MODEL 3",}
{"State":"WA","ModelYear":"2023","Model":"MODEL Y",}
I also modified the configuration value to use my second index with Facets:
// setup options
options = new SearchOptions()
{
    Filter = "",
    Size = 10,
    IncludeTotalCount = true
};

// add Facet value of Make
options.Facets.Add("Make");

// specify fields to select
options.Select.Add("Make");
options.Select.Add("ModelYear");
options.Select.Add("Model");
options.Select.Add("VIN");

// do the actual search and write to the console
response = srchclient.Search<Vehicle>("*", options);
WriteDocuments(response);
For the console output I also had to modify the way it parsed the facets in the response with the following:
if(searchResults.Facets != null && searchResults.Facets.Count > 0){
    Console.WriteLine("FACETS");
    var makeFacets = searchResults.Facets["Make"];

    foreach(var facets in makeFacets)
    {
        Console.WriteLine($"  Value: {facets.Value}, Count: {facets.Count}");
    }
    Console.WriteLine("");
}
With everything setup for Facets, the resulting console output was the following values:
FACETS
  Value: TESLA, Count: 3293
  Value: NISSAN, Count: 941
  Value: CHEVROLET, Count: 752
  Value: BMW, Count: 453
  Value: FORD, Count: 399
  Value: KIA, Count: 384
  Value: TOYOTA, Count: 345
  Value: JEEP, Count: 302
  Value: VOLVO, Count: 272
  Value: VOLKSWAGEN, Count: 251

{"VIN":"1FMCU0EZXN","ModelYear":"2022","Make":"FORD","Model":"ESCAPE",}
{"VIN":"1G1FW6S03J","ModelYear":"2018","Make":"CHEVROLET","Model":"BOLT EV",}
{"VIN":"1FADP5CU8F","ModelYear":"2015","Make":"FORD","Model":"C-MAX",}
{"VIN":"WB523CF03P","ModelYear":"2023","Make":"BMW","Model":"IX",}
{"VIN":"1G1RC6S54J","ModelYear":"2018","Make":"CHEVROLET","Model":"VOLT",}
{"VIN":"WBY1Z4C56G","ModelYear":"2016","Make":"BMW","Model":"I3",}
{"VIN":"1G1RD6E44D","ModelYear":"2013","Make":"CHEVROLET","Model":"VOLT",}
{"VIN":"1G1FW6S00J","ModelYear":"2018","Make":"CHEVROLET","Model":"BOLT EV",}
{"VIN":"KNDCC3LG2L","ModelYear":"2020","Make":"KIA","Model":"NIRO",}
{"VIN":"WAUTPBFF3H","ModelYear":"2017","Make":"AUDI","Model":"A3",}
There are many more things you could do here, but I kept these queries necessarily simple just to showcase how this works.
Wrapping Up
In this post I hope you learned some details about how Azure Search works. I introduced search as a concept, and then went into detail about how search works with Azure. I covered an example that created an Azure Search instance and ran sample queries with the search explorer. I also included some examples of how you could use the Azure Search Nuget Package to query Azure Search in a C# .NET application. I only covered a high level of how to get started, and definitely recommend reviewing the various Microsoft tutorials and documentation that work with search. Other features that are worth noting are Autocomplete with Azure Search as well as several other advanced search options you can find in the official Azure Search documentation. Azure Search has a lot of potential to provide good solutions to searching needs. Thanks for reading my post!