Getting started with Lit
I recently worked on a project with the Lit Framework from Google and wanted to write about it. If you’re new to Lit, it is a minimal framework that utilizes web components for Frontend projects. Lit is really good with performance, and allows you to share components between parent existing projects built with Frameworks or Libraries like React. In this post, I’m just going to discuss a few of the highlights and share some code samples. In my discussion, I’ll be referring to a sample project that I built with Lit that I used to track my half marathon training plan on GitHub.
What is Lit?
Lit is a small library for building web components. Lit takes advantage of the Shadow DOM to isolate components. Lit is great for design systems or shareable libraries that may be consumed by multiple frameworks like Angular or other Libraries like React.
You can install Lit as a dependency on an existing project, or pull it in from a CDN. There are also starter projects and you can even build Lit with Vite.
Lit works with both JavaScript and TypeScript. The basic structure of a Lit component is to have a component name, render function, and definitions for property values consumed by the component. Here is a copy of the example from the Lit documentation:
import {LitElement, html, css} from 'lit';
import {customElement, property, state} from 'lit/decorators.js';
/* playground-fold */
import {play, pause, replay} from './icons.js';
/* playground-fold-end */

@customElement("my-timer")
export class MyTimer extends LitElement {
  static styles = css`/* playground-fold */

    :host {
      display: inline-block;
      min-width: 4em;
      text-align: center;
      padding: 0.2em;
      margin: 0.2em 0.1em;
    }
    footer {
      user-select: none;
      font-size: 0.6em;
    }
    /* playground-fold-end */`;

  @property() duration = 60;
  @state() private end: number | null = null;
  @state() private remaining = 0;

  render() {
    const {remaining, running} = this;
    const min = Math.floor(remaining / 60000);
    const sec = pad(min, Math.floor(remaining / 1000 % 60));
    const hun = pad(true, Math.floor(remaining % 1000 / 10));
    return html`
      ${min ? `${min}:${sec}` : `${sec}.${hun}`}
      <footer>
        ${remaining === 0 ? '' : running ?
          html`<span @click=${this.pause}>${pause}</span>` :
          html`<span @click=${this.start}>${play}</span>`}
        <span @click=${this.reset}>${replay}</span>
      </footer>
    `;
  }
  /* playground-fold */

  start() {
    this.end = Date.now() + this.remaining;
    this.tick();
  }

  pause() {
    this.end = null;
  }

  reset() {
    const running = this.running;
    this.remaining = this.duration * 1000;
    this.end = running ? Date.now() + this.remaining : null;
  }

  tick() {
    if (this.running) {
      this.remaining = Math.max(0, this.end! - Date.now());
      requestAnimationFrame(() => this.tick());
    }
  }

  get running() {
    return this.end && this.remaining;
  }

  connectedCallback() {
    super.connectedCallback();
    this.reset();
  }/* playground-fold-end */

}
/* playground-fold */

function pad(pad: unknown, val: number) {
  return pad ? String(val).padStart(2, '0') : val;
}/* playground-fold-end */
The example here renders a timer that looks like the following:

The TypeScript version of Lit uses annotations like the customElement one that is used to define the component name.
In the HTML or view of your component, you would then just import your element and use it directly in the HTML (example was copied from the Lit documentation):
<!doctype html>
<head>
  <!-- playground-fold -->
  <link rel="preconnect" href="https://fonts.gstatic.com" />
  <link
    href="https://fonts.googleapis.com/css2?family=JetBrains+Mono:ital,wght@1,800&display=swap"
    rel="stylesheet"
  />
  <script type="module" src="./my-timer.js"></script>
  <style>
    body {
      font-family: "JetBrains Mono", monospace;
      font-size: 36px;
    }
  </style>
  <!-- playground-fold-end -->
</head>
<body>
  <my-timer duration="7"></my-timer>
  <my-timer duration="60"></my-timer>
  <my-timer duration="300"></my-timer>
</body>
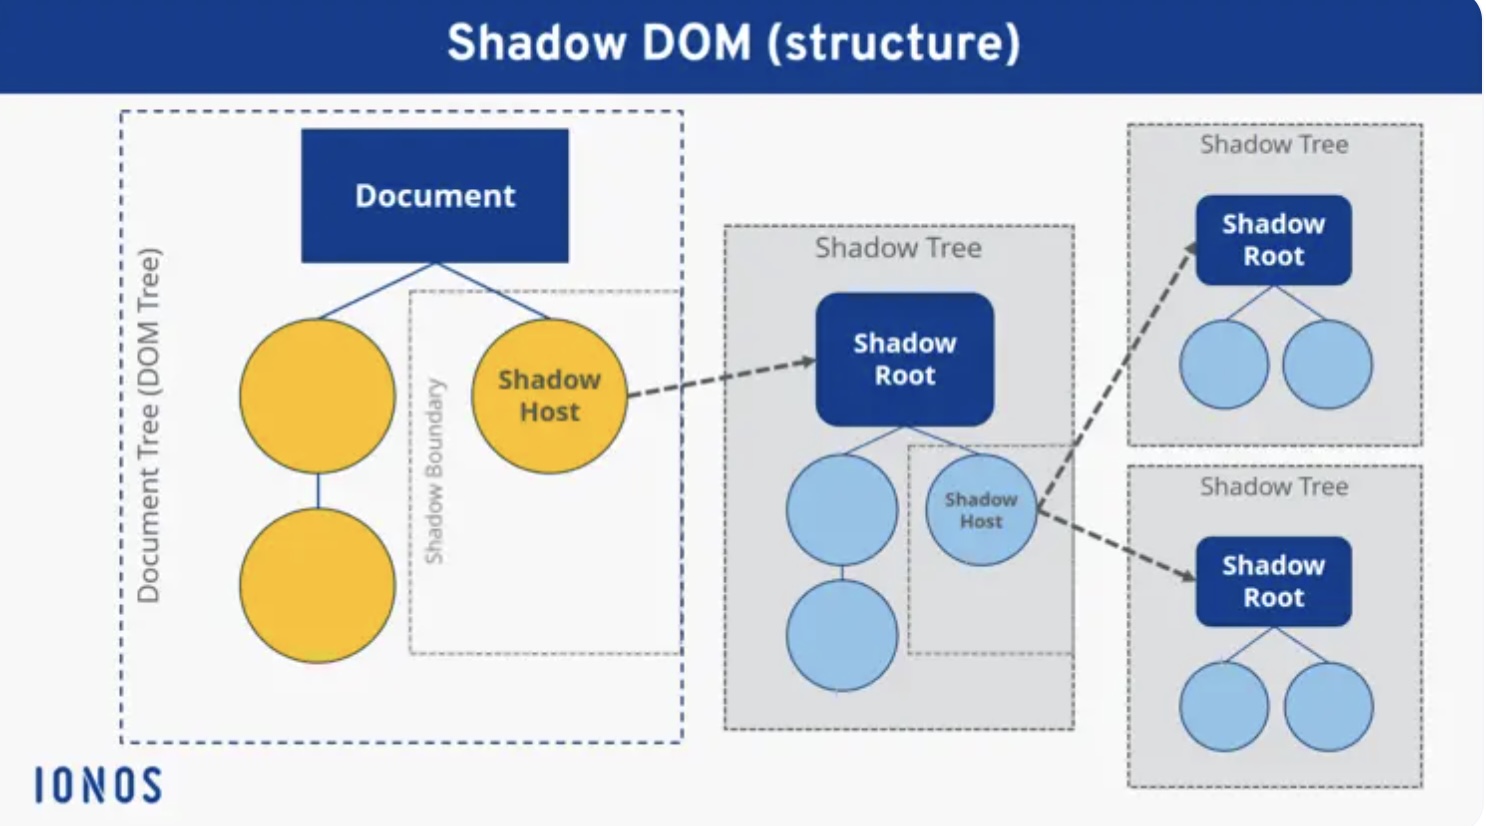
Lit uses the Shadow DOM to isolate components. This is very powerful as it allows you to isolate state and things like styling. When people talk about the Shadow DOM, it can be difficult to understand. Here is a visual from IONOS that shows how the Shadow DOM exists visually:

The Shadow DOM basically allows you to have a isolated portion of the regular DOM to do you work. Lit accomplishes using Shadow DOM elements through DOM API’s like document.querySelector. When working with Lit, you don’t normally think about using the Shadow DOM and focus more on just getting your components to render. It helps to understand how it works under the covers though for a more wholistic explanation. Lit has a good page that goes into how it uses the Shadow DOM..
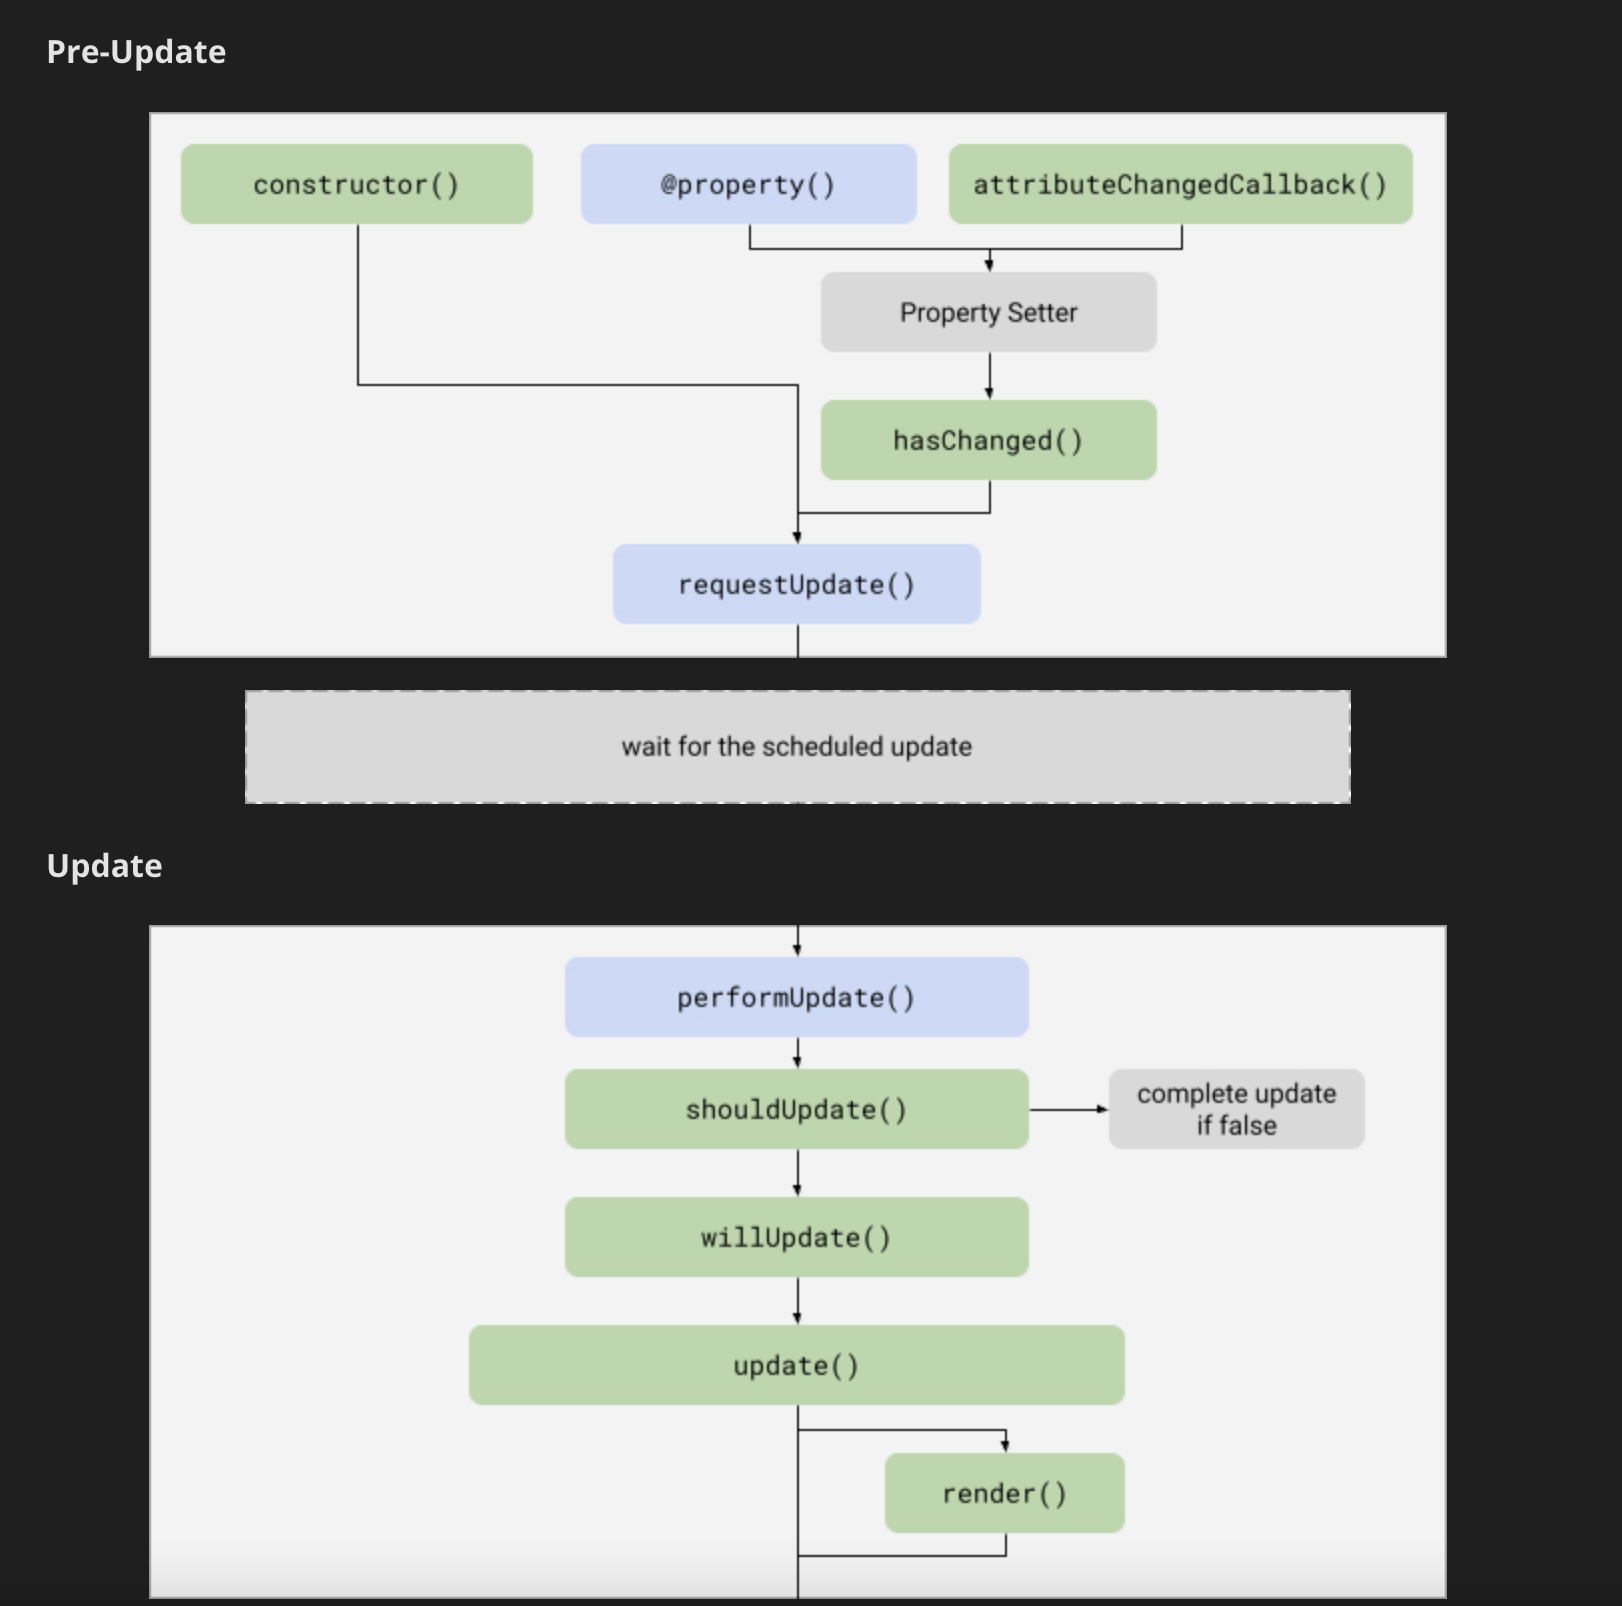
Other than the Shadow DOM, Lit makes use of lifecycle methods similar to the way Angular and React work. Here are some examples (photo copied from the Lit documentation):

In your Lit components, you can also create event listeners or directly attach a process to a click event (example copied from the Lit documentation on event listeners):
import {LitElement, html} from 'lit';
import {customElement, property} from 'lit/decorators.js';
@customElement('my-element')
class MyElement extends LitElement {
  @property() hostName = '';
  @property() shadowName = '';
  constructor() {
    super();
    this.addEventListener('click',
      (e: Event) => this.hostName = (e.target as Element).localName);
  }
  protected createRenderRoot() {
    const root = super.createRenderRoot();
    root.addEventListener('click',
      (e: Event) => this.shadowName = (e.target as Element).localName);
    return root;
  }
  protected render() {
    return html`
      <p><button>Click Me!</button></p>
      <p>Component target: ${this.hostName}</p>
      <p>Shadow target: ${this.shadowName}</p>
    `;
  }
}
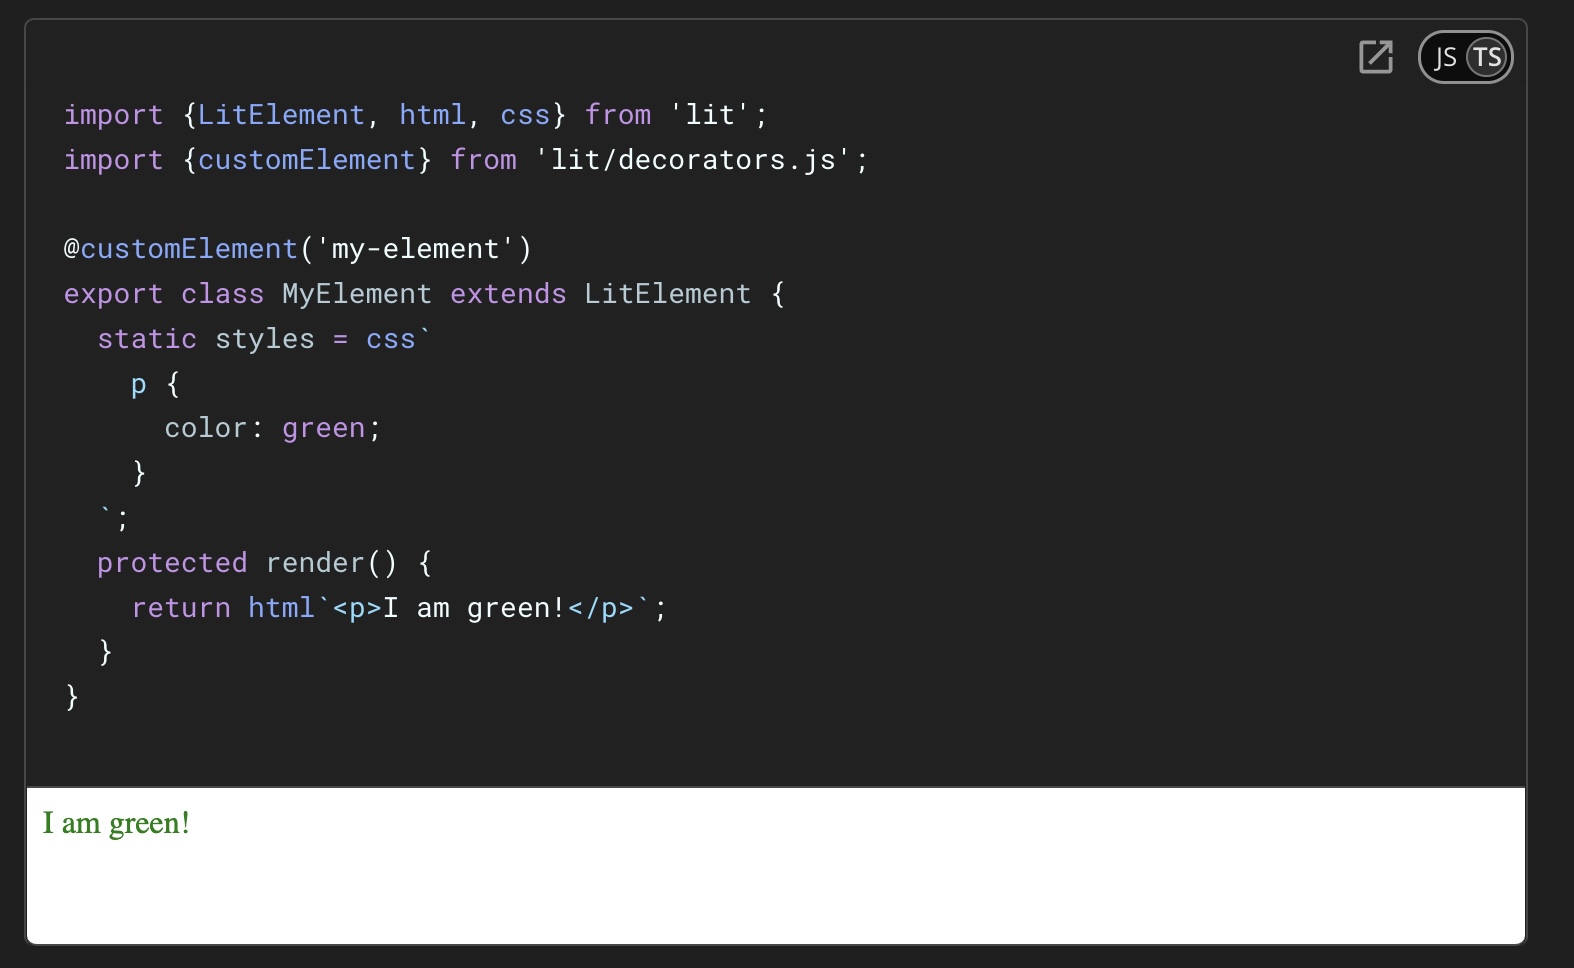
It is not present in the examples I showed above, but for styling you can define a “styles” variable that is then consumed by your component’s view. You can see this in another example copied from the Lit documentation:

If you’re working with a React project, you can import your Lit component with the Lit React package.
There is a lot more that you can do with Lit. In the next sections, I’ll walkthrough some examples in my sample project.
A Real Example, Navigation and Event Handling
In the intro I mentioned a sample application I created for half marathon training. I’m planning to run the Richmond Half Marathon this year and thought it would be fun to have a training plan that used Lit. My sample application I’ve shared just has a month of values, but you could expand it to show more. The basic app displays the workouts for the week, month, total, and a countdown calculator to the race day.
Building a sample application gave me some hands on experience with normal problems you face in development. The first issue I had was navigation. I wanted to basically have a SPA app. After some googling I found that most things were pointing me to use a routing library, but there is aGitHub issue that discusses options. In my sample application I basically just created a conditional statement that hid or showed values based on what was clicked. I know this is not perfect, but it got me what I wanted since my application was very simple.
I first just created an attribute in my main element:
@customElement('main-element')
export class MainElement extends LitElement {
    @property({ type: String })
    clicked = '';

    render() {
        let display;
    // more in the component but did not show here to keep it small
Then I added event handlers for the clicks:
    private _clickHandler(e: Event) {
        this.clicked =
            e.target === e.currentTarget
                ? 'container'
                : (e.target as HTMLDivElement).textContent!;
    }

    private _clickBack() {
        this.clicked = '';
    }
Then in the actual view portion of the component I added the event handlers and conditionally checked for the “clicked” value:
    render() {
        let display;
        // This basically is creating a SPA app, but a
        // router package could be used instead of
        // manually handling these transitions.
        // The point here was just demonstrating how events
        // can be passed between parent and children components.
        if (this.clicked === '') {
            display = html`<section>
                <div class="title">
                    <h1>Half Marathon Training with Lit</h1>
                </div>
                <div @click="${this._clickHandler}" class="main-body">
                    <button>Week</button>
                    <button>Month</button>
                    <button>Total Plan</button>
                    <button>Countdown Calculator</button>
                    <button>About</button>
                </div>
                <img src="./COVER.jpg" />
            </section>`;
        } else {
            if (this.clicked === 'Week') {
                display = html`<week-element
                    titleValue=${this.clicked}
                    @backListener=${this._clickBack}
                />`;
            } else if (this.clicked === 'Month') {
                display = html`<month-element
                    titleValue=${this.clicked}
                    @backListener=${this._clickBack}
                />`;
    // more in the component but did not show here to keep it small
If you notice I register the event listener with the @backListener attribute in the element. If you go over to one of the elements (in this case its the month element), you’ll see I have defined a handler that calls this listener:
    render(){

        // took out a lot to keep this brief

                        <button @click=${this._dispatchBackButtonClicked}>
                            BACK
                        </button>
                    `;
                }
            },
            error: (e) => html`<p>Error: ${e}</p>`,
        });
    }

    // when clicked it dispatches an event to indicate back button is clicked
    private _dispatchBackButtonClicked() {
        this.dispatchEvent(new CustomEvent('backListener'));
    }

    // kept brief so took out the remainder of the component in this example
If you wanted to see more, just look at the main-element.ts and src/components/month-element.ts files in the example project.
Async Calls
With most web applications, developers have to work with async functionality like calling an API endpoint. Lit allows you to do this with async tasks.
If you look back at the month element in my example project, I first define a task to retrieve a JSON file. I could have hosted the plan’s JSON file in storage or some other mechanism, but I just packaged it alongside the project.
    private _planTask = new Task(this, {
        task: async ([], { signal }) => {
            const response = await fetch(`./TRAINING_PLAN.json`, {
                signal,
            });
            if (!response.ok) {
                throw new Error(response.status.toString());
            }
            return response.json();
        },
        args: () => [],
    });
Then in the render function I call the task, and you’ll note that Lit also provides handlers for pending behavior (loading) as well as when an error occurs:
    render() {
        return this._planTask.render({
            pending: () => html`<p>Loading plan...</p>`,
            complete: (overallResponse) => {
                // find page value for this week
                const pageValue = overallResponse.filter((value: any) => {
                    return isThisMonth(new Date(value.startDate));
                });

                if (pageValue !== undefined) {
                    return html`
                        <h1>${this.titleValue}</h1>
                        ${pageValue.map(
                            (week: any) => html` <div
                                class="week"
                                ${animate({
                                    in: fadeInSlow,
                                })}
                            >
                                <h3>${week.week} of 16</h3>
                                <h4>
                                    starting
                                    ${format(week.startDate, 'MM-dd-yyyy')}
                                </h4>
                                <div class="schedule">
                                    ${week.schedule.map(
                                        (day: any) => html`
                                            <div
                                                class="day"
                                                ${animate({
                                                    in: fadeInSlow,
                                                })}
                                            >
                                                ${day.day}: ${day.activity}
                                            </div>
                                        `
                                    )}
                                </div>
                            </div>`
                        )}
                        <button @click=${this._dispatchBackButtonClicked}>
                            BACK
                        </button>
                    `;
                }
            },
            error: (e) => html`<p>Error: ${e}</p>`,
        });
    }
So in some total this all does the following:
- when the page is loading the
<p>Loading plan...</p>is shown - when the page is loaded, it shows the view with the values and a button
- if an error occurs the
<p>Error: ${e}</p>is shown with the message
Handling State
In my example project, the countdown calculator handles multiple state values and updates them accordingly:
import { format } from 'date-fns';
import { LitElement, html, css } from 'lit';
import { customElement, property, state } from 'lit/decorators.js';

@customElement('countdown-calculator')
export class CountdownCalculator extends LitElement {
    @property({ type: String }) titleValue = '';
    @property({ type: String }) selectedOption: string = 'days';
    // race day is 11/16/24
    @property({ type: String }) targetDate: string = '2024-11-16T00:00:00Z';

    @state()
    private _message = 'until RACE DAY';

    static styles = css`
        .container {
            max-width: 400px;
            margin: 20px auto;
            padding: 20px;
            border: 1px solid #ccc;
            border-radius: 5px;
            text-align: center;
        }
        button {
            border-radius: 8px;
            border: 1px solid transparent;
            padding: 0.6em 1.2em;
            font-size: 1em;
            font-weight: 500;
            font-family: inherit;
            background-color: red;
            cursor: pointer;
            transition: border-color 0.25s;
            margin-top: 50px;
            width: 95%;
        }
        select {
            margin-top: 10px;
            padding: 5px;
            font-size: 16px;
        }
        .result {
            margin-top: 20px;
            font-size: 18px;
            font-weight: bold;
        }
    `;

    calculateTimeLeft(): string {
        const targetDateTime = new Date(this.targetDate).getTime();
        const now = new Date().getTime();
        const timeDifference = targetDateTime - now;

        if (this.selectedOption === 'days') {
            const daysLeft = Math.floor(timeDifference / (1000 * 60 * 60 * 24));
            return `${daysLeft} ${this.selectedOption} ${this._message}`;
        } else if (this.selectedOption === 'weeks') {
            const weeksLeft = Math.floor(
                timeDifference / (1000 * 60 * 60 * 24 * 7)
            );
            return `${weeksLeft} ${this.selectedOption} ${this._message}`;
        } else if (this.selectedOption === 'hours') {
            const hoursLeft = Math.floor(timeDifference / (1000 * 60 * 60));
            return `${hoursLeft} ${this.selectedOption} ${this._message}`;
        }
        return '';
    }

    handleChange(event: Event): void {
        const selectElement = event.target as HTMLSelectElement;
        this.selectedOption = selectElement.value;
    }

    // when clicked it dispatches an event to indicate back button is clicked
    private _dispatchBackButtonClicked() {
        this.dispatchEvent(new CustomEvent('backListener'));
    }

    render() {
        return html`
            <div class="container">
                <h1>${this.titleValue}</h1>
                <p>Race Day is ${format(this.targetDate, 'MM-dd-yyyy')}</p>
                <select @change="${this.handleChange}">
                    <option value="days">Days</option>
                    <option value="weeks">Weeks</option>
                    <option value="hours">Hours</option>
                </select>
                <div class="result">${this.calculateTimeLeft()}</div>
                <button @click=${this._dispatchBackButtonClicked}>BACK</button>
            </div>
        `;
    }
}
In this example component the values for title and selectedOption are dynamically updated and then used to calculate what is shown.
This pattern is basically how you would update properties in your components. Lit also has an in depth walkthrough of how properties work in their documentation.
Lifecycle Methods
In the total plan component in my sample project, I use a call to the firstUpdated lifecycle method:
    firstUpdated() {
        const weekElements = this.shadowRoot!.querySelectorAll('.week');
        weekElements.forEach((element, index) => {
            setTimeout(() => {
                element.classList.add('visible');
            }, index * 500);
        });
    }
My call here updates the Shadow DOM and incrementally displays the values in an ease in style display. This gives the effect that the plan is shown slowly on the page. There are a lot of lifecycle methods available to you and I recommend checking out the Lit documentation for more.
Wrapping Up
In this post, I’ve covered some basics of how Lit works and and also provided links and an example project. I covered how Lit can be used to built standalone components, or even a full application. I covered things like event handling and state management. I also covered things like API calls. I’ve really only touched the surface of what you can do with Lit. I recommend checking out the links I’ve provided, and using Lit for yourself. It is a pretty powerful (and easy to use) framework that has a lot of options and applications. Thanks for reading my post!