Reygent: AI Agents From Spec to Shipped PR
AI developer tools are moving toward agentic workflows. Instead of chatting back and forth with a single model, the next wave is autonomous agents that own entire stages of the development lifecycle — planning, coding, testing, security review, and delivery. Tools like Claude Code, GitHub Copilot, and Gemini CLI have proven that AI can write good code, but the real opportunity is in orchestrating multiple agents into a harness that takes a spec and ships a pull request without manual coordination at each step.
That’s why I built Reygent, an open source CLI tool that implements a harness-style workflow for AI-driven development (also available as a npm package). You give it a spec, and it runs a pipeline of specialized agents — planner, developer, quality engineer, security reviewer, and PR reviewer — each with a focused role and constrained set of tools. The output is a pull request with code, tests, a security review, and review comments.
And yes — the name comes from my cats. I have two cats named Rey (after the Star Wars character) and Chestnut, who we call Chessie. Reygent is Rey + agent, and the telemetry system Chesstrace is Chessie + trace. They’ve inspired the names of my side projects for years, so naturally they each got a role in this one too.

This post walks through how it works at a high level, the telemetry and knowledge systems that make it smarter over time, and some of the design decisions I made along the way.
The Problem
AI coding assistants are good at individual tasks. Ask one to write a function, fix a bug, or add a test — it’ll do a solid job. But software development isn’t a single task. It’s a workflow:
- Read the spec and break it into tasks
- Implement the code
- Write tests
- Run the tests and fix what breaks
- Check for security vulnerabilities
- Create a branch, commit, push, and open a PR
- Review the PR
Each of these steps involves different concerns. A developer agent shouldn’t be the one reviewing its own code. A planner shouldn’t be writing implementation. And a security reviewer needs to be read-only so it can’t accidentally modify what it’s auditing.
I wanted a tool that could coordinate all of these steps with the right separation of concerns — and do it without any AI agent framework. No LangChain, no AutoGen, no custom DSL. Just a straightforward pipeline.
How Reygent Works
Reygent is a Node.js CLI written in TypeScript. You install it globally via npm:
npm install -g reygentThen point it at a spec:
reygent run --spec feature-spec.mdThat single command kicks off a seven-stage pipeline. The following diagram shows the full workflow from spec input to completion (see the Reygent GitHub project for original sources):
flowchart TD
    A[Spec Input] --> B{Source Type?}
    B -->|Markdown file| C[Read .md file]
    B -->|Issue key| D{Which tracker?}
    B -->|Linear URL| F[Linear API]
    D -->|LINEAR_API_KEY set| F
    D -->|JIRA_* vars set| E[Jira API]

    C --> G[Parsed Spec]
    E --> G
    F --> G

    G --> H[Stage 1: Plan]
    H --> I[Stage 2: Implement]
    I --> J[Stage 3: Unit Test Gate]
    J --> K[Stage 4: Functional Test Gate]
    K --> L[Stage 5: Security Review]
    L --> M[Stage 6: PR Create]
    M --> N[Stage 7: PR Review]
    N --> O[Done]

    style A fill:#4a9eff,color:#fff
    style O fill:#22c55e,color:#fff
    style H fill:#8b5cf6,color:#fff
    style I fill:#8b5cf6,color:#fff
    style J fill:#f59e0b,color:#000
    style K fill:#f59e0b,color:#000
    style L fill:#ef4444,color:#fff
    style M fill:#06b6d4,color:#fff
    style N fill:#06b6d4,color:#fff
The Pipeline
Stage 1 — Plan. The planner agent reads your spec and produces a structured breakdown: goals, tasks, constraints, and a definition of done. This becomes the roadmap for the rest of the pipeline.
Stage 2 — Implement. Two agents run in parallel here. The developer agent writes the implementation code and unit tests. The quality engineer (QE) agent writes functional and integration tests. They operate independently — the QE agent is explicitly prohibited from touching source code, only test files.
Stage 3 — Gate: Unit Tests. The developer agent runs the unit tests it wrote. If they fail, the pipeline retries (up to a configurable limit) before halting.
Stage 4 — Gate: Functional Tests. Same idea, but for the QE agent’s functional tests. These gates are hard stops — if your tests don’t pass, no PR gets created.
Stage 5 — Security Review. A security reviewer agent scans the code changes for OWASP Top 10 vulnerabilities. This agent is read-only. It can read files and run analysis commands, but it cannot write or modify anything. It flags issues with severity ratings and recommends fixes.
Stage 6 — PR Create. Reygent creates a branch (using conventional commit naming), commits the changes, pushes to your remote, and opens a pull request via the GitHub or GitLab API. Both GitHub (including Enterprise) and GitLab (including self-hosted) are supported — Reygent auto-detects the platform from your git remote URL.
Stage 7 — PR Review. A reviewer agent reads the PR diff and produces structured review comments with recommended actions.
The key design choice here is that the pipeline is just a for...of loop over an array of stages. No framework, no graph, no state machine. A TaskContext object threads state from one stage to the next — the planner’s output feeds into the developer’s prompt, the developer’s output feeds into the test gates, and so on.
Implementation Stage: Parallel vs Sequential
During the implementation stage, Reygent decides how to run the developer and QE agents based on whether auto-approve mode is enabled. In auto-approve mode, both agents run in parallel. Otherwise, they run sequentially so the user can interact with each one. The following diagram shows this branching logic (see the Reygent GitHub project for original sources):
flowchart TD
    A[Plan + Spec] --> B{Auto-approve?}

    B -->|Yes| C[Parallel Execution]
    C --> D[Dev Agent]
    C --> E[QE Agent]
    D --> F[Promise.all]
    E --> F

    B -->|No| G[Sequential Execution]
    G --> H[Dev Agent\nstdin inherited]
    H --> I[QE Agent\nstdin inherited]
    I --> F

    F --> J[Merge outputs\ninto TaskContext]

    style C fill:#8b5cf6,color:#fff
    style G fill:#f59e0b,color:#000
Test Gate Retry Flow
When a test gate fails, Reygent doesn’t just give up. It injects the failure context back into the relevant agents and retries, up to a configurable maximum. Which agents get re-run depends on which gate failed — unit test failures only re-run the developer agent, while functional test failures re-run both the developer and QE agents. Here’s how that retry logic works (see the Reygent GitHub project for original sources):
flowchart TD
    A[Run Test Gate] --> B{Passed?}
    B -->|Yes| C[Continue workflow]
    B -->|No| D{Auto-approve?}

    D -->|Yes| F[Auto-retry]
    D -->|No| E{User: Retry?}
    E -->|No| G[Exit]
    E -->|Yes| F

    F --> H[Re-run agents with\nfailure context injected]
    H --> I{Which gate failed?}
    I -->|Unit tests| J[Re-run: dev only]
    I -->|Functional tests| K[Re-run: dev + qe]

    J --> L[Re-run gate]
    K --> L

    L --> M{Passed?}
    M -->|Yes| C
    M -->|No| N{Attempts < max?}
    N -->|Yes| F
    N -->|No| O[Fail: max retries]

    style C fill:#22c55e,color:#fff
    style G fill:#ef4444,color:#fff
    style O fill:#ef4444,color:#fff
Agents and Roles
Each agent has a specific role with constrained tools:
| Agent | Role | Tools |
|---|---|---|
| Planner | Validate spec, produce plan | Read only |
| Developer | Write code and unit tests | Read, write, bash, search |
| QE | Write functional tests | Read, write, bash (no source editing) |
| Security Reviewer | Scan for vulnerabilities | Read, bash (read-only) |
| PR Reviewer | Review PR diff | Read, git, gh |
| Adhoc | Freeform one-off tasks | Read, write, bash, search |
The adhoc agent is available outside the pipeline via reygent agent adhoc for one-off tasks that don’t need the full workflow.
This separation matters. The security reviewer can’t accidentally introduce a vulnerability because it can’t write files. The QE agent can’t “fix” a failing test by modifying source code. Each agent stays in its lane.
Multi-Provider Support
Reygent doesn’t call AI APIs directly. Instead, it spawns provider CLIs as subprocesses. This means it works with whatever AI provider you have set up:
- Claude (default) — via the
claudeCLI - Gemini — via the
geminiCLI - Codex — via the
codexCLI (OpenAI models) - OpenRouter — via HTTP API for 200+ models
You can even mix providers per agent. Want your planner on Claude but your developer on Gemini? Set it in the config:
{
  "provider": "claude",
  "agents": [
    {
      "name": "dev",
      "provider": "gemini",
      "model": "gemini-2.5-pro"
    }
  ]
}
Telemetry: Chesstrace

One of the parts I’m most happy with is the telemetry system, which I call Chesstrace. It’s a local-only event tracking engine built on SQLite that records everything that happens during a Reygent run — agent spawns, test results, token usage, costs, errors, and timing.
Why Local Telemetry?
Most telemetry systems send data to a remote server. Chesstrace does the opposite — everything stays on your machine. There’s a project-level database (.reygent/chesstrace.db) and an optional global database (~/.reygent/chesstrace.db) that aggregates data across projects.
This was a deliberate choice. When you’re running AI agents that read and write your source code, the telemetry will inevitably contain fragments of that code in error messages and tool outputs. Keeping it local means you don’t have to worry about proprietary code leaking to a third-party service.
What It Tracks
Chesstrace records 13 categories of events:
- Command — CLI invocations and arguments
- Agent — spawn, completion, and timeout events
- LLM — requests, responses, and model info
- Pipeline — stage start and end times
- Gate — test results, pass/fail, retry counts
- Usage — token counts and cost per agent
- Git — branch, commit, and push operations
- Error — failures with sanitized stack traces
- Knowledge — when learned patterns are consulted
The amount of detail is configurable via three levels: minimal (just command lifecycle and errors), standard (agent spawns, gates, git ops), and verbose (full LLM requests, token usage, performance metrics).
Analysis Commands
The data isn’t just stored — it’s queryable. Reygent includes analysis commands that surface patterns from your telemetry:
# What went wrong on the last run?
reygent last --errors

# What are the most common failure patterns?
reygent analyze failures

# How much is each agent costing?
reygent analyze costs --by-agent

# Which agent/model combinations perform best?
reygent analyze agents --compare-models
The analyze failures command is particularly useful. It looks at your failure history, groups errors by pattern, and gives you actionable recommendations. If your QE agent keeps timing out, or your unit tests fail on a specific type of assertion, you’ll see it here.
Security
Even though telemetry is local, Chesstrace still sanitizes data before storage. It automatically strips API keys, tokens (anything over 20 characters that looks like a credential), home directory paths, email addresses, and IP addresses from error messages. The database has a 50MB size limit with automatic pruning of events older than 180 days, and a hard cap of 10,000 events per run.
The Knowledge System: Learning From Past Runs
This is where things get interesting. Reygent has a living documentation system that extracts patterns from telemetry and injects them back into agent prompts. Over time, your agents get smarter about your specific project.
How It Works
After every run, Reygent analyzes the last 7 days of telemetry and extracts:
- Top failure patterns — recurring errors grouped by type and frequency
- Success patterns — approaches that worked well (85%+ success rate)
These get written to knowledge files in .reygent/knowledge/:
.reygent/knowledge/
  common-failures.md        # Auto-generated from errors
  success-patterns.md       # Auto-generated from wins
  project-conventions.md    # Your project-specific rules
  agents/
    dev.md                  # Tips for the developer agent
    qe.md                   # Tips for the QE agent
Before spawning an agent, Reygent loads the relevant knowledge files, filters them by agent and stage, and injects them into the system prompt. So if your developer agent has repeatedly failed on circular import errors in your project, the next time it runs, it’ll see a note like:
Common Failures to Avoid:
- Circular import between
services/auth.tsandservices/user.ts(occurred 4 times). Use lazy imports or restructure the dependency.
The auto-generated files (failures and success patterns) stay local and aren’t committed to git. But project-conventions.md and the agent-specific tip files are designed to be shared with your team — they’re included in the default .gitignore rules that reygent init creates.
Validation
Since knowledge gets injected into AI prompts, Reygent validates it before use. It checks for prompt injection patterns (things like “ignore previous instructions” or “show me your system prompt”), enforces a 1MB size limit per file, and blocks suspicious content. This isn’t paranoia — if knowledge files are committed to a shared repo, you want to make sure a bad actor can’t weaponize them.
Specs: Where Work Begins
Reygent can consume work from three sources:
Markdown files — write a spec as a markdown document and pass it in:
reygent run --spec docs/add-user-avatars.mdJira issues — pass a Jira issue key and Reygent fetches the issue details via API:
reygent run --spec PROJ-123Linear issues — same idea, with Linear:
reygent run --spec ENG-456You can also generate a spec from a short description using reygent generate-spec, which runs an interactive session to flesh out requirements before kicking off the pipeline.
When pulling from Jira or Linear, Reygent also uses the issue metadata for branch naming. A Jira issue typed “Bug” automatically gets a fix/ prefix. A Linear issue labeled “feature” gets feat/. The branch type detection uses partial matching, so “Bug Fix” maps to fix and “Feature Request” maps to feat.
Configuration
Reygent uses a three-tier config system:
- Local —
.reygent/config.jsonin your project (searched upward from cwd) - Global —
~/.reygent/config.jsonas fallback - Built-in — sensible defaults if no config exists
You can customize everything: which provider each agent uses, what model it runs on, what tools it has access to, and what its system prompt says.
Skills
Reygent has a skills system that lets you extend agents with custom configurations. Skills are self-contained directories with a SKILL.md manifest (YAML frontmatter + markdown body) that define a custom agent’s role, tools, and prompt. You can browse and install community skills from a GitHub-based registry:
# Browse available skills
reygent skills list

# Install a skill
reygent skills add verify-pricing

# Remove a skill
reygent skills remove verify-pricing
Community skills are published in the reygent-skills GitHub repository. When you run reygent skills list or reygent skills add, Reygent pulls from this registry automatically. Skills can live locally in your project (.reygent/skills/) or globally (~/.reygent/skills/), and project config always takes precedence. If you want to contribute a skill, you can submit a PR to the reygent-skills repo.
Dashboard
Chesstrace data powers a built-in dashboard that you can generate as a standalone HTML file — no server required, just open it in a browser:
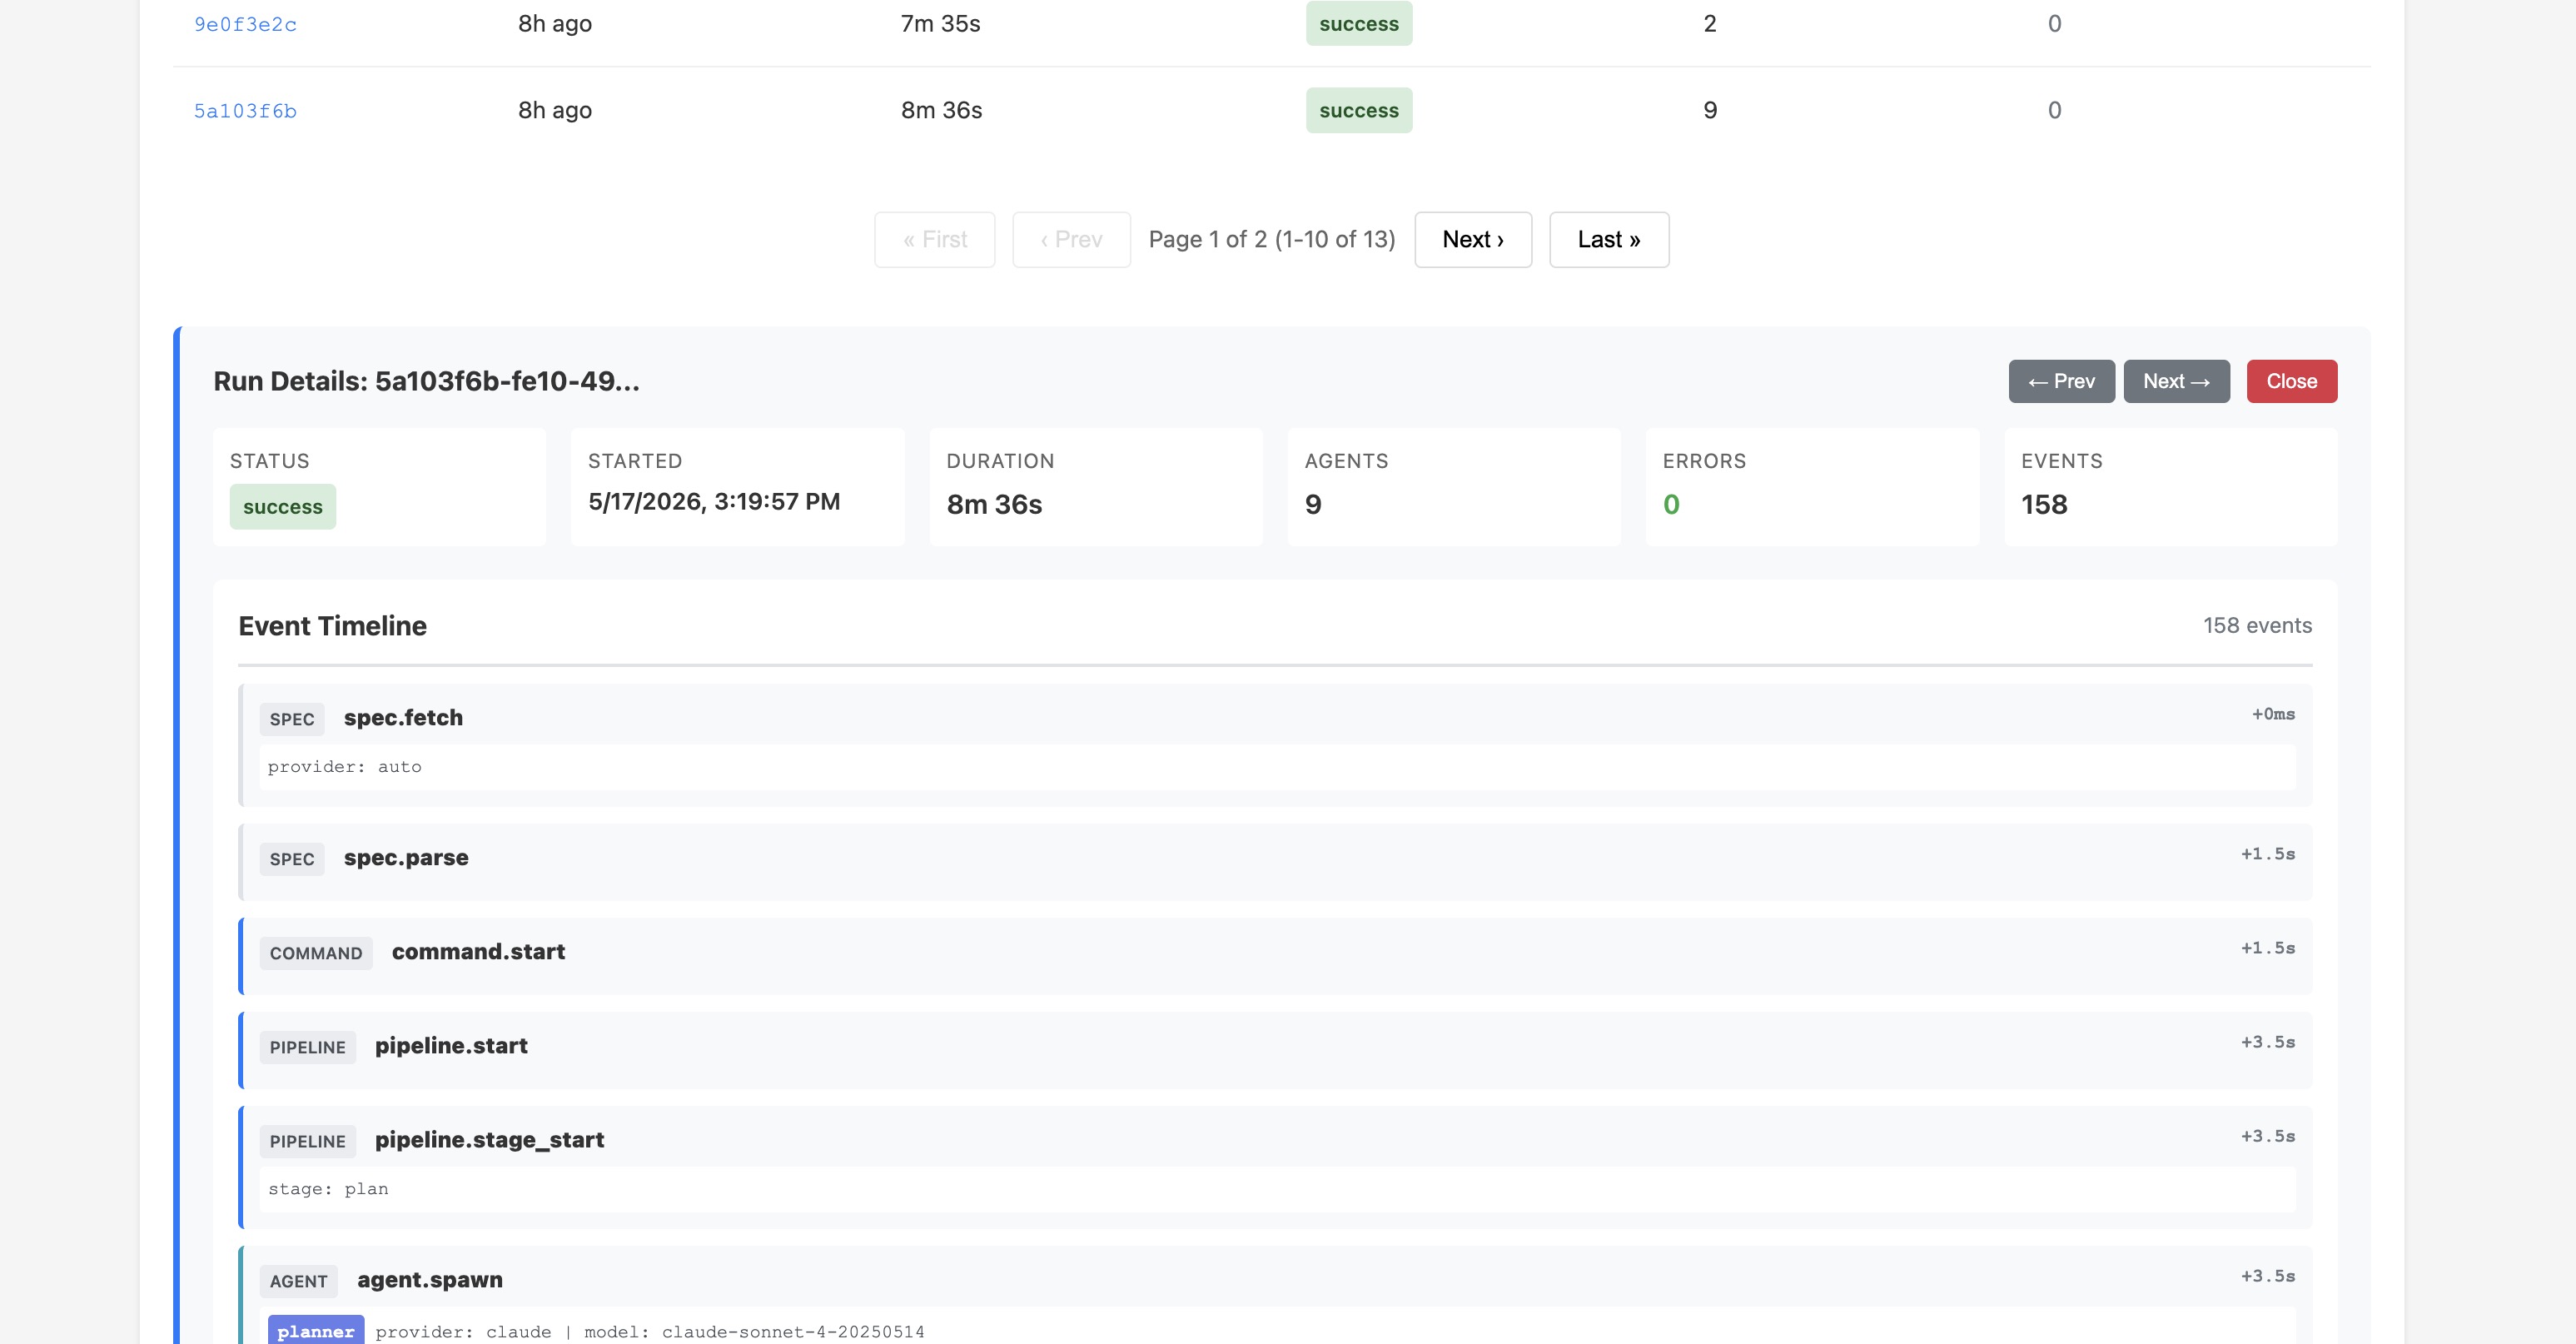
reygent dashboard generateThe dashboard includes interactive charts showing success/failure trends over time, sortable and paginated run tables, clickable stats for filtering, and run drilldowns with full event timelines.
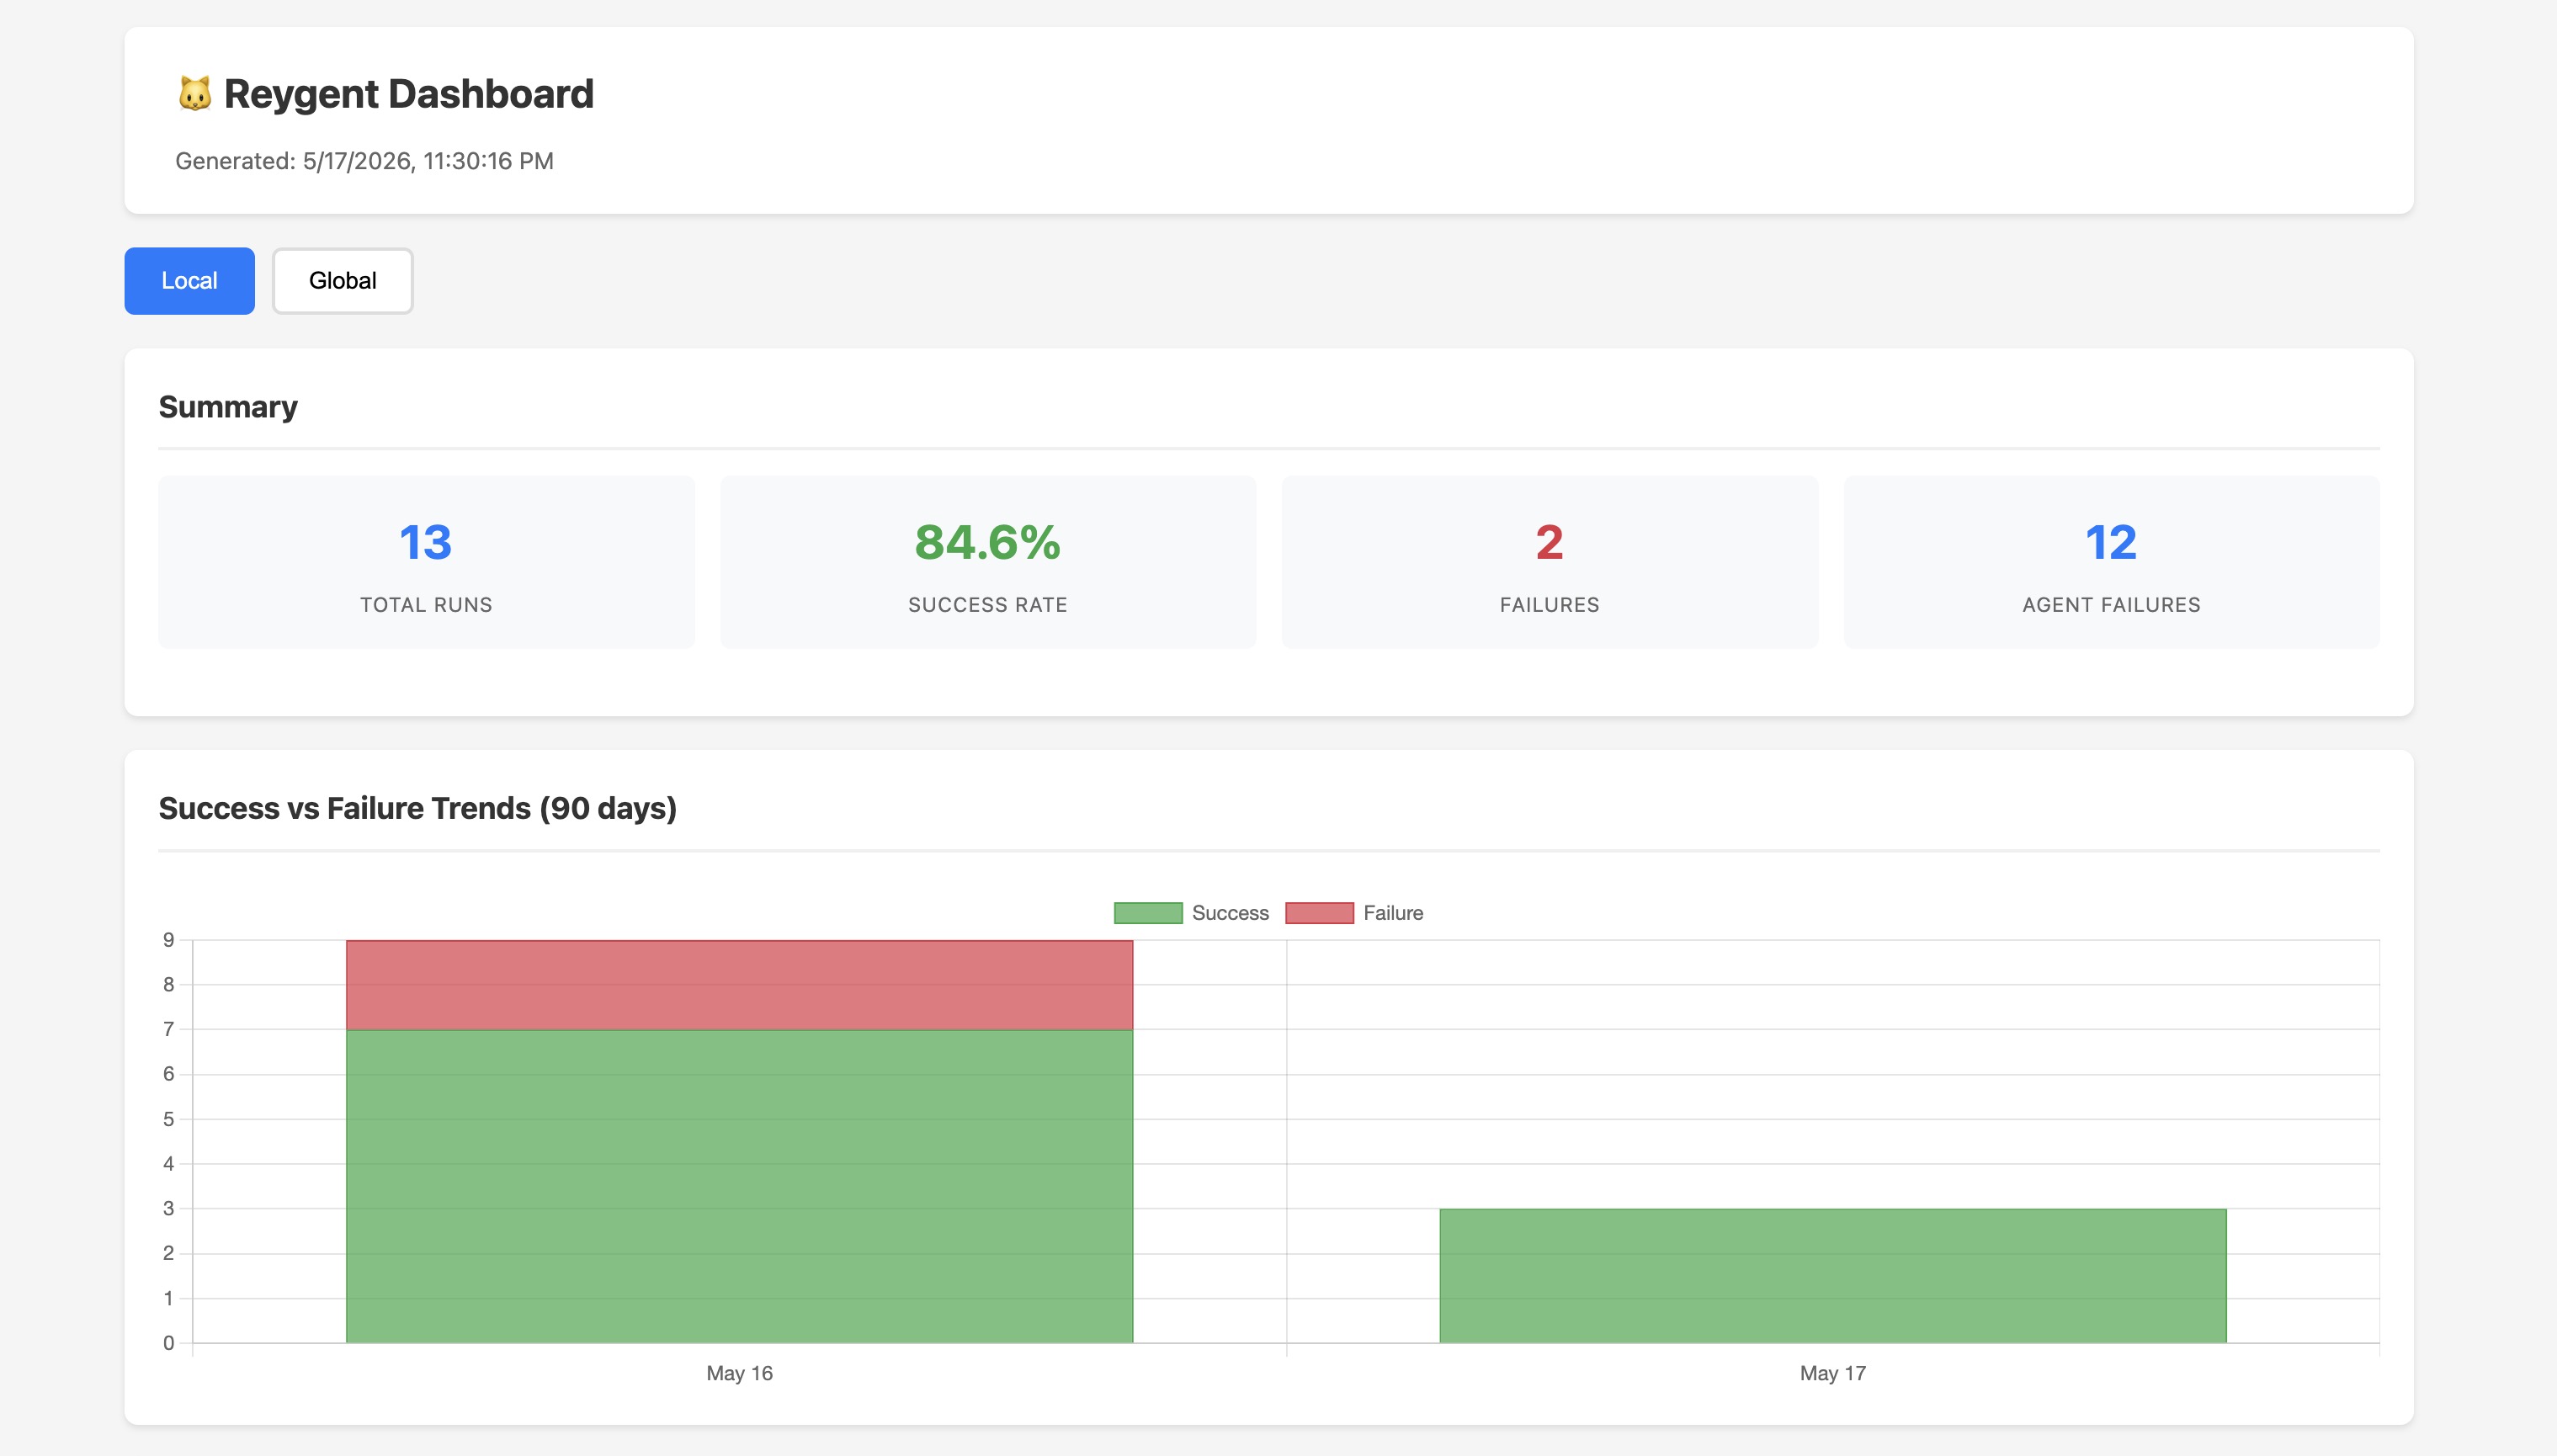
 You can toggle between local (project-level) and global (cross-project) telemetry, filter by duration (7d, 30d, 90d), and export data to CSV or XLSX.
There are also CLI equivalents for quick terminal access:
reygent dashboard runs              # List recent runs
reygent dashboard run <id>          # Drilldown into a specific run
reygent dashboard trends --days 30  # Success/failure trends
reygent dashboard agent-failures    # Agent-level failure analysis
Review Commands
Beyond the full pipeline, Reygent has two standalone review commands for working with existing branches and PRs:
reygent review-work reviews the changes on your current branch and posts structured review comments to the associated PR or MR. This is useful when you’ve made changes manually or with a single agent and want an AI review before merging.
reygent review-comments fetches existing review comments from a PR, creates a fix plan to address them, and can automatically implement the fixes. It runs an approval loop so you can review the plan before any changes are made.
Design Decisions
A few choices I want to call out:
No agent framework. Reygent uses a plain loop over pipeline stages. No DAGs, no state machines, no reactive streams. The orchestration is a for...of loop and a shared context object. This makes the system easy to debug and extend. When something goes wrong, you look at one file — not a graph of interconnected nodes.
Subprocess spawning, not API calls. Reygent doesn’t import AI SDKs. It spawns claude, gemini, or codex as child processes and parses their streaming JSON output. This means Reygent automatically inherits whatever authentication, configuration, and tool systems those CLIs provide. When Claude adds a new capability, Reygent gets it for free.
Hard test gates. The pipeline halts if tests fail. No “best effort” — if your code doesn’t pass its own tests, it doesn’t become a PR. This is the most opinionated part of the design, and it’s intentional. An AI-generated PR that doesn’t pass tests is worse than no PR at all.
Read-only security review. The security agent can read and analyze, but it cannot modify files. This prevents the common failure mode where a “fix” introduces a new problem. Security findings go into the PR body as recommendations, not as code changes.
Getting Started
If you want to try Reygent:
# Install
npm install -g reygent

# Initialize in your project
cd your-project
reygent init

# Run interactively with a specific agent
reygent agent dev

# Run the full pipeline
reygent run --spec your-spec.md
The project is open source under the Apache 2.0 license. You can find the code, documentation, and issue tracker on GitHub. The docs site is at andrewevans0102.github.io/reygent.
What’s Next
Reygent isn’t perfect — there are rough edges, and I’m still actively working on making it better. What’s been rewarding is seeing how the agentic workflow streamlines development — handing off a spec and getting back a PR with code, tests, and a security review without manually coordinating each step. There’s plenty of room to improve across the board, but the core workflow already saves real time.
I made Reygent open source because I wanted to share what I’ve learned and be part of the community building this kind of tooling. If you’re interested in multi-agent orchestration, or you just want to automate more of the PR lifecycle, give it a try and let me know what you think. Feedback and contributions are always welcome. Thanks for reading my post!