
Hello Next.js
I’ve recently been learning about React and this brought me to Next.js. After building a project with Next.js I was super impressed, and wanted to discuss my experiences and what I learned.
This post will cover some basics about Next.js and a high level walkthrough of some advanced features I used in my project. My project can be reached on GitHub here.
What is Next.JS?
Next.js was created for the React framework. It provides a quick and easy way for developers to build JavaScript applications. It was developed by Zeit and easily makes use of many features of React. Since it works with React and JavaScript, it is also easily scaled if you want to build larger projects. Next.js is also super helpful if your building a static site.
Next.js also has a lot of really useful features including:
- Server Side Rendering (SSR)
- Prerendering
- Static Exporting
- CSS in JS support
- automatic code splitting
- hot reloading
- Webpack support
- many more
One of the things I noticed almost immediately about Next.js was that there was a very minimal learning curve. Even if you’re new to JavaScript frameworks, the process from initial install to seeing code in front of you was literally just a few steps.
Next.js has some great docs that also include a walkthrough tutorial that you can learn by doing. As I was getting up and running with Next.js, I found this learn tutorial to be super helpful. The APIs that Next.js has built in are also well documented. Check out the Next.js API docs here.
How Next.JS works
As I stated in the intro, Next.js leverages React to generate sites. To better understand how this works it helps to build a small project.
Next.js does require Node.js to be installed on your system. I also recommend a good terminal and your favorite editor available as well.
To get started you only need to do the following:
mkdir first-project
cd first-project
npm init -y
npm install --save react react-dom next
mkdir pages
touch pages/index.js
This creates a folder structure that basically looks like this:
.
├── package-lock.json
├── package.json
└── pages
└── index.js
You’ll also want to create some scripts for development. Within your package.json file you’ll want to replace the “scripts” section with:
"scripts": {
  "dev": "next",
  "build": "next build",
  "start": "next start"
}
When you want to run the project, you can now just do:
npm run devWhen you’re ready to build the project you can do:
npm run buildThe “pages” folder and the “index.js” file are really the only things that you need to get started.
Let’s add something to our “index.js” file, so we have something to show when the app is running. Replace the “pages/index.js” file you just created to be the following:
export default function Index() {
  return (
    <div>
      <p>First Project</p>
    </div>
  );
}
When you run “npm run dev” and open http://localhost:3000 you should see the following:

From here, you can build out additional pages as JavaScript files in the “pages” folder. Since Next.js works with React, you can also create React Components that your pages can share for layout and other functionality. Some basic pointers from here:
- The “index.js” file is basically your apps entry point
- If you want to serve static content like images, Next.js also makes use of a “public” folder at the base of your project. For more on this check out Next.js docs here.
- Next.js has a built in router mechanism called “link” that you can use to handle navigation between pages. For more information on this, check out the docs on Next.js link here.
- When learning to building shared components, I recommend following the Next.js Shared Components Tutorial.
- Next.js also provides several APIs that you can call to enable prerendering pages when you build your project. For more information on this, I recommend checking out the docs here.
Next.js is super flexible and supports both static and dynamic websites. The basic setup enables you to make both small and large applications.
In the next sections I’m going to walkthrough a project I created with Next.js called “Evans Houseplants.” I’m going to talk about my project, and cover some of the more advanced features I used at a high level.
My Project

The project that I built is actually a site that I’m using to track the growth of my house plants. My wife and I recently got several plants for a small garden we have on our balcony, and I thought it’d be cool to keep regular pictures as the garden progresses. My project can be reached on GitHub here.
To build my project, I used Next.js to create a static site that reads in Markdown files with a cover image. I basically leveraged all of what I covered in the intro section, and some more advanced features. The basic structure is the same with the additional usage of the Next.js API method getStaticProps() and a few additional methods that parse markdown files in the “_posts” folder.
I also took it a step farther and hosted it with Zeit’s Now deployment platform. Zeit Now, provides a very simple setup and makes it easy to deploy applications that you build.
In the next sections I’m going to cover the more advanced features I used.
Understanding Prerendering
I used prerendering on both my “Home Page” and “About Page.” One of the best parts of Next.js is that it offers prerendering and Server Side Rendering (SSR) options. These are both good for performance, depending on what you are building. I’m going to be focusing on prerendering, but for more info (including the Next.js SSR options) I recommend checking out their docs here.
Prerendering, helps alleviate two problems:
- Page Performance, as the browser just has to retrieve the static content rather than running any associated JS bundles.
- Search Engine Optimization(SEO), as the static content can be read by web crawlers easily.
With JavaScript projects, Web Crawlers have a difficult time understanding JS bundles as opposed to static HTML pages. This is due to the fact that the JS bundle is read and rendered by the browser when the page loads etc. Since a Web Crawler is directly retrieving a site without a browser, it doesn’t always know what to do when it sees JavaScript. With static HTML pages, web crawlers can more easily understand your content and thereby index your site so that you can boost your SEO.
It’s also important to point out that prerendering is different than SSR.
- Prerending is when you build a set of static pages and deploy them.
- SSR is where you do the page rendering on a server, and your client application calls that server to retrieve the rendered content to be shown.
There are a lot of posts available that have more information on this. I found the VueJS docs to have a great explanation here https://ssr.vuejs.org/#ssr-vs-prerendering
In my project, both the “About” page and the “Home Page” uses prerending with Next.js’s getStaticProps() methods.
In the “About Page” you can see the call to getStaticProps() here:
import Header from "../components/Header";
import About from "../components/About";

function AboutPage({ allPlants }) {
  return (
    <div>
      <Header></Header>
      <About plants={allPlants} />
    </div>
  );
}

export async function getStaticProps() {
  const allPlants = [];

  return {
    props: {
      allPlants,
    },
  };
}

export default AboutPage;
Note I removed the plant array information here for brevity.
At build time, Next.js uses this. method to build (prerender) the page. The process looks like this:
- When the project is built, the getStaticProps() method is called to return the plants information as a variable to the rendered page
- Next.js uses the plants information to render the “About Page”
- The “AboutPage” becomes a Static HTML page in lieu of a JS bundle
- Next.js adds this Static HTMl page (and associated JS and CSS) into the build, and then this prerendered content is what is delivered when the app is deployed
In both of my project’s pages I’m using getStaticProps() for prerendering:
- In the case of the “About Page”, I defined the content locally in a JSON array. There are a lot of better ways to do this, but since my site was super small I left it this way. (you can see this here).
- In the case of the “Home Page”, I’m getting Next.js to read the “_posts” folder to pull out any Markdown files. Then I’m parsing the Markdown file and showing them as HTML in the associated component (you can see this here).
Using Markdown for Next.JS Pages
There are a lot of blog posts available that discuss how to use Markdown for Next.js sites. This is particularly useful in the case of blogs since most of the time a blog post’s content can easily be written in Markdown.
I found the Next.js “blog starter” project super helpful with this since they had already essentially written the code to handle it. You can reach this example here. The place in the blog starter that does the parsing of the Markdown is here.
I used the starter code for my “Home Page” where I parsed the Markdown files. I originally used the react-markdown package, but switched to using remark and remark-html using the React component’s dangerouslySetInnerHTML attribute. (you can see this here).
In a conversation on Twitter, Next.js lead Tim Neutkens explained that react-markdown ships with a parser that you don’t necessarily need. If you use remark and remark-html with your project it makes use of lighter weight libraries. Since I went with Tim’s recommendation, I didn’t have to use react-markdown for the parsing which helped improve my sites performance. You can see this here and in the commit here.
This all makes creating posts super simple, since all you have to do is add a Markdown file to the “_posts” folder and then (in the case of my project) also create an associated cover image in the “public” folder. The Next.js blog starter method is generic enough that it an read anything you’ve defined in your Markdown:
export function getPostBySlug(slug, fields = []) {
  const realSlug = slug.replace(/\.md$/, "");
  const fullPath = join(postsDirectory, `${realSlug}.md`);
  const fileContents = fs.readFileSync(fullPath, "utf8");
  const { data, content } = matter(fileContents);

  const items = {};

  // Ensure only the minimal needed data is exposed
  fields.forEach((field) => {
    if (field === "slug") {
      items[field] = realSlug;
    }
    if (field === "content") {
      items[field] = content;
    }

    if (data[field]) {
      items[field] = data[field];
    }
  });

  return items;
}
When it reads in one of my project’s Markdown files it will get (1) title, (2) date, (3) cover image, and (4) post number. Here is an example Markdown file:
---
title: "Hello World"
pubDate: "April 08, 2020"
coverImage: ""
postNumber: 1
---

Hello! this is my first post with this site. I'll be sharing my plants progress as they grow. More updates to come soon!
Once the Markdown has been parsed, it will then use my “Post” component to render it with the following:
import PostImage from "./PostImage";

const Post = ({ post }) => {
  return (
    <section className="post">
      <div className="post__title">{post.title}</div>
      <div className="post__date">{post.date}</div>
      {post.coverImage && <PostImage coverImage={post.coverImage} />}
      <article
        className="post__content"
        dangerouslySetInnerHTML={{ __html: post.content }}
      />
    </section>
  );
};

export default Post;
Notice the use of React’s dangerouslySetInnerHTML, this content is made into HTML with the methods here. I didn’t put a custom style component here other than just centering the content, but you could create a style and scope it specifically here for standard HTML like h1 etc.
The final result after the site is built (with the example above) is the following:
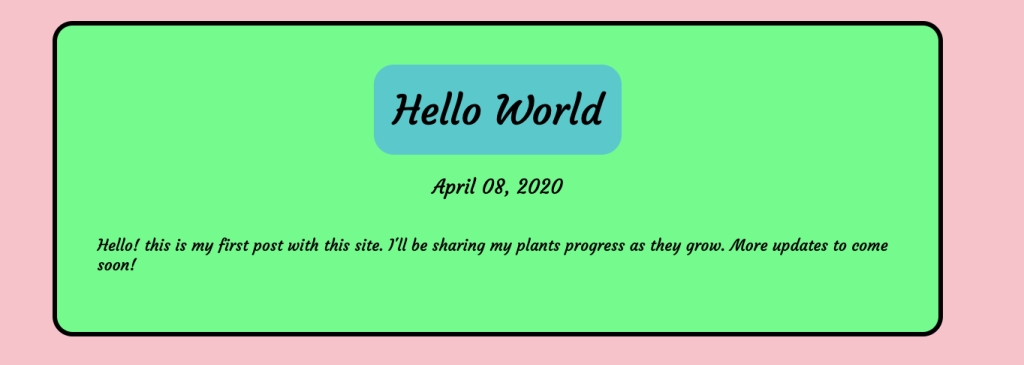
Please note this post did not have a cover image, otherwise that would’ve been shown as well.
Using Zeit Now for Deployment
Once I had built my site, I wanted to deploy it. I originally was going to go for one of the standard options using CircleCI. However, I heard about Zeit’s “Now” deployment platform and wanted to give it a shot.
The basic process is you just:
- start at the Zeit Site
- login with GitHub
- connect them to your project repo
- then define the build.
They have a nice little dashboard and a lot of different logging features:

Now has a lot of customizations, but the basic setup is super easy to go with. You can set it to build and deploy whenever a commit is pushed to your master branch.
Additional Notes
When I was working with Next.js I also had a few things that came up that I think could help folks that are just starting out:
- If you want to use the HTML “Head” element, you’ll need to import it. I did that so I could import a Google font I wanted to use. This is also useful if you’re trying to load content from a CDN. Here’s what it looks like:
import Link from "next/link";
import Head from "next/head";

const Header = () => (
  <div className="header">
    <Head>
      <title>Evans Houseplants</title>
      <link
        href="https://fonts.googleapis.com/css2?family=Courgette&display=swap"
        rel="stylesheet"
      ></link>
    </Head>
    <div className="header__image">
      <h1 className="header__title">Evans Houseplants</h1>
    </div>
    <div className="header__links">
      <Link href="/">
        <a className="header__anchor">Home</a>
      </Link>
      <Link href="/about">
        <a className="header__anchor">About</a>
      </Link>
    </div>
  </div>
);

export default Header;- If you want to use one of the Next.js API methods for prerendering or SSR, its important to note that they must be in the context of a “page.” I tried to do this in a component I had created that I was using for a shared layout. I found that it didn’t work because you have to call this method in a “page” directly in lieu of the component. This was not super clear to me initially, so it is just something I wanted folks to be aware of. With my “About” component I think I lost an hour or so to trying to figure out why that wouldn’t work.
- If you want to use SASS or a global style sheet, you’ll need to create an “_app.js” file in the “pages” folder. This is somewhat different than normal development because you are unable to directly pull in style files. Next.js does a great job of immediately throwing an error for this. They also have a page in their docs on it. The “_app.js” file that you create looks like this:
import "../_styles.scss";

export default function MyApp({ Component, pageProps }) {
  return <Component {...pageProps} />;
}- When I was working on the project, I wanted to analyze the Webpack bundle for my project. I found the Next.js Webpack Bundle Analyzer. If you add that to your project along with the associated config file and build script, then it provides a great way to look at your bundle at build time.
- I recommend building React components for any of your pages. I think that this is probably a style choice, but I found that super helpful.
Closing Thoughts
So I hope my post here has helped you to get a basic understanding of Next.js. I think it is a really cool framework, and is well put together. I recommend checking out the learning tutorial on the Next.js site as well as the examples they have in their GitHub repo.