
My First Open Source Project
Recently, I did a small weather app that I’ve made into an open source project.
The project is hosted on Firebase and can be viewed here.
Additionally, the source code is available for viewing here.
Working on this project taught me a lot and gave me experience with the following:
- Developing a Custom CICD Pipeline
- Creating a “fat” Component with the “ngOnChanges” Lifecycle Hook
- Using the HTML5 Geolocation APIs
- Using Async Await to Clean Up Nested Promises
- Handling Errors
- Covering My Code with Karma Tests
- Utilizing the MIT Open Source License on GitHub
Developing a Custom CICD Pipeline
For my project I used CircleCI. I’ve blogged about this before with my post here. The biggest thing I learned here (past what I’ve written about) was just using Firebase. I had a couple issues with getting the build to work because the necessary dependencies were not being pulled in. I just had to make sure to cache the firebase json file and associated information that the CLI uses to deploy. The full config.yml file can be seen here.
Creating a “fat” Component with the ngOnChanges Lifecycle Hook
In most of the Angular apps that I’ve worked with previously, I had individual components that were essentially their own separate entities. In this case, I wanted to make sure that the same information captured about location was passed to the each component. So I created a setup where the main App component acts as a parent to child components for display. The actual data this shown is pulled in from HTTP GET calls to NOAA API endpoints. The resulting architecture looked like the following:

There are many ways to do this, and you definitely could just create an observable and have the components subscribe to it. However, after reading about “ngOnChanges” I thought that was cool and kept with it. I developed the components to use ngOnChanges with a common object that is passed as input parameters to the child components. The whole setup can be seen in the source code link above but basically I just did the following:
- passed a data element from the main App component to the child components and bound it with the ” @Input() ” Angular decorator
- Implemented ngOnChanges with the child components and basically had those check for when changes occur from the parent with methods like the following
// Use the lifecylce hook here to listen to when the parent is loaded
ngOnChanges(changes: {[propKey: string]: SimpleChange}) {
  for (const propName in changes) {
    if (propName === 'weatherDisplay') {
      const changedProp = changes[propName];
      this.weatherDisplay = changedProp.currentValue;
      this.displayValues = true;
    }
  }
}- Made a call on initialization of the main App Component to grab the location (using the geolocation API) and then call a custom service I implemented as so:
  ngOnInit(): void {
    try {
      navigator.geolocation.getCurrentPosition((position) => {
        this.savePosition(position);
      });
    } catch (error) {
      alert('Browser does not support location services');
    }
  }

  savePosition(position) {
    this.lat = position.coords.latitude.toFixed(4).toString();
    this.long = position.coords.longitude.toFixed(4).toString();

    this.weatherService.getWeather(this.lat, this.long)
      .then(
        function(success) {
          this.weatherDisplay = success;
          if (this.weatherDisplay.errorMessage !== undefined) {
            alert(this.weatherDisplay.errorMessage);
          }
        }.bind(this),
        function(error) {
          alert(error);
          this.weatherDisplay = new WeatherDisplay();
        }.bind(this)
     );
  }
}- Then when the “weatherDisplay” object is populated, it is passed down to the child components and the app is able to update with the same information accordingly
Using the HTML5 Geolocation APIs
In order to get the initial location data, I obviously had to use the geolocation APIs. I’ve blogged more about this in a related post, check it out for a basic explanation here.
Using Async Await to clean up nested promises
I started with a messy set of nested promises that I had written to call the NOAA APIs. This was because in order to correctly use the APIs you have to get information from one and then feed it to another etc. To clean this up, I wrapped everything in a try{}..catch{} block and used Async Await. I wrote a nice post that shows you the code here.
Handling errors
Since the app basically just retrieves weather data, there were not really a lot of errors to be concerned about. However, the actual API calls could be error prone so I had to be able to catch errors at each API endpoint I called and then be able to pass them back. To do this, I caught the errors first at the endpoint like the following method shown here:
getMetadata(lat: string, long: string): Promise<any> {
  const metadataURL: string = 'https://api.weather.gov/points/' + lat + ',' + long;
  return this.http.get(metadataURL).toPromise()
    .catch(() => new Error('error when calling metadataURL'));
}
Then in the calling (main) method I check for a response of type “Error” and “throw” the error there if it occurs like you see here:
async getWeather(lat: string, long: string): Promise<WeatherDisplay> {
  try {
    const metadata: any = await this.getMetadata(lat, long);
    if (metadata instanceof Error) {
      throw metadata;
    }
Then at the “catch” block in the main method, if an error is thrown, I capture it in a special property of the main weatherDisplay object like shown here:
    } catch (error) {
     this.weatherDisplay.errorMessage = error.message;
    }
Then when the promise is resolved at the calling component, if there is an error I show it with an alert like you see here:
this.weatherService.getWeather(this.lat, this.long).then(
  function (success) {
    this.weatherDisplay = success;
    if (this.weatherDisplay.errorMessage !== undefined) {
      alert(this.weatherDisplay.errorMessage);
    }
  }.bind(this),
  function (error) {
    alert(error);
    this.weatherDisplay = new WeatherDisplay();
  }.bind(this),
);
Covering My Code with Karma Tests
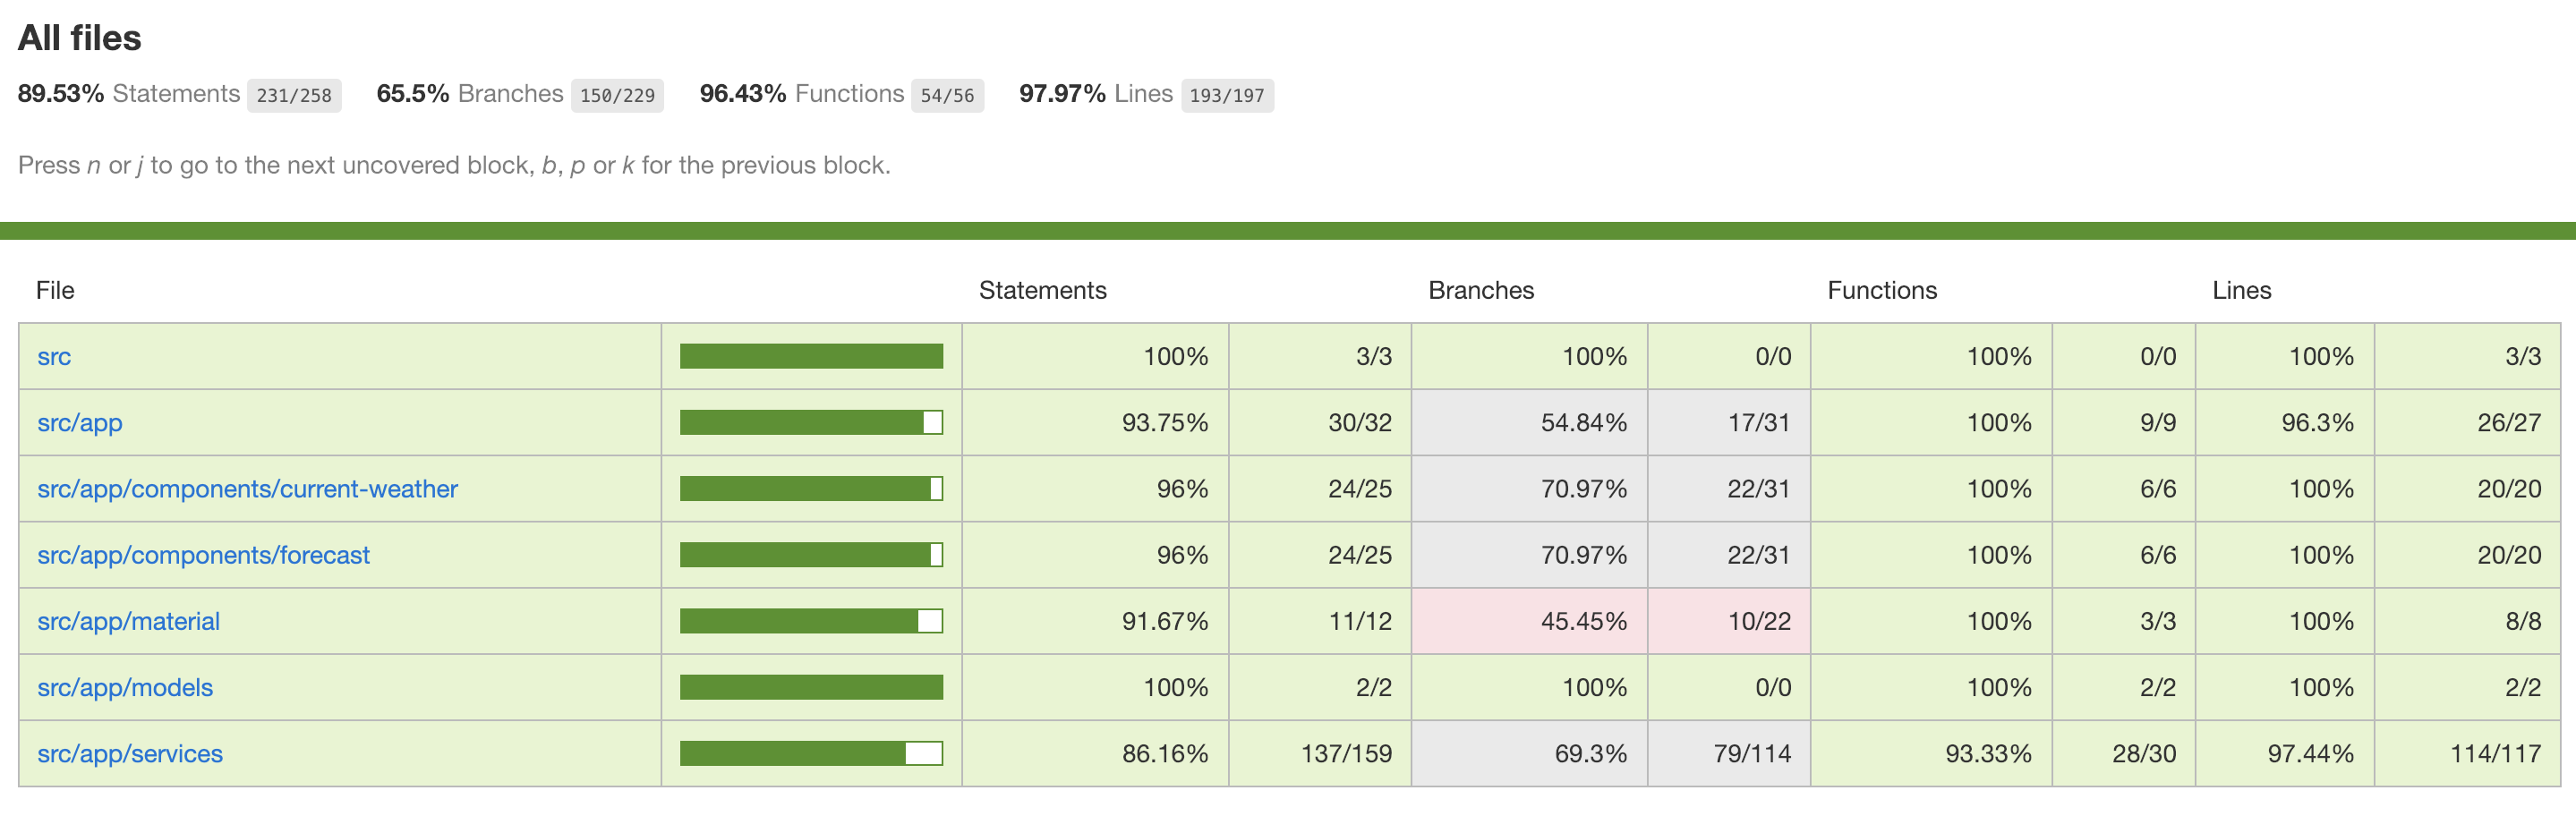
So for the first time I worked through covering all of my code with unit tests. This actually helped a lot because it forced me to really consider what I was trying to do. After a lot of refactoring I got up to 89% coverage. There are still some scenarios I could write more tests for, but I was happy with the amount I learned from the experience. I write about some of this in my post here.
Utilizing the MIT Open Source License on GitHub
Finally, after coming through building and deploying the application I decided to make it open source. GitHub actually makes this really easy to do with license templates.
I picked the MIT license since it was fairly flexible and very popular. There’s a nice article on how to do this and what it means here.