
Raspberry Pi Print Server
So as my mentioned in my last post, I recently got a Raspberry Pi and have been playing around with it. After looking at several different projects, I decided on the print server to bring new life into an old HP wireless printer that we have and use at home.
So you want to make your Raspberry Pi into a print server, what do you do first?
Well I should note that for my Raspberry Pi I used the Linux Raspbian distro. You can do this with the other distros, but what I’m going to be referencing here is Raspbian. Its really easy to setup and comes as part of the Noobs installer that boots fresh on your disk. You can also go to the Raspberry Pi site and download Raspbain, and install it on a micro SD card https://www.raspberrypi.org/downloads/
I also wanted to be able to run my Pi over a wireless network which took some extra googling, but editing the supplicant file worked for me. I just had to enter the SSID name and Password and the Pi connected. To do this do the following:
Connect the Raspberry Pi to a Wireless Network
Open a terminal and enter the following:
sudo nano /etc/wpa_supplicant/wpa_supplicant.confThe file should look similar to the following:
country=US
ctrl_interface=DIR=/var/run/wpa_supplicant GROUP=netdev
update_config=1
network={
scan_ssid=1
ssid="Your Hidden SSID"
psk="Your SSID's Password"
key_mgmt=WPA-PSK }
I saw several forum posts and stack overflow articles that reference changing other settings, but I found just putting my SSID and my SSID’s password in psk worked for me. Here’s a stackoverflow article that helped as well: https://stackoverflow.com/questions/37312501/how-do-i-detect-and-connect-to-a-hidden-ssid-on-my-raspiberry-pi-3-raspbian
Once you have the OS installed, and are connected to wifi, lets move on to setting up CUPS:
Install CUPS
So linux and unix distros normally come with an implementation of the CUPS printer system (https://github.com/apple/cups). Its actually patented by Apple (yes the owner of your iPhone), and is really easy to work with. It allows you to run a print server from your computer, so you can share any printer you hookup to you computer with other computers on the same network (or the greater internet if you wanted). First open up a terminal and lets get started!
Open up a terminal and type the following:
sudo apt-get update
sudo apt-get upgrade
Next install cups here:
sudo apt-get install cupsNext enable the pi user to get to the admin function of cups without needing sudo:
sudo usermod -a -G lpadmin piOpen up cups to all traffic on your local network:
sudo cupsctl --remote-any
sudo /etc/init.d/cups restart
Install SAMBA
Install and setup SAMBA to enable CUPS to communicate with Windows printers. Samba is just a service that Linux uses to communicate with Windows, some quick googling will give you more info.
sudo apt-get install sambaMake sure to edit your SAMBA configuration with the following file:
sudo nano /etc/samba/smb.confCopy and paste the following into the bottom of the file (if this section already exists then just make sure the bottom of the file looks like this):
# CUPS printing.
[printers]
comment = All Printers
browseable = no
path = /var/spool/samba
printable = yes
guest ok = yes
read only = yes
create mask = 0700

# Windows clients look for this share name as a source of downloadable
# printer drivers
[print$]
comment = Printer Drivers
path = /var/lib/samba/printers
browseable = yes
read only = no
guest ok = no
Restart SAMBA to load in the configuration:
sudo /etc/init.d/samba restartNow that SAMBA is running and CUPS is installed its time to go to the GUI and setup the configuration. Get your IP address here:
hostname -IOpen up a browser and type “your IP address” + “:631” to go to the CUPS service running locally on port 631, should look something like this:
http://192.168.1.105:631
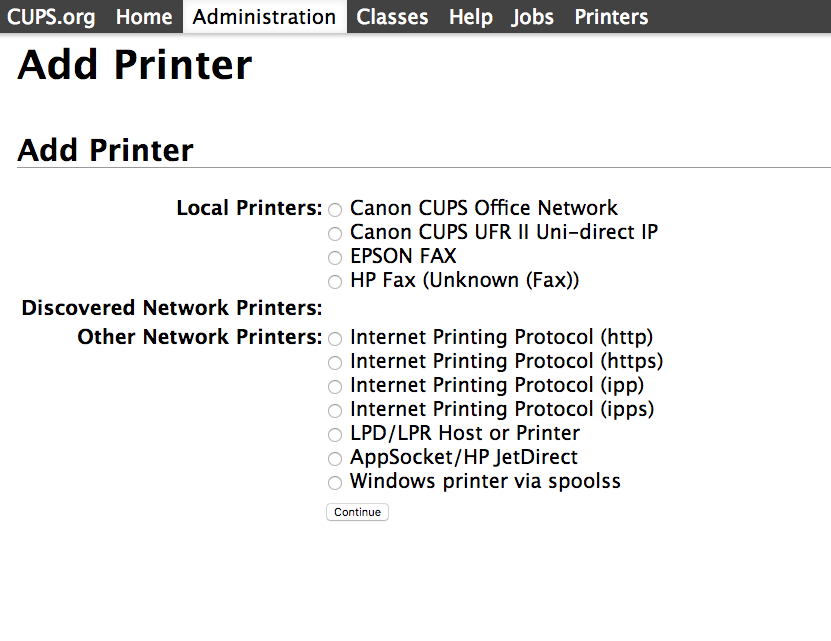
Add Printer
So now lets go to “Administration” and add a printer

Now follow the onscreen instructions and specify the driver etc. to finish this up
Now that you have CUPS and SAMBA all setup with your printer on your network. You need to connect your computers to this print server:
Windows:
- Go to the usual “add a printer utility”
- Click the “the printer I want is not listed”
- Go the CUPS GUI and go to the page that has the details of the printer you added. Copy this URL from the browser address bar.
- Paste the copied URL into the “add a printer by address” option. This will include your IP address, I would recommend giving it your raspberry pi’s network name and then the address (by default this is literally “raspberrypi” but you could change it). That way when dynamic DNS kicks in and your pi is on a different IP address locally, you won’t have an issue. So bottom line should look somthing like this:
http://raspberry_pi_name_on_local_network:631/the_name_of_your_added_printer
Mac OSX:
- When I added it to my Mac, the default printer dialog didn’t pickup the printer. I did some googling and found that the only way to set it up was to run the CUPS print server on my Mac and then connect it from there. So if you’re using a Mac make sure to open up a terminal and run “sudo cupsctl WebInterface=yes” to turn on the Web interface, then find out your IP and open a browser and put your IP:631 (just like you did on the Raspberry Pi to setup CUPS in the first place). Once you’re there following the add a printer dialog in CUPS and everything should be good.
Chromebook:
- When I went to add it to my Chromebook I found that the Chromebook doesn’t see CUPS printers by default. Fortunately, there’s an add on to Chrome that enables Chromebooks to see CUPS printers https://chrome.google.com/webstore/detail/ipp-cups-printing-for-chr/lkhfeoafdgbaecajkdbioenncjopbpmk?hl=en-GB
Linux:
- There are very similar settings to Mac OSX so some googling of your selected distro and you should be good to.
Additional Help
- There are several places you can go to look at configurations. Also have to give some credit to the following page for helping me figure this out https://pimylifeup.com/raspberry-pi-print-server/