
Using Karma Tests with Angular
When developing Angular applications, you normally want to include a testing suite as part of your development pipeline. Angular is great because it comes with a test tool called “Karma” right out of the box. Karma makes it easy for you as a developer to build out tests with your application. It also makes it easy to use the Angular CLI command “ng test” to automatically run these tests. Karma is fully customizable and can run on a variety of frameworks. For the official documentation check out the Karma site here Karma Site.
Before I go into Karma, I want to take a second to emphasize the importance of testing. Having a robust test suite keeps your application stable, and minimizes the amount of time you spend fixing bugs. It is also typically a best practice to make tests run with your Continuous Integration Continuous Delivery (CICD) pipeline so that your code is always tested before deploying changes. Using testing in a CICD pipeline is particularly advantageous, because it provides a fast and routine way to make sure your newest change didn’t break something else. If you don’t have tests (CICD integrated or not), then the only way to verify new changes didn’t break something is manual checks and code reviews. Manual processes are error prone and results in spending more time resolving bugs than adding features. A robust test suite creates a maintainable project, that allows you as a developer to focus more on building than fixing. For more general information on different test strategies check out my earlier post Software Testing.
So now with all of that introduction, here is a walkthrough of Karma Tests. I’m going to explain what Karma tests are and how you can use them in your projects.
What are Karma Tests
“Karma Tests” are actually just a set of components that create a web server which runs scripted tests on your projects code. The tool is built into the newest versions of Angular, but can also be manually added as a dependency.
There are lots of cool things that you can do with Karma Tests beyond just basic tests. For more information check out the Karma Tests project site in the link I provided above.
Where do I Start with Karma Tests
When you create an Angular project with the Angular CLI (for versions 2 and beyond) you can find the necessary configuration for Karma Tests within your “src/karma.conf.js” file. Additionally, the “src/test.ts” file also has some basic bootstrapping, and you don’t really have to be concerned with that unless you want to make some modifications to enhance your test capabilities. The “karma.conf.js” file determines how the Karma Test tool will be setup. For more information on the configuration check out the official Karma Tests configuration site here Karma Configuration. It allows you to add and remove features to include custom reports and added plugins based on what you need. Here is the default layout of the “karma.conf.js” file:
module.exports = function (config) {
  config.set({
    basePath: "",
    frameworks: ["jasmine", "@angular-devkit/build-angular"],
    plugins: [
      require("karma-jasmine"),
      require("karma-chrome-launcher"),
      require("karma-jasmine-html-reporter"),
      require("karma-coverage-istanbul-reporter"),
      require("@angular-devkit/build-angular/plugins/karma"),
    ],
    client: {
      clearContext: false, // leave Jasmine Spec Runner output visible in browser
    },
    coverageIstanbulReporter: {
      dir: require("path").join(__dirname, "../coverage"),
      reports: ["html", "lcovonly"],
      fixWebpackSourcePaths: true,
    },
    reporters: ["progress", "kjhtml"],
    port: 9876,
    colors: true,
    logLevel: config.LOG_INFO,
    autoWatch: true,
    browsers: ["Chrome"],
    singleRun: false,
  });
};
Pay special note to the “plugins” section, this would be where you will need to add new plugins you might install to use with your tests. Also, if you set “singleRun” to “true” it will stop the Karma server from running continually when you run “ng test”. The other features are relatively self explanatory and so I won’t go into more detail here.
In order to run the Karma Tests you can either run the Angular CLI command “ng test” at the root of your project, or you can also just run “npm run test” since it is created as a package script at project creation. The process that follows this is:
- A Karma server is spun up with the settings in your “karma.conf.js” file
- The server reads any of the spec files (“*.spec.ts”) that are in your associated components, services, etc.
- The server runs the code that is within them
- A second window popup will appear that is actually the server running in a new browser session. As the tests run and fail or succeed you see the output in this session window.
The Karma server by default is live reload, so you can actually have this running as you are coding and it will take in any changes and rerun the tests against your changes. There are some cool ways to get reports out of this, and I will explain that at the end of this post.
How do you Write Karama Tests
Actually writing the tests is also pretty straightforward. I’m going to use some examples from a really helpful walkthrough available on the Angular Firebase YouTube channel. You can view the video here, or just walkthrough the example I’m providing below.
To start lets look at the template file, component file, and spec file that I’m showing below.
Template File
<div class="content">
  <h1>Alert Button</h1>

  <article class="message is-warning">
    <div class="message-header">warning code {{ severity }}</div>
    <div class="message-body">{{ content }}</div>
  </article>

  <button (click)="toggle()" class="button is-info">Toggle Visibility</button>
</div>
Component File
import { Component, OnInit } from '@angular/core';
import { timer, Observable } from 'rxjs';
import { MessageService } from '../message.service';

@Component({
  selector: 'app-alert-button',
  templateUrl: './alert-button.component.html',
  styleUrls: ['./alert-button.component.css']
})
export class AlertButtonComponent implements OnInit {

  content = 'you have been warned';
  content2: Observable<any>;
  hideContent = true;
  severity = 423;

  constructor(private messageService: MessageService) { }

  ngOnInit() {
    this.content2 = this.messageService.getContent();
  }

  toggle() {
    this.hideContent = !this.hideContent;
  }

  toggleAsync() {
    timer(500).subscribe(() => {
      this.toggle();
    });
  }

}
Spec File
import {
	async,
	ComponentFixture,
	TestBed,
	inject,
	tick,
	fakeAsync,
} from "@angular/core/testing";
import { DebugElement } from "@angular/core";
import { By } from "@angular/platform-browser";
import { AlertButtonComponent } from "./alert-button.component";
import { MessageService } from "../message.service";
import { of } from "rxjs";

describe("AlertButtonComponent", () => {
	let component: AlertButtonComponent;
	let fixture: ComponentFixture;
	let de: DebugElement;
	let serviceStub: any;

	beforeEach(async(() => {
		serviceStub = {
			getContent: () => of("you have been warned"),
		};

		TestBed.configureTestingModule({
			declarations: [AlertButtonComponent],
			providers: [{ provide: MessageService, useValue: serviceStub }],
		}).compileComponents();
	}));

	beforeEach(() => {
		fixture = TestBed.createComponent(AlertButtonComponent);
		component = fixture.componentInstance;
		de = fixture.debugElement;

		fixture.detectChanges();
	});

	it("should create", () => {
		expect(component).toBeTruthy();
	});

	it("should have a message with `warn`", () => {
		expect(component.content).toContain("warn");
	});

	it("should have a severity greater than 2", () => {
		expect(component.severity).toBeGreaterThan(2);
	});

	it("should have an H1 tag of `Alert Button`", () => {
		expect(de.query(By.css("h1")).nativeElement.innerText).toBe("Alert Button");
	});

	it("should toggle the message boolean", () => {
		expect(component.hideContent).toBeTruthy();
		component.toggle();
		expect(component.hideContent).toBeFalsy();
	});

	it("should toggle the message boolean", fakeAsync(() => {
		expect(component.hideContent).toBeTruthy();
		component.toggleAsync();
		tick(500);
		expect(component.hideContent).toBeFalsy();
	}));

	it("should have message content defined from an observable", () => {
		component.content2.subscribe((content2) => {
			expect(content2).toBeDefined();
			expect(content2).toBe("you have been warned");
		});
	});
});
Example Explained
Whenever you create objects with the Angular CLI, by default it will generate a spec file that runs a basic “hello world” test. This test usually creates the object and loads in the default dependencies. As you build out your Angular objects you’ll need to add additional dependencies to this spec file and additional test methods to cover functionality.
Lets walk through this spec file above section by section.
The first part is just the basic imports, but then you see this
describe('AlertButtonComponent', () => {
  let component: AlertButtonComponent;
  let fixture: ComponentFixture;
  let de: DebugElement;
  let serviceStub: any;
With Karma, the “describe” keyword is what Karma sees as the beginning of a test. You follow the describe keyword with an actual description of the component, service, module, etc. that you are creating.
In this code snippet, there are also several values declared. Here is what they mean:
- “component” is an object representing the component to be tested
- “fixture” is basically just a virtual instance of the component that Karma can test on
- “de” is a Karma object that expands what you can pull out of a test (more on that later)
- “serviceStub” is just an example of a stub that you use when calling a service. Typically when you test a service, you stub it rather than actually calling the service (though you can do that too).
All of these values set the groundwork for the tests you are going to run.
Next you see some “beforeEach” methods which basically run before the tests do. This is a way that Karma can preconfigure objects for testing.
beforeEach(async(() => {
  serviceStub = {
    getContent: () => of("you have been warned"),
  };

  TestBed.configureTestingModule({
    declarations: [AlertButtonComponent],
    providers: [{ provide: MessageService, useValue: serviceStub }],
  }).compileComponents();
}));

beforeEach(() => {
  fixture = TestBed.createComponent(AlertButtonComponent);
  component = fixture.componentInstance;
  de = fixture.debugElement;

  fixture.detectChanges();
});
The first “beforeEach” method is creating a stub with a service method call and dummy response in the format that the method is looking for. In this case when the “getContent()” method is called, its expecting a observable (hence the use of the “of” rxjs object). The observable is going to return with a text body which is what the method is looking for.
Below stubbed service, you see the “TestBed.configureTestingModule” which is important as it configures (not creates) the objects and services formally before the tests are run. This is important and required for Karma to understand what it is going to be tested. Here we have declared the App and also the stub of the service that we are testing (“MessageService”). The final “.compileComponents” pulls in any CSS used in the component template that we may want to test or parse as part of the test runs.
The second “beforeEach” method actually builds the objects for testing. The fixture, component, and debug objects are initialized. Then the “fixture.detectChanges();” basically sets up the object tested to act as live reload, so any new code changes are automatically pulled in and trigger a rerun of the test suite.
When it comes to actually writing test methods, just follow this pattern
- Start with the “it” keyword to identify a test case
- Add a description of the test case
- Potentially wrap it in “async” if necessary
- Within the body run some action or add an “expect” to signal to Karma to test for this condition being true, etc.
A good example here is:
it("should create", () => {
  expect(component).toBeTruthy();
});
This example is the “hello world” test method that is created by default with the component. This method is just making sure the component was created successfully. The statement “toBeTruthy” is not meant in a literal boolean sense, but rather just that the object is created. If the object is created then “.toBeTruthy()” passes, otherwise it will fail (you can test the reverse of the “.toBeTruthy()” case with a “toBeFalsy()”.
Lets now move on to the next section.
it("should have a message with `warn`", () => {
  expect(component.content).toContain("warn");
});

it("should have a severity greater than 2", () => {
  expect(component.severity).toBeGreaterThan(2);
});

it("should have an H1 tag of `Alert Button`", () => {
  expect(de.query(By.css("h1")).nativeElement.innerText).toBe("Alert Button");
});
These tests just basically check for compiled conditions to occur. These tests also show how you can get Karma to navigate the Document Object Model (DOM) for object content. The line “expect(de.query(By.css(‘h1’)).nativeElement.innerText).toBe(‘Alert Button’);” is basically querying the css an looking for an “h1” element that has the text “Alert Button” in it.
it("should toggle the message boolean", () => {
  expect(component.hideContent).toBeTruthy();
  component.toggle();
  expect(component.hideContent).toBeFalsy();
});

it("should toggle the message boolean", fakeAsync(() => {
  expect(component.hideContent).toBeTruthy();
  component.toggleAsync();
  tick(500);
  expect(component.hideContent).toBeFalsy();
}));
The next two tests mimic behavior in the app and even include a delay with the “async” method. If you notice the second test here makes use of the “tick” module with a “tick(500);” which forces a delay. This can be helpful if you either want to force a delay or need to wait on a process, etc.
it("should have message content defined from an observable", () => {
  component.content2.subscribe((content2) => {
    expect(content2).toBeDefined();
    expect(content2).toBe("you have been warned");
  });
});
Finally, the last test uses the stub to mock passing back a response to the service call. As mentioned above, you typically build out a stubbed response and then check for it here. This way you can run the test on the code without having to actually run the tested service. There are two conditions being tested here (1) “expect(content2).toBeDefined();” makes sure a response is returned and (2) “expect(content2).toBe(‘you have been warned’);” verifies the response is what you wanted.
Code Coverage
Typically teams usually want to know how much of their project was covered with tests. There are options with different coverage plugins that allow you to establish test coverage thresholds on every build (i.e. 90% test coverage). I’m just going to show you how to create a basic report here, but there are many other possible enhancements.
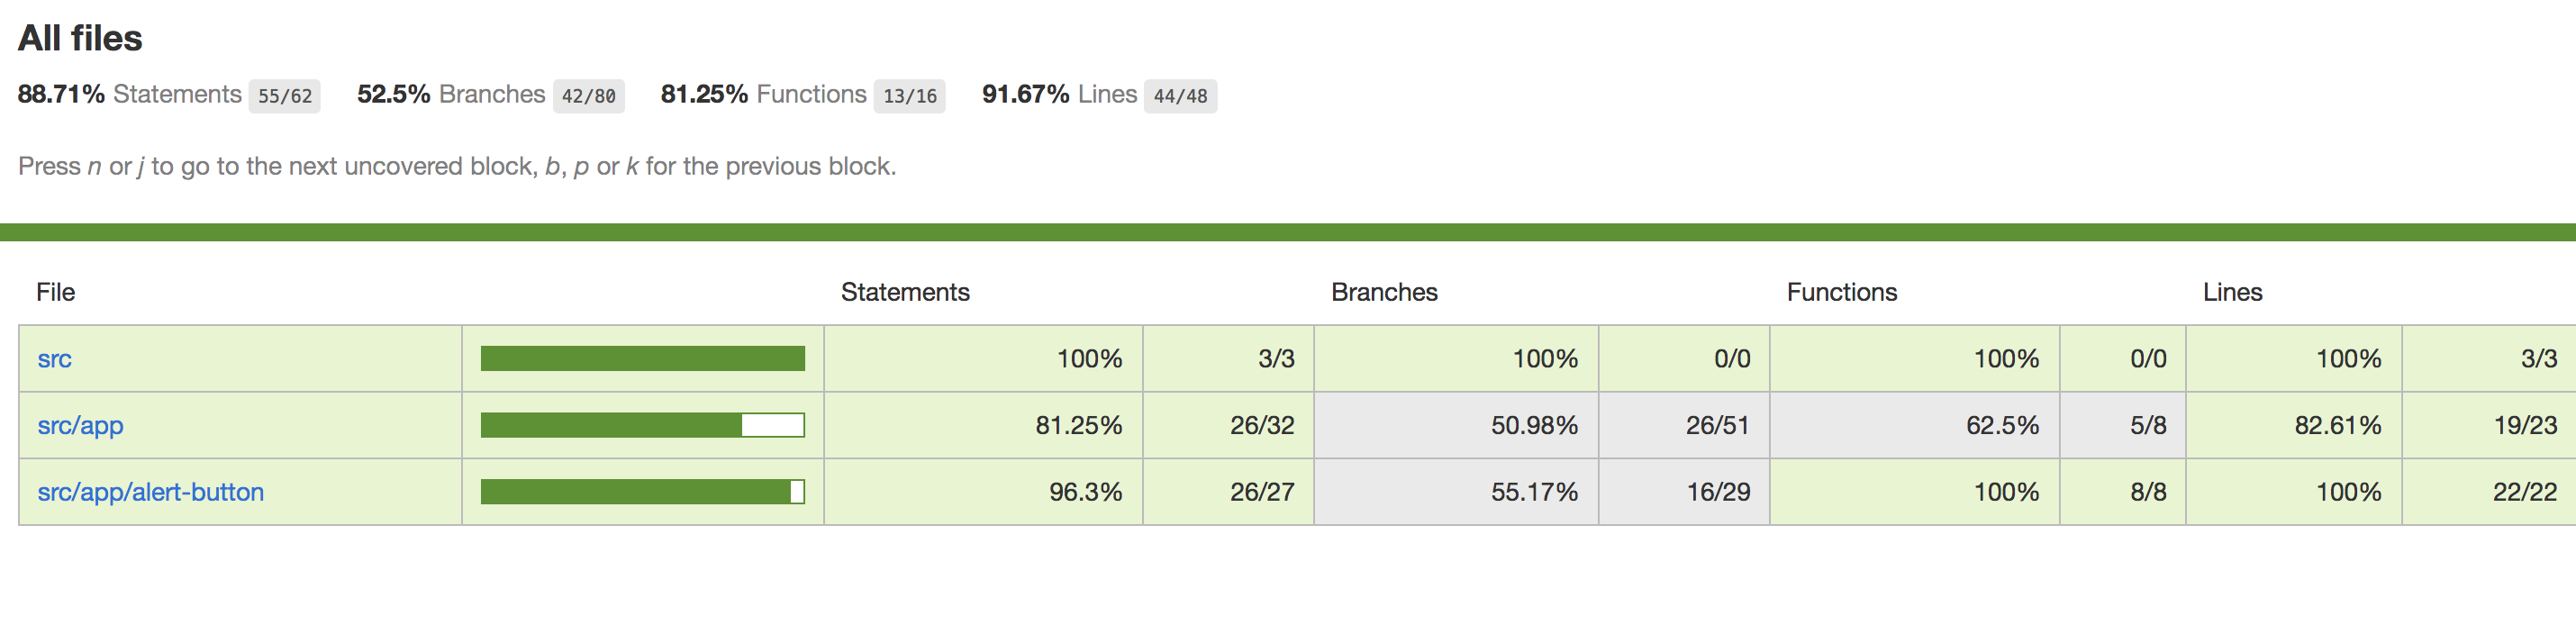
In order to get a full report on your tests code coverage you can utilize the built in Angular CLI code coverage report. To create this report just run your tests with “ng test –code-coverage.” When you use the “–code-coverage” flag it creates a full html report on your project at the “/coverage” folder. You can see more on this on the official Angular Docs here Angular Testing.
Additionally, you can view the Angular CLI code coverage report using the npm module “http-server” that is available at this npm package. In order to do this first install “http-server” globally with
npm install http-server -gNext create a custom script in your project that looks like the following:
"code-coverage":"http-server -c-1 -o -p 9875 ./coverage"Run the custom script with “npm run code-coverage” and you’ll see a visual way to navigate your project for code coverage. As you build out your tests you can rerun this report, and see where you should add more etc. You should see something like the following:

Hopefully this gave you a good start into the possibilities of Karma testing with Angular. Some quick googling will show you the many possibilities, and can also show you ways to make working with this technology even better.