
Playwright: A High Level Overview
Playwright is an automation library from Microsoft that enables developers to build automated tests for their projects. I have previously written a post about getting started with playwright, but I wanted to write another post on the “big picture” of how it works and also why automated testing is important. The following post covers a high level overview of Playwright and automated testing concepts. The post also includes a few lessons learned from my experience using Playwright on various projects.
Why is automated testing important?
When developing any software application, testing is critical to success. Even if done manually, applications must be tested before they can be shipped to customers.
There are several types of software tests that developers can use. Automated Testing (or end-to-end testing) is of particular importance because it allows developers to:
- quickly regression test new changes
- debug production issues (use Prod data to recreate in Dev environment)
- document features (tests serve as pseudo documentation)
- enforce good coding practices (forces devs to review how code is written)
Automated tests are definitely not required, but they can make dev teams lives much easier. Manual testing can be laborious at times, and having automation can enable faster delivery of features. Further, the artifacts that result from Automated Testing (videos, reports, traces, and logs) provide actionable information that developers can use to debug issues and even communicate with shareholders.
What is Playwright?
Playwright is an automation library that allows software developers to write tests for their applications. Developed by Microsoft, Playwright is:
- an automation library for end-to-end testing of web applications
- can run cross browser (supports most of the major browsers)
- cross platform (can run in Linux, Windows, and MacOS)
- pipeline support (can be ran as part of a CICD delivery pipeline)
- cross language (can run in JavaScript, TypeScript, Python, .NET and Java)
Playwright is very flexible and can be configured for most applications. Some of the major features include:
- a code generation tool
- live inspection during tests
- trace viewer (ability to review an interactive view of test runs)
- log on once configuration
From experience I can attest to all of the above and more. I wanted to highlight that the trace viewer is particularly powerful, as it lets you walk through a test directly instead of being forced to rely on logs. Some other features that I didn’t mention above include parallelization for performance (run multiple tests at the same time) and a very robust set of configuration. For more on all of these features, I recommend checking out the official documentation.
Common Patterns
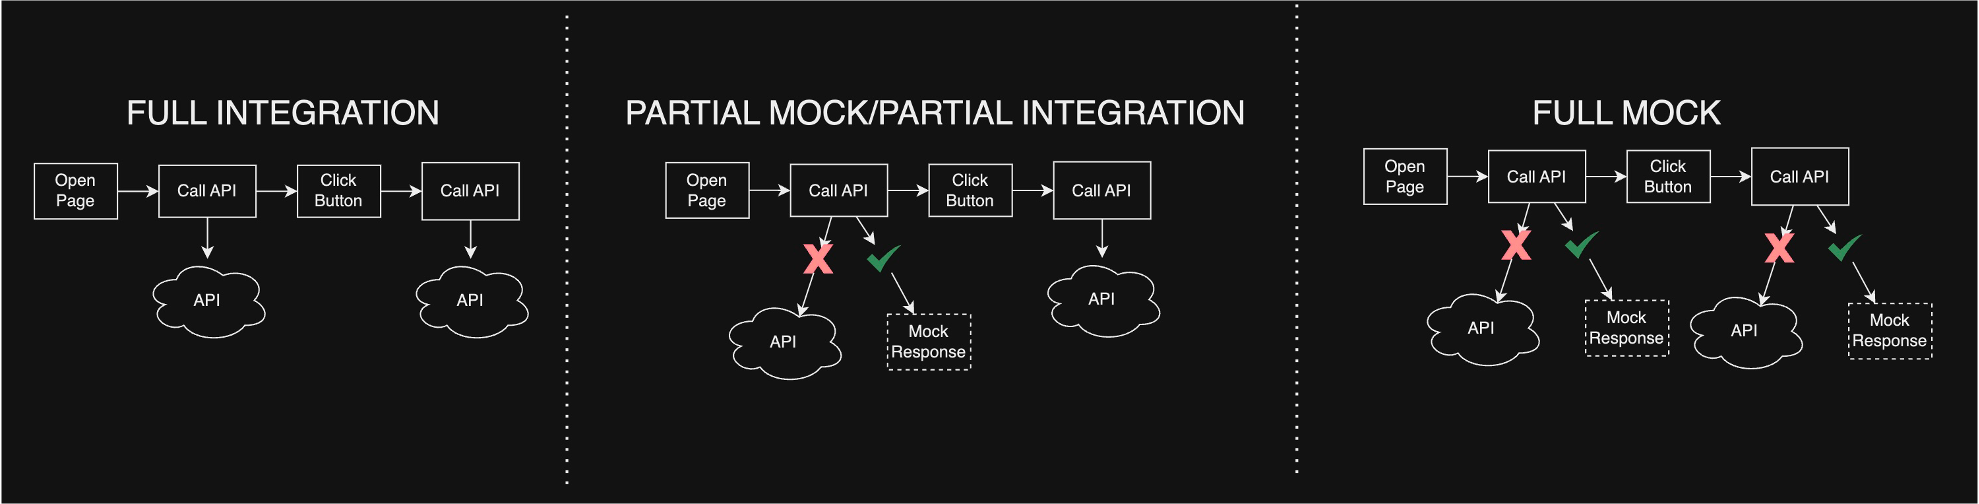
One of the best parts about Playwright is that it can be configured to accommodate a wide range of scenarios. This configuration allows developers to determine the degree of integration that tests have (call actual APIs vs using mocked data). I’ve noticed the following 3 approaches in different projects:
- Build all of your tests as full integration
- Build some tests integrated and others mocked
- Build all of your tests using mock values
The great part about Playwright is that there is no set way to build your data for testing. Playwright gives you the tools, and leaves the configuration up to your team. Even what your tests do is up to you. Here are some examples:
- verify web forms properly input values
- verify API call results in the right payload
- verify page navigation work (what happens when I click back?)
- verify a workflow completes properly
- verify visual elements have the right attributes
- much more
Writing tests also gives you insight into how your application behaves and performs. When you run tests, you start to notice things like long running API calls or bottlenecks in a process.
Network Calls and Proper Data
Playwright provides the ability to intercept API calls. With playwright you can listen for an API call, and inject a custom response. You can also modify requests as well as use a proxy or even work with WebSockets. With this network ability, developers can choose to mock or actually call endpoints and services.
The big issue with automated testing is having the right data setup for the tests. You also have to consider cleaning up data that is generated. Playwright offers global setup and teardown of tests that run. This means that you can optionally (1) run something to generate data before the tests run and (2) run something to cleanup data when tests finish. This can be particularly useful if you have a complex application that requires things like role based permissions or data that must pass through multiple processes.
Given the different requirements with test data, there is usually a mix with what will be mocked vs. what is actually called with each run of your test suite.
In addition to the mock vs. integration choice, teams also can either run their suite against (1) a local running instance of the app or (2) against a deployed environment. The benefit of running it against a local running instance (meaning localhost) is that you can potentially get around access issues with environment firewalls etc. However, having it run against deployed environments is an extra benefit as the test is running on deployed code vs. just local sessions.
One last note that commonly comes up is where to install Playwright. According to the install docs, Playwright can be installed in any project. This means that you can either (1) install Playwright as a dev dependency right inside your project or (2) you could have “Playwright Project” that has it installed there.
A project that has Playwright installed inside the project just leverages things like npm scripts to run the tests. The tests and configuration (playwright.config file) reside alongside the rest of your project.
A project that has Playwright installed outside of your regular application, allows you to move your automated tests around if you have a unique configuration. The only bad part about having the tests outside your app is that you have to maintain things like credentials which can result in more work.
Reporting

image copied from the playwright docs
Good reporting is an important part of any automated tests suite. Playwright provides multiple reporting options for your tests. I mentioned in the earlier sections about the trace viewer. There are also several other options including:
Generating Tests

One of the best parts about Playwright is that it comes with a test generator. This is a tool that basically records your behaviors as a test, and lets you quickly scaffold out a test. A common workflow is to:
- run the test generator against a locally running version of your application
- walkthrough a specific behavior in your application (the codegen tool listens for this and scaffolds a test for you)
- copy the scaffolded test into its own
.spec(test) file - modify the test to do any assertions you mean need
- formally run the newly generated test with the rest of your suite
You can also do this if you pause and continue a test.
When I write new tests, I usually do a combination of using the test generator and then debugging the corresponding steps until I’ve built out what I need.
Awaiting Behavior
One great feature of Playwright is that it has built in mechanisms to wait for page renders and other asynchronous events. Consult their page on awaiting for more info.
Despite the various checks, I’ve also found it to be helpful to create a helper function that basically forces the main thread to pause for a specified number of milliseconds before completing.
export const forceDelay = (ms: number) => {
    return new Promise((resolve) => setTimeout(resolve, ms));
};
Many of the actions that you invoke in Playwright tests also allow you to specify a timeout which does the same thing:
await page.getByRole("heading", { name: "My App" }).isVisible({
  timeout: 200000,
});
What does a test look like?
Similar to many test frameworks, Playwright tests make use of a page object which then invokes actions on different pages of your application. Here is an example login test:
test("make sure that a cash value can be created", async ({ page }) => {
  // Go to http://localhost:3000/
  await page.goto("http://localhost:3000/");

  // input amount
  await page.locator('[data-testid="amount"]').click();
  await page.locator('[data-testid="amount"]').fill("10");
  // input note
  await page.locator('[data-testid="note"]').click();
  await page.locator('[data-testid="note"]').fill("hey here is anote");

  // validate that value entered is there
  await expect(page.locator(`text=Note: ${note}`)).toContainText(note);
});
This test is very simple, but as you can see the first parts look for an element on the page for “amount” and a “note.” Next the test validates that those values are present on the page. Normally you would do something like call an API or “submit” button, but this test shows the basic structure. The page object has many different abilities and just uses a “locator” or way to identify an element, and then passes an event like “click” or “fill” etc. to it. There are many more advanced things you could do here, but I kept it simple just to showcase what a simple test looks like.
Authentication
One of the hardest parts of testing, is being able to run tests when authentication is part of your application. There are several issues that come up like:
- where should I store credentials?
- what user will be accessing my app?
- if the user is automated, how do I prevent them for wreaking havoc?
- Do the permissions of the test user align with what needs to be tested?
With regards to credentials, this is especially an issue in CICD pipelines when a stage exists for tests to run and the actual credentials need to be retrieved.
A common approach to handling credentials is to have a .env file with your tests. The .env file might also have things like specific API domains for Dev vs. Qa vs. Prod as well as other configurable values. Using an environment file works well for local development as your team can all agree to a common format of your environment file, and then utilize that for regular development. Each person’s individual environment file will not be checked into source control, but the pattern lets each developer have freedom to test different values and potentially even users.
Moving from local to the pipeline, most of the major CICD platforms offer secret storage either directly in a pipeline stage or other mechanism. You could also leverage something like Azure Key Vault to store the credentials, and have a startup script retrieve them when the pipeline runs.
The challenge with this is also having to authenticate before each test is run. As I stated in the intro, Playwright allows you to consolidate your authentication to be taken care of at the beginning of a test suite. This solves the common problem where you need to authenticate for any interaction you have with an application. Without playwright’s auth setup, you would have to login and logout for each test, which would result in a lot of wasted time. With playwright you add a setup project to your configuration which is basically a test that runs before any test in your suite. Usually it is something like the following (screenshot from the Playwright auth docs):
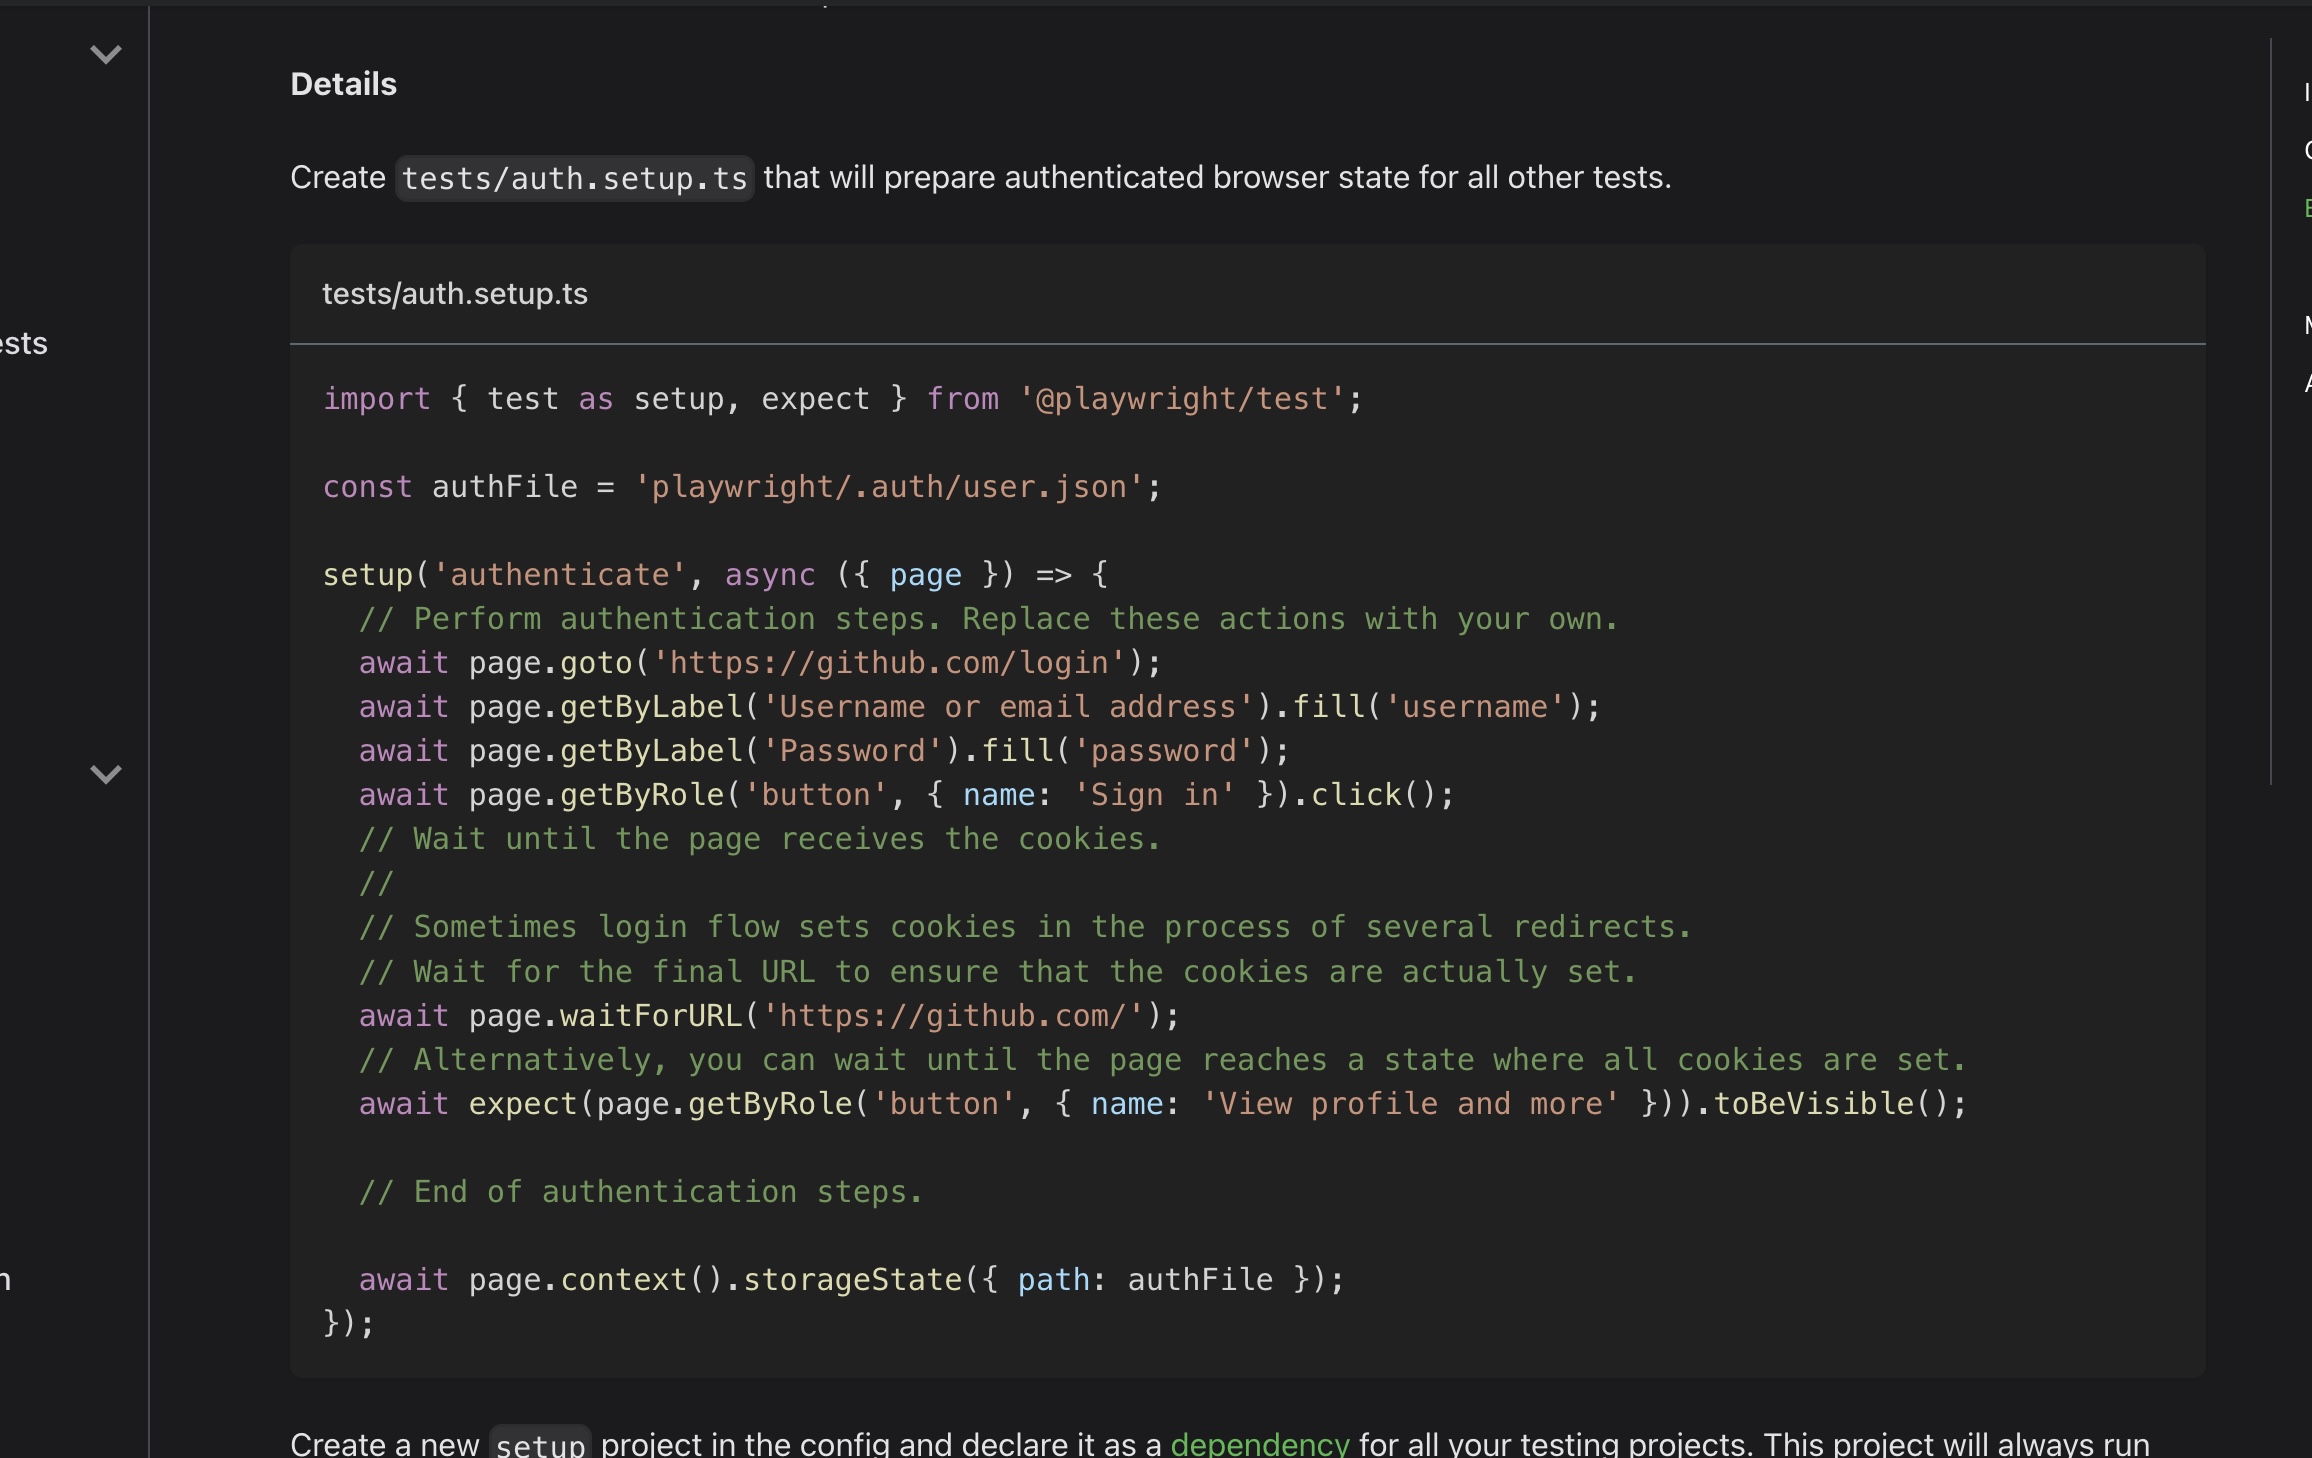
If you notice in that screenshot, the setup function walks through a traditional login flow. The last step of the setup function saves off the values retrieved in the auth flow with:
await page.context().storageState({ path: authFile });This authFile can then be shared by all tests in a suite vs. having to login for each test individually. This will have to be done once for each test run, but still is a great time saver.
In the playwright.config file you just then add the setup project as a dependency to the section where you specify which browsers you use:
    /* Configure projects for major browsers */
    projects: [
        // setup project for auth
        { name: 'setup', testMatch: /.*\.setup\.ts/ },
        // desktop chrome
        {
            name: 'Google Chrome',
            use: {
                ...devices['Desktop Chrome'],
                channel: 'chrome',
                storageState: 'playwright/.auth/user.json',
            },
            dependencies: ['setup'],
        },
    ],
Parallel Performance
Playwright has several options for performance with test runs. Parallelization is of particular value as you can run several tests in a suite at the same time vs. having to run each individually.
The specific value that is configured with parallelism is the workers property. Playwright creates worker processes based on the number you pass to workers and spins up individual browsers for each worker. You basically have isolated sessions for each test, which is a pretty powerful feature by itself.
The worker value can be customized for efficiency and there are multiple scenarios possible. In your playwright configuration file it would look similar to this:
// copied from the example at https://playwright.dev/docs/test-parallel
import { defineConfig } from "@playwright/test";

export default defineConfig({
  // Limit the number of workers on CI, use default locally
  workers: process.env.CI ? 2 : undefined,
});
One word of caution when implementing parallelism with Playwright is to be careful of race conditions. I was in a situation where I tried to use the parallelization, but the data I was using was shared between tests. The result was various race conditions would occur when the test suite ran. In the end I had to remove the parallelization for the test suite, but I could also have potentially worked around this with a more robust set of data to work with.
Example Install and Initial Setup
Installing playwright is very simple and can be accomplished by just running:
npm init playwright@latestUpon starting this install, you’ll get a set of questions from the Playwright CLI about how you want it configured:
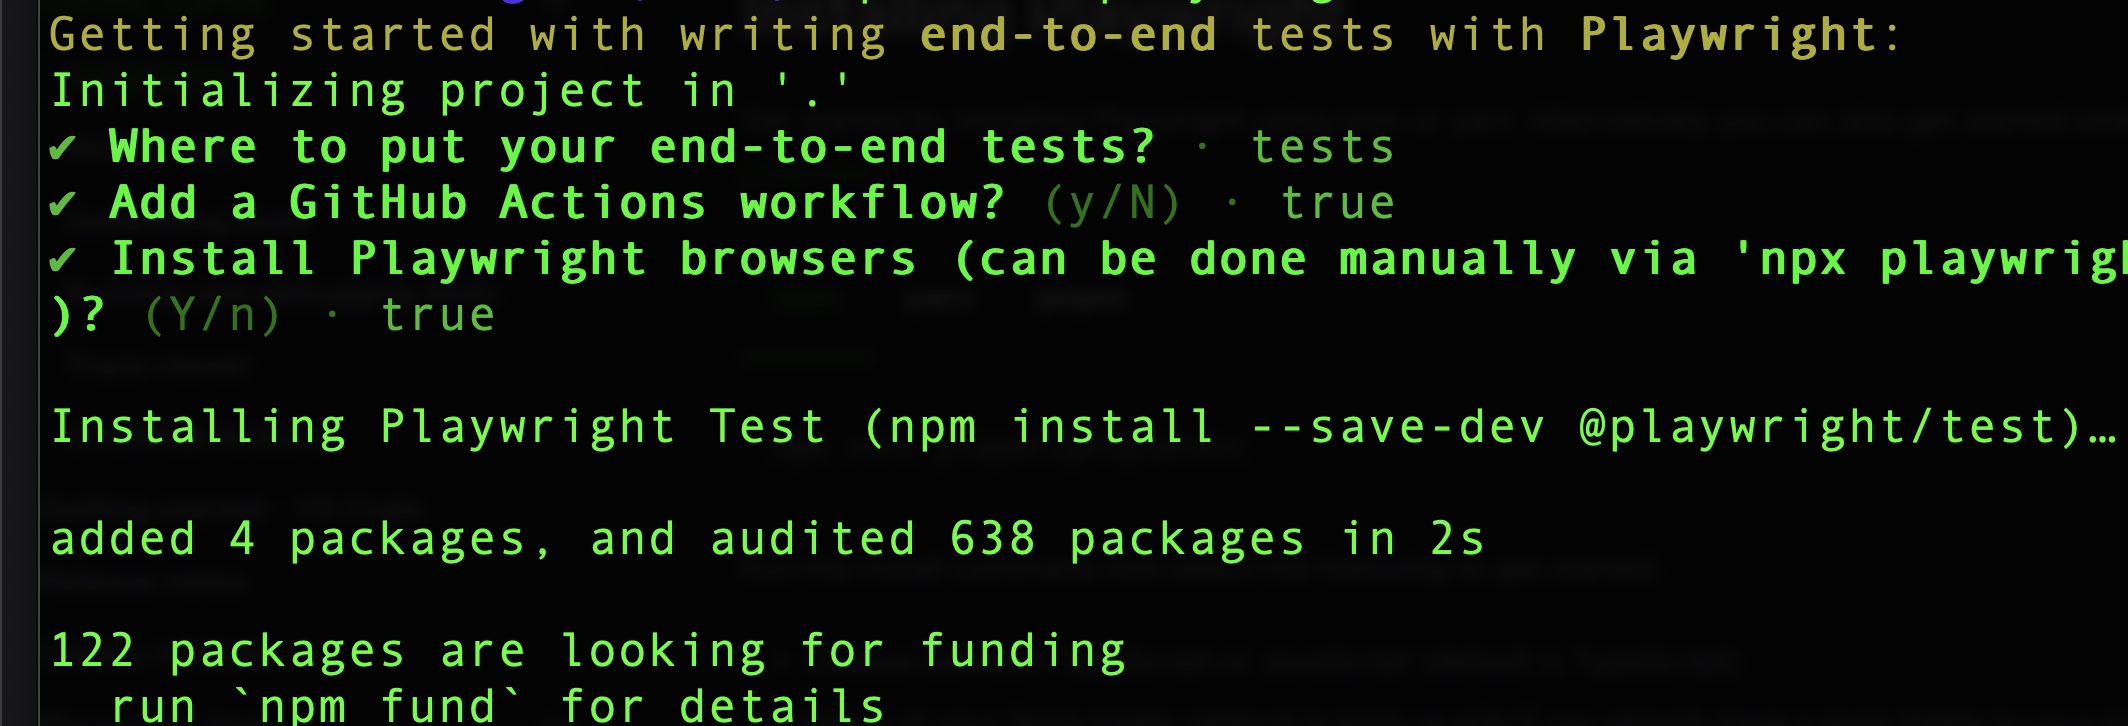
Once the install completes, you’ll get a few things added to your project:
- a
playwright.config.tsfile that holds your configuration - a
testsfolder that houses your tests - a
tests-examplesfolder that has test examples you can refer to - a GitHub action (if you enable it)
With this installed you have different commands that you can run with their CLI to either run the tests or run things like the codegen tool or trace viewer.
Lessons Learned
I’ve had the opportunity to use Playwright on both small and large projects. With that being said, I’ve observed a few things that might help if you’re new or just getting started.
First, it’s important to control the data you use to test. As I stated in my earlier section on parallelization, it’s easy to make the mistake of multiple tests operating on the same values. Some considerations you need to make with your data is:
- do I need to setup the data before each run?
- do I need to dynamically update values like dates in the data?
- is the same data operated by many tests at once
- when should I refresh the data?
- does the data I use match what I commonly see in Production?
Second, dealing with timeouts and inconsistent behavior. I’ve had several experiences where my Playwright tests seem to run fine locally, but they timeout or behave differently when in the pipeline. Most of the time this comes back to either (1) data or (2) not using Playwright’s awaiting mechanisms properly. In these cases the trace view as well as Playwrights Inspector help a great deal.
I also wanted to take a note about using environment variables. As I mentioned in the example setup section, if you can use a .env file with your project its great as you can quickly swap users or datasets. These makes it so your tests can dynamically adjust if you want to change the data you are working with.
I’ve also found writing small helper functions can help keep your tests small. Many times applications will have common sets of steps that users will run through to do similar behaviors. If you can leverage helper functions, this can make your code lighter and easier than if you had to manually write out the test steps each time you wrote a test. Here is an example:
const retrieveEnvironment = (): EnvironmentValues => {
    // verify values are not null before starting
    const USERNAME = process.env.USERNAME;
    const PASSWORD = process.env.PASSWORD;
    const BASE = process.env.BASE;

    if (
        USERNAME === undefined ||
        PASSWORD === undefined ||
        BASE === undefined
    ) {
        throw new Error('environment values not defined');
    }

    return {
        USERNAME,
        PASSWORD,
        BASE,
    };
};
As you can see in this helper function, its basically just retrieving and validating a set of environment variables for login. You could also just as easily do something with common actions like navigating to a certain page or always selecting a value in a dropdown. The point is just to have these functions so you can commonly call this behavior and not have to repeat it in each test. This becomes particularly important as your test suite scales up. The larger a test suite, the more important it will be to have these commonly shared functions.
When trying to use Playwright’s locators, I’ve found that using the locate by test id approach. Test Id’s allow you to isolate elements in a clean and efficient manner. Test Ids also seem to be more resilient than locators that have to parse other elements on a page.
I’ve also found that you should leverage Playwright’s developer community for help. When I’ve gotten stuck on a test, I’ve often found GitHub issues with workarounds or at least a discussion of the topic. An example would be when I was working on a side project with Firebase, I tried to use the shared auth setup I’ve covered earlier. Unforutnatley, it was not working because Firebase uses IndexDB and not localStorage for auth information. Looking around for a bit, I found this GitHub issue on IndexDB that had a few contributors sharing ways of potentially handling the situation.
Making use of Playwright’s Network features where you can intercept API calls is also a powerful tool in your testing. As I mentioned earlier, you can mock or call as many APIs as you want. You can have a full integration test suite, or just a partial integration test. I was actually on a project once where we used the API intercepting feature to recreate a production issue because we could not load the proper Prod Data. Using the API intercepting feature where I modified the API response allowed me to recreate an issue that I couldn’t create with the data I had in my Dev environment.
Finally, one last note I wanted to make was just to treat your tests as production code. Its easy to not give tests the same attention as your regular work, however that also can lead to inefficiencies and make it harder to maintain. Wherever possible, treating tests with the same level of focus that you have on regular prod code makes them better and your life easier when maintaining.
Wrapping Up
I hope this blog post has given you a high level overview of Playwright. I also hope that it has given you some helpful tips for getting started. I’ve had a very positive experience using Playwright on projects and would definitely recommend it. No solution is perfect, and there are definitely caveats to the different features. That being said,I’ve found both a solid developer experience and definite production value of Playwright. I encourage you to review the Playwright docs and try it out for yourself. Thanks for reading my post!